


In this step-by-step tutorial, you will build a flow that imports users from a Google Sheets spreadsheet and creates new users in Okta.
Things you will learn:
- How to connect and import data from Google Sheets.
- How to use a helper flow to create for-each logic.
- How to create users in Okta.
- How to test individual cards and the flow.
- How to set up a flow to run on schedule.
The automation you will build has two flows.
The first flow runs on schedule and imports users from a spreadsheet:
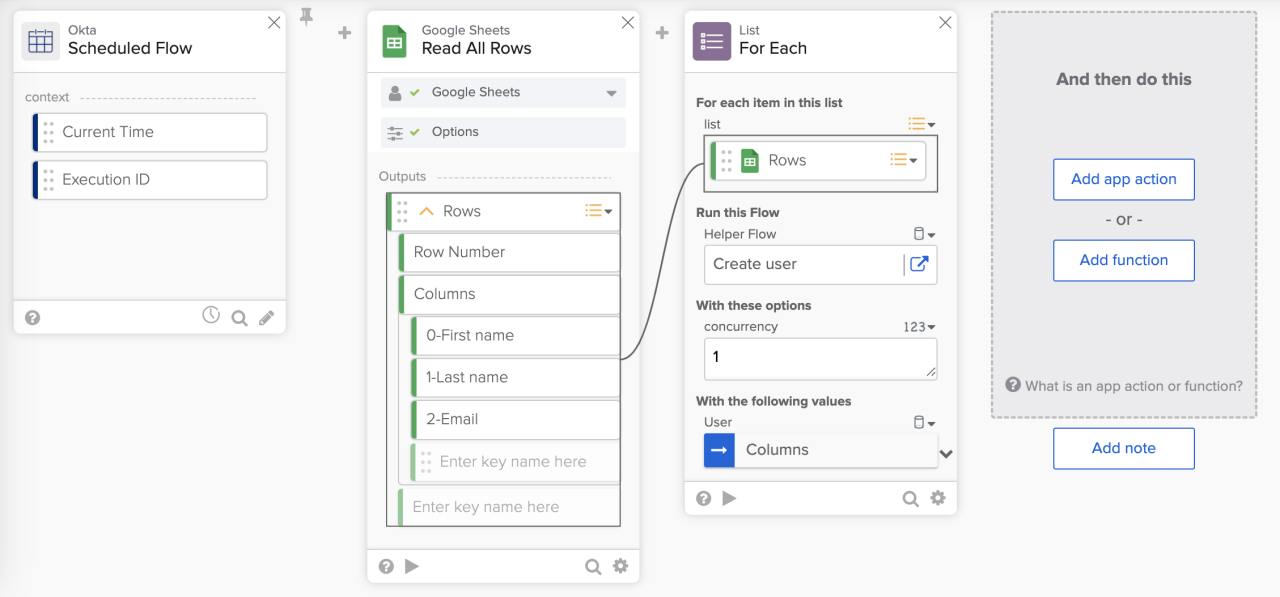 Import user flow.
The second flow creates a user in Okta from the spreadsheet:
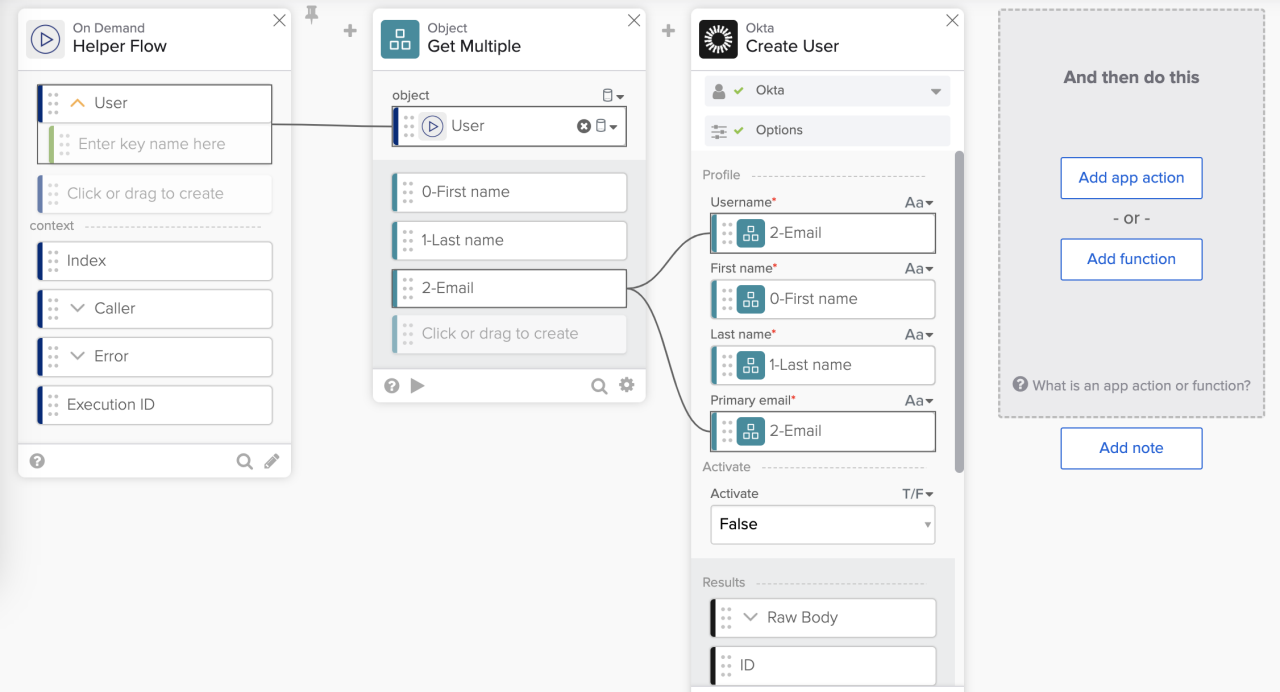 Create user flow.
What is Okta Workflows?
Okta Workflows is a no-code platform that allows you to build automations to help with identity processes. For example, you can build the following workflows without asking IT or developers for help:
- Reset password end user sessions when suspicious activity is detected.
- Give or remove user access to applications.
- Send notifications (Slack, email) when events occur in your Okta organization.
- In this tutorial, you will run a low when a user is suspended event occurs.
- Create basic reports.
This is a short list of what is possible.
Getting access to Okta Workflows
To complete this tutorial, you need to have access to Workflows.
There are two ways to access Workflows:
- You might be entitled to Workflows if you already use some Okta products.
- Access to Workflows as part of the WIC (Workforce Identity Cloud) trial.
Workflows when using other Okta products
If you have Okta SSO (Single Sign-On) or Okta UD (Universal Directory), you might be entitled to Workflows. Check if you can access Workflows by going to Okta organization > Admin > Workflows > Workflows console.
If you use these products but don’t have access to Workflows, please contact your account manager. Or, contact me, and I will try to help you.
Okta Workflows as part of the WIC (Workforce Identity Cloud) trial
To sign up for a WIC trial:
- Go to the Okta Workforce trial page.
- Register for the WIC trial to access Workflows.
Opening the Okta Workflows console
To access Workflows:
- Sign in to your Okta org
- If you are using a trial, your org URL can be found in an email with the subject "Activate your Okta account".
- It has the following format: https://trial-<ID>.okta.com.
- For example https://trial-6093533.okta.com.
- Click Admin (upper right) to access the Admin console.
- On the right-hand side menu, click Workflows > Workflows console to open Workflows.
You will see the Workflows home page:
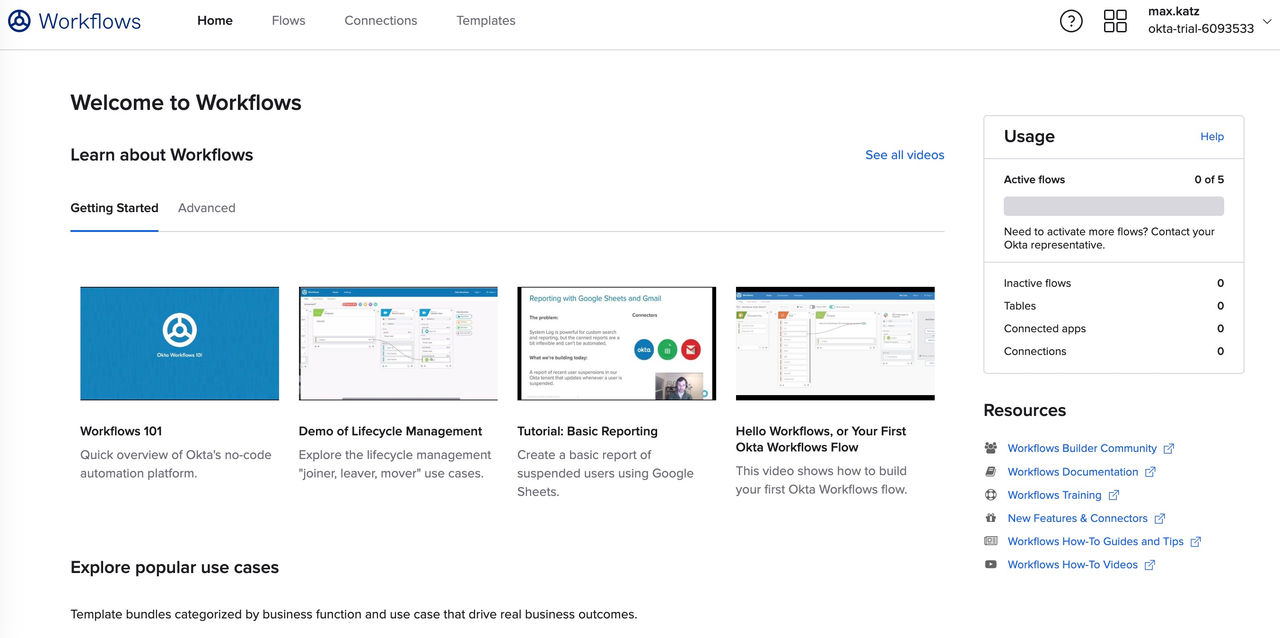 Workflows home page.
Okta Workflows fundamentals
Each card represents one step in a flow.
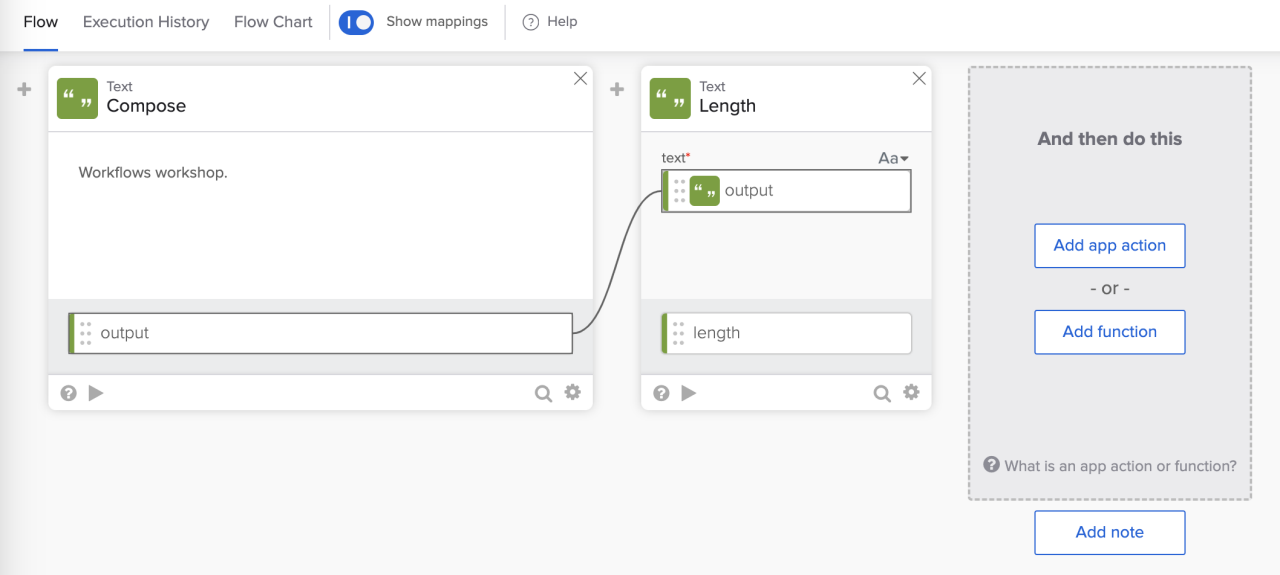 A flow with two steps.
A card has two types of fields: input and output. Input fields accept values. Output fields are the values a card produces, which can be passed to subsequent cards
This is an example of the Text – Length card:
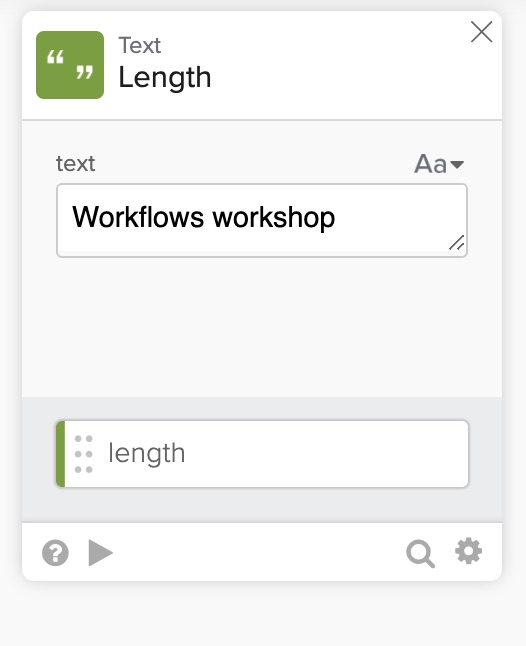 Text - Length card.
This card calculates and returns the number of characters in a text string.
- The text field is the card’s input
- The length field is the card’s output (the lower grey area)
There are two types of cards:
- App action cards are steps that control other applications or web services. For example, Gmail, Slack, and Jira.
- Function cards are steps to interact with, change, or control the data in a flow. Examples of Function cards:
- True/False: Evaluate values based on true or false conditions
- Flow Control: Manage and manipulate the structure of your flow
- Date & Time: Parse and manipulate times and dates
- List: Create and iterate over lists of items
- Number: Perform mathematical operations
- Text: Build, modify, and parse text
Building the import users flow (part 1)
The Import Users flow reads all users from a Google Sheets spreadsheet. The flow then passes every user to a helper flow to create a new person in Okta.
Creating the flow
- In the Workflows console, click Flows.
- In the Default Folder, click + New Flow to create a new flow.
- Click Unnamed (upper left corner).
- For name, enter Import Users.
- For Description, enter This flow imports users from a Google Sheet.
- Also, check the Save all data that passes through the Flow? checkbox. You will be using this capability at the end of this tutorial.
- Click Save to save the flow name and description.
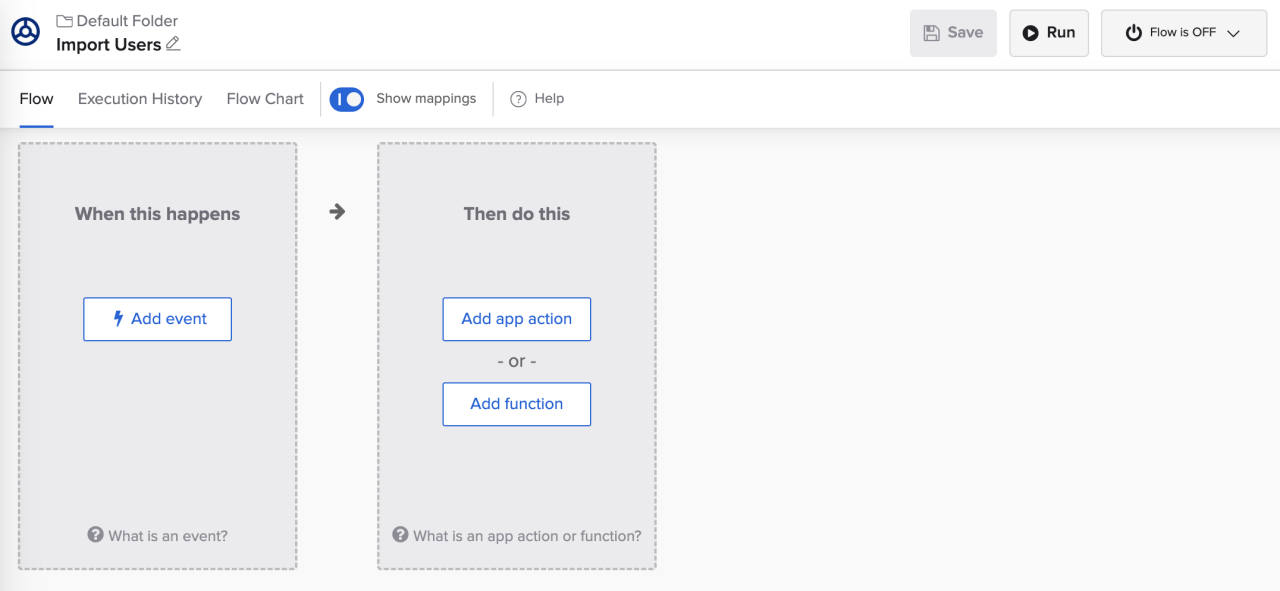 A new flow.
Creating a spreadsheet with new users
- Create a Google Sheets spreadsheet called New Okta users
- Make sure the first row holds the column names.
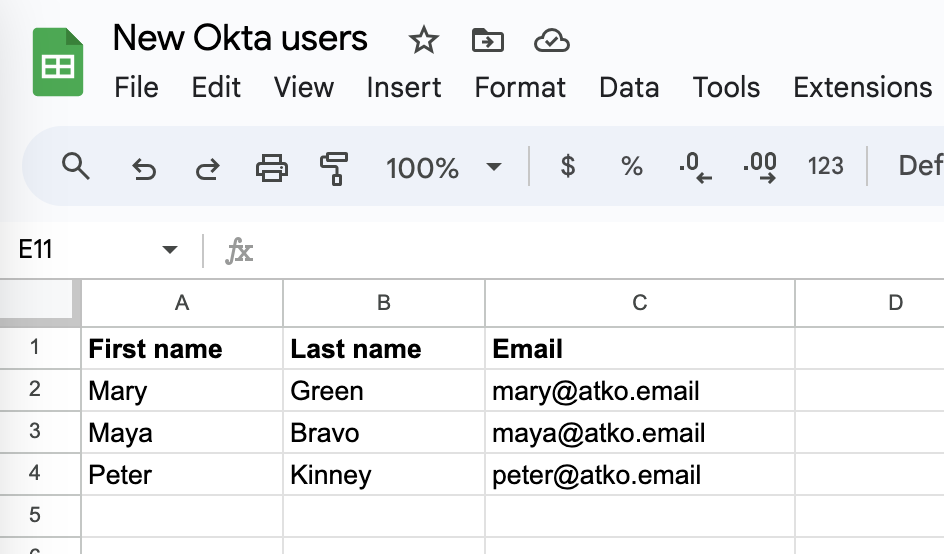 Spreadsheet with new users.
How to start (trigger) the flow
There are several ways to trigger a flow:
- Event
- For example: run a flow when a new user is activated.
- Schedule
- For example: run a flow every Monday at a specific time.
- API endpoint
- For example: an external system calls an API that triggers a flow.
In this tutorial, you will use the Schedule option. You will configure it at the end of the tutorial.
Reading data from a Google Sheets spreadsheet
In the first step, you are going to read all the rows using the Google Sheets – Read All Rows card.
Adding the Google Sheets – Read All Rows card
- Click Add app action in the second box (Then do this).
- Find and select the Google Sheets connector.
- Find and select the Read All Rows action. You can also search for it.
- Click + New Connection to create a connection to Google Sheets. If you have an existing connection, you can use it.
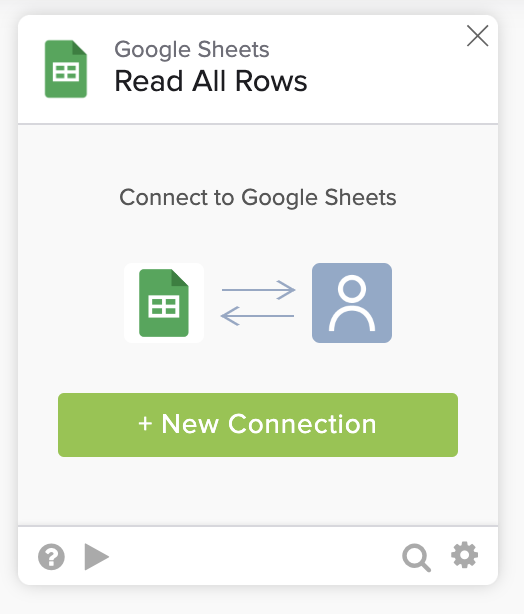 The Google Sheets – Read All Rows card.
Setting up a connection to Google Sheets
- For the Connection Name field, keep the default Google Sheets name or enter another name.
- Click the Create button to continue.
- Choose a Google account to use for this connection.
- Click the Allow button to create the connection.
Configuring the Google Sheets - Read All Rows card
- For the Spreadsheet name, select the Okta new users spreadsheet.
- For the Worksheets, select Sheet1.
- You don't need to change any other fields.
- Click Save.
- On the next view, you choose what output fields to show. You want to show all of them. Click the Save button.
- Click the flow Save button to save all the changes.
The Import Users flow with the Read All Rows card:
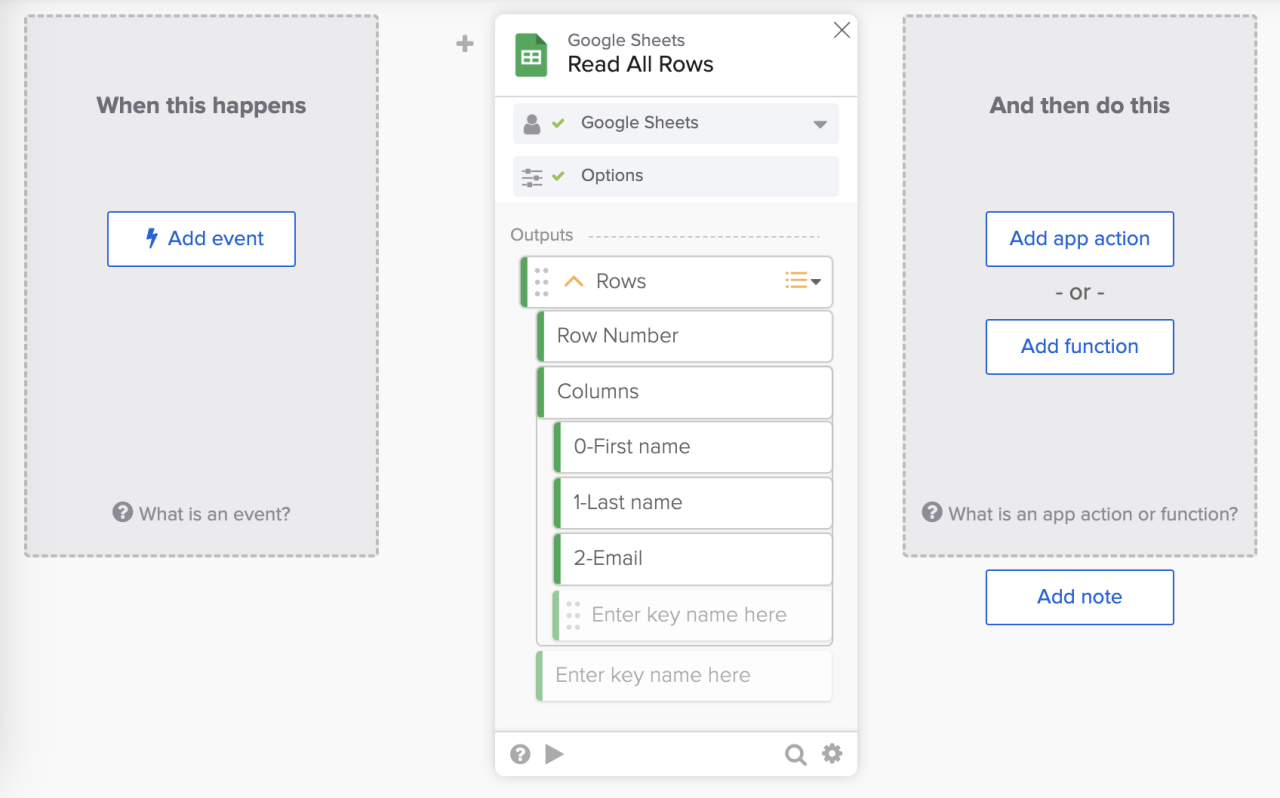 Import users flow.
Testing the Google Sheets – Read All Rows card
In Workflows, you can test a card individually.
- Click ▶️ on the bottom of the card.
- Click Test to test the card.
Testing the Read All Rows card returns three users from the Google Sheets spreadsheet.
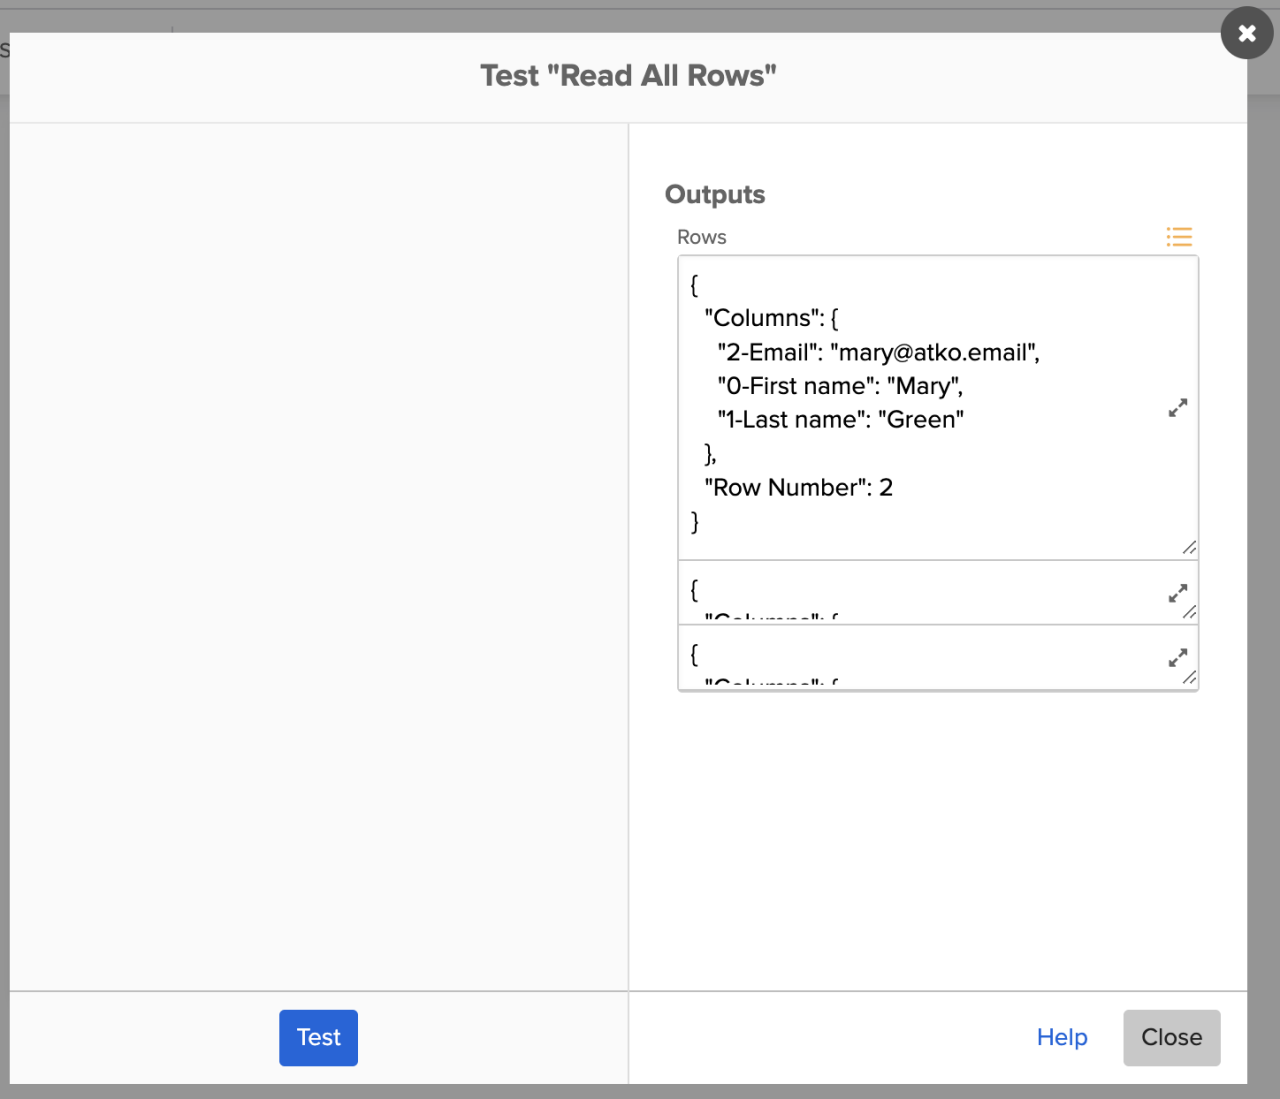 Testing the Read All Rows card.
If you expand a user, you will see the following JSON object:
{
  "Columns": {
    "2-Email": "mary@atko.email",
    "0-First name": "Mary",
    "1-Last name": "Green"
  },
  "Row Number": 2
}
Testing the flow
- Click the Run button to test the entire flow.
The view switches to the Execution History tab, where you can see the flow run:
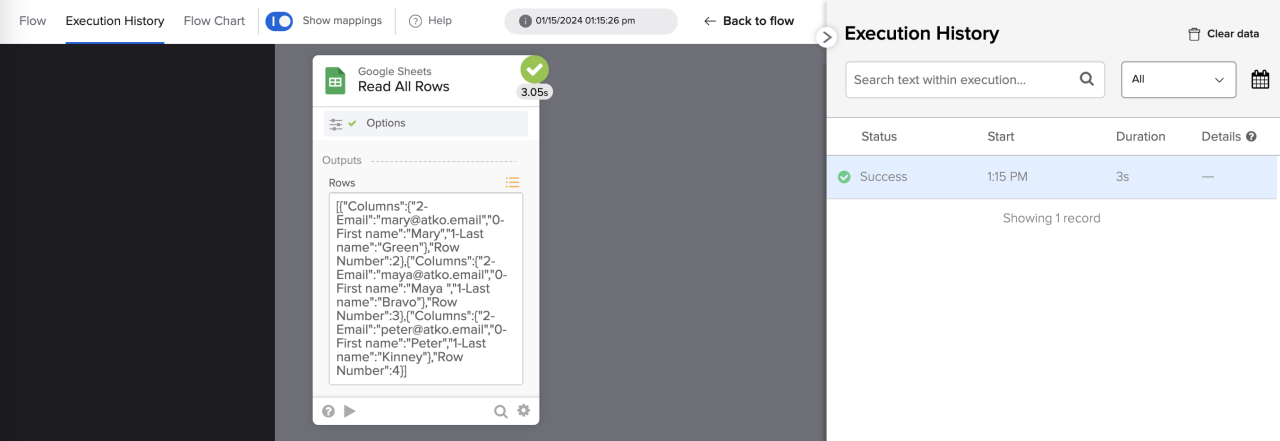 Testing the Import Users flow.
- Click the Run button again.
You now have two flow executions. You can switch between them to see the date for each run.
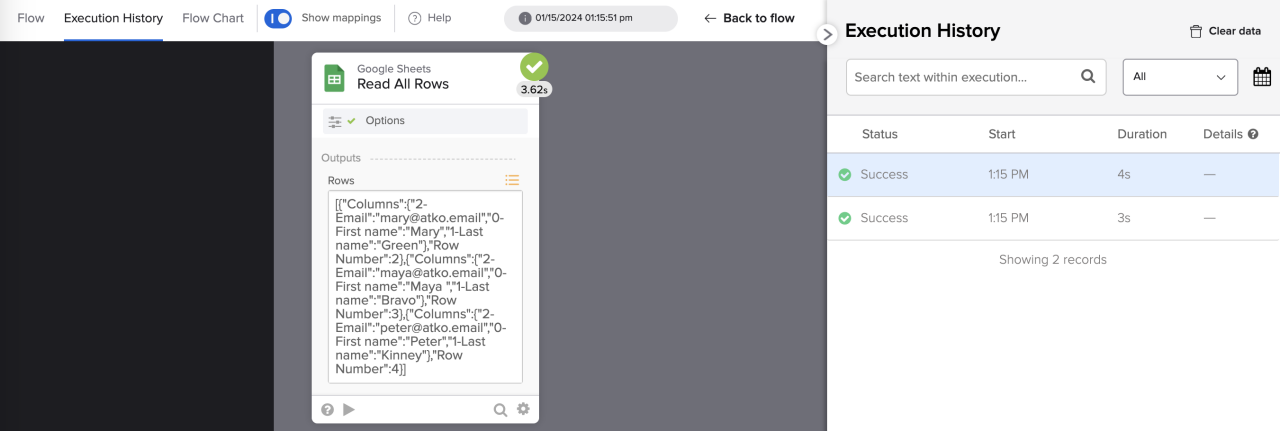 Testing the Import Users flow.
Building a helper flow to create a user
A helper flow is a flow that another flow calls. You will use a helper flow to create a new user from the list.
Creating a flow
- Click on the Default Folder above the Import Users flow name to go back to the folders view.
- Click + New Flow to create a flow.
- Click on Unnamed (top left) to enter a flow name.
- For Flow Name, enter Create user.
- For Description, enter This flow creates a user in Okta.
- Check the Save all data that passes through the Flow? checkbox. You will be using this capability at the end of this tutorial.
Setting up the helper flow
A flow becomes a helper flow when the first card is the Helper Flow card.
- In the first card, click Add event.
- In the Okta Apps section, click on Helper Flow. You have now set up a helper flow.
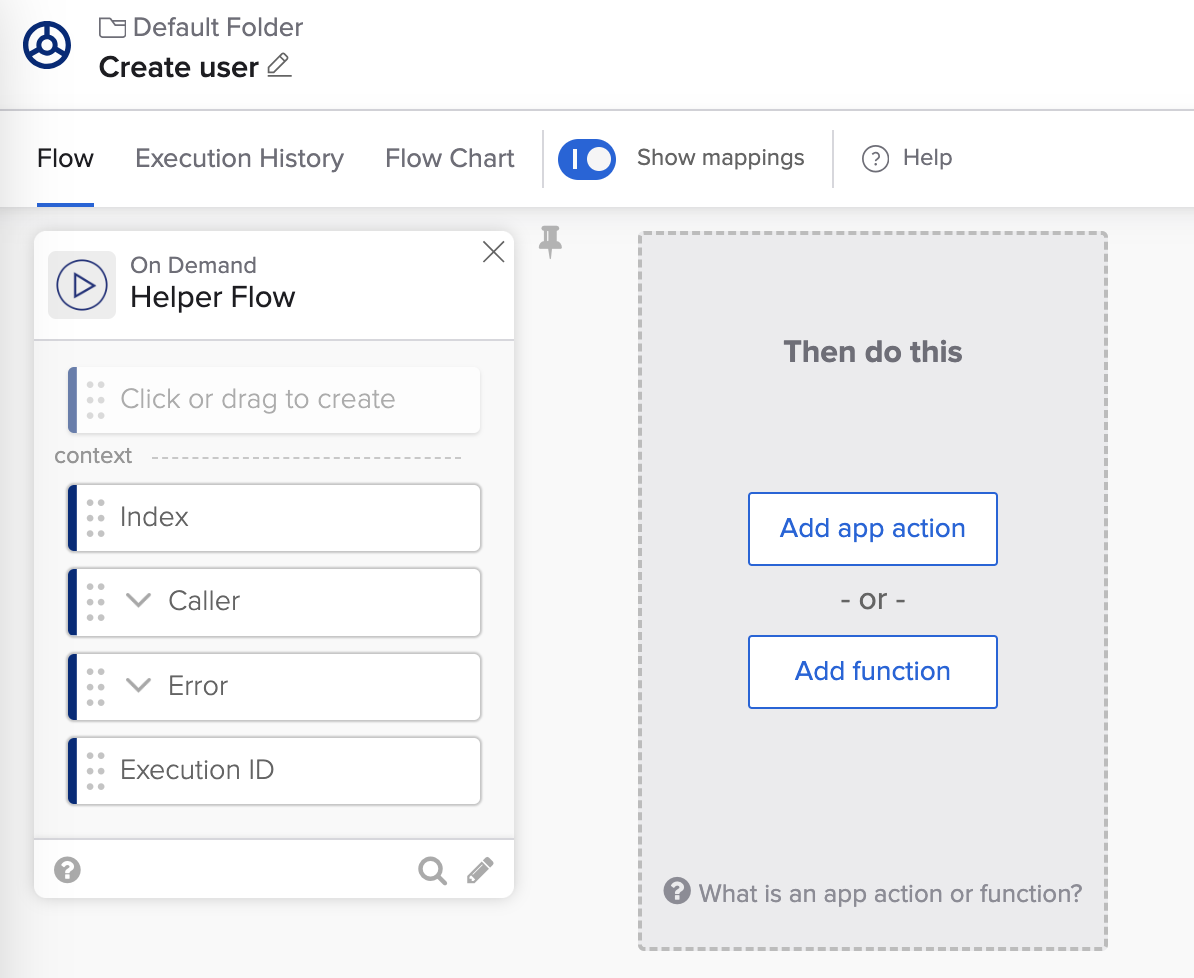 The Create User flow.
Setting up helper flow inputs
The helper flow accepts inputs from the main flow. To set up inputs:
- In the Helper Flow card, click inside the top box and enter User. Click Enter.
- You need to change the field type to an object. Place your mouse over the field box, open the list under Aa, and choose Object.
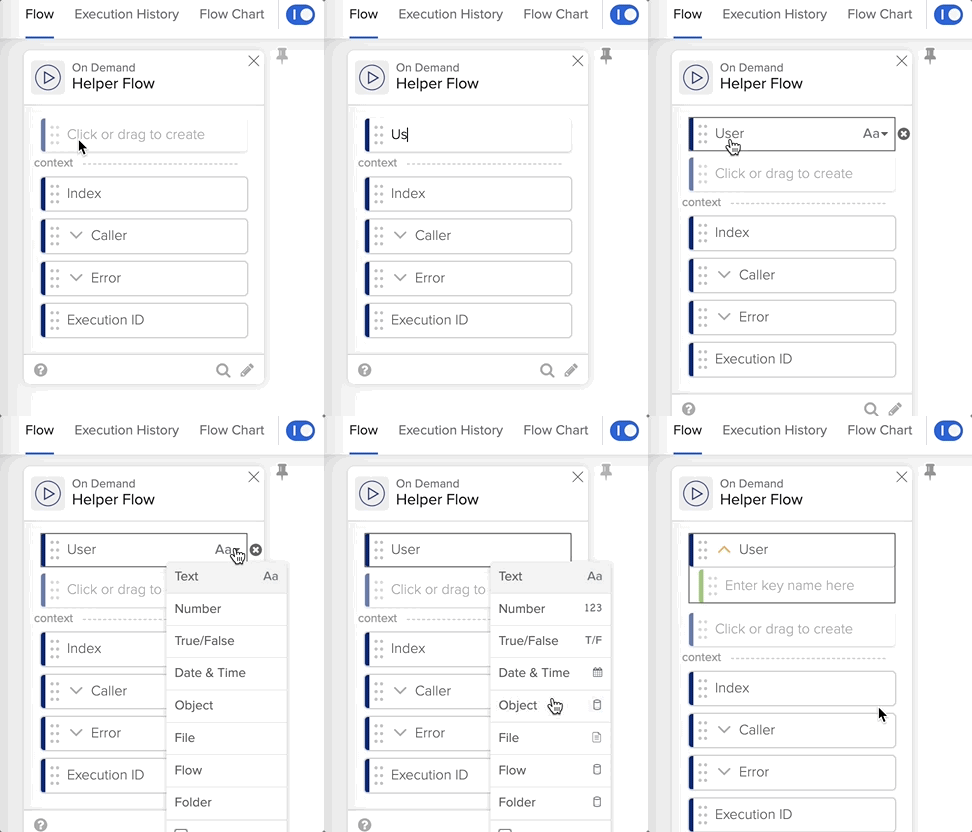 Creating helper flow input.
When a user is passed to the helper flow, its JSON object will look like this (you saw the same JSON above):
{
    "2-Email": "mary@atko.email",
    "0-First name": "Mary",
    "1-Last name": "Green"
}
You need to retrieve the 0-First name, 1-Last name, and 2-Email fields to create a new user.
Getting values from a JSON object
The Object - Get Multiple card allows getting multiple values from a JSON object.
- In the second box, click Add function.
- Select the Object category.
- Find and click the Get Multiple function.
To pass the User object to the Get Multiple card:
- Click the User object from the Helper Flow card and drag it to the object field in the Get Multiple card.
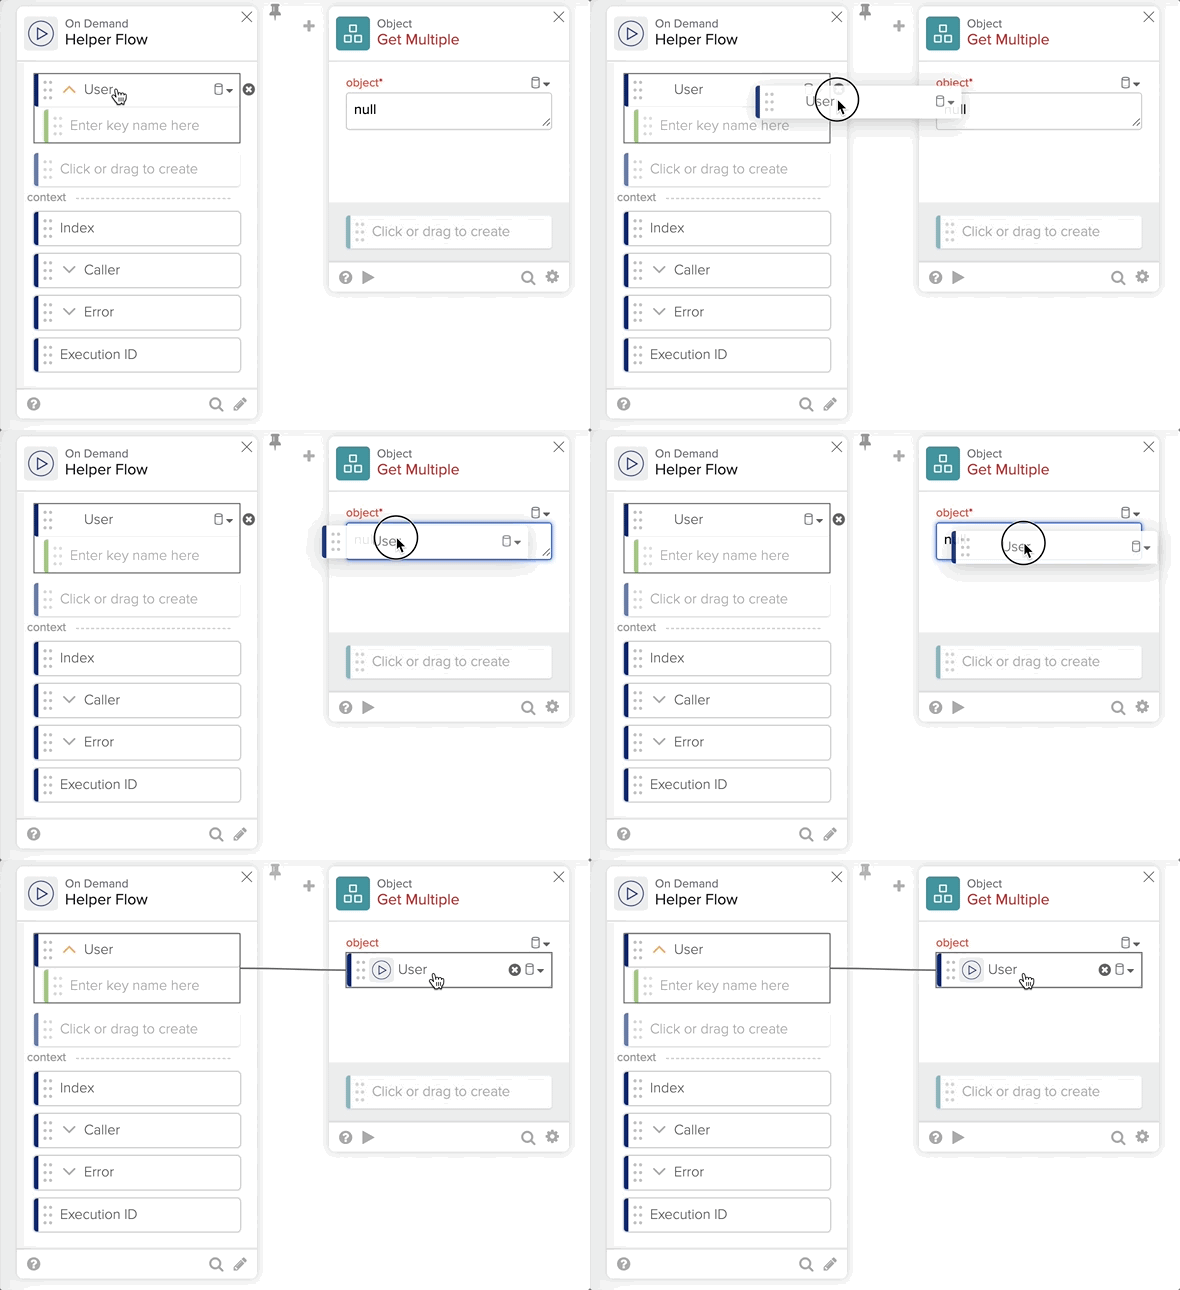 Passing data to a card.
Now you need to specify the keys for which you want to get values.
- In the Get Multiple card output section, click inside the field box, type 0-First name, and click Enter.
- Repeat the same steps to add 1-Last name and 2-Email fields.
The flow now looks like this:
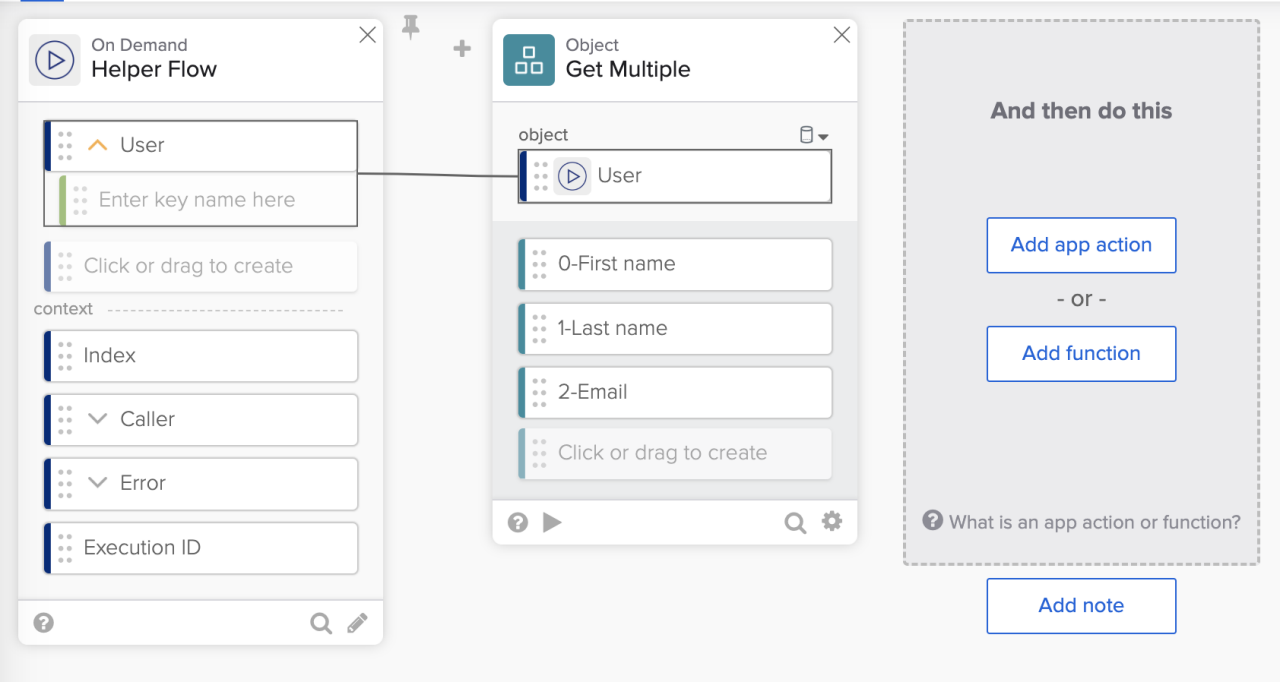 Getting user information with the Get Multiple card.
Testing the Get Multiple card
{
    "2-Email": "mary@atko.email",
    "0-First name": "Mary",
    "1-Last name": "Green"
}
- Click ▶️ on the Get Multiple card.
- For the object field, paste the sample JSON object from above.
- Click Test.
Testing the helper flow
- Click the Run button to test the flow.
- For the User field, enter the same sample JSON object.
- Click Run Test.
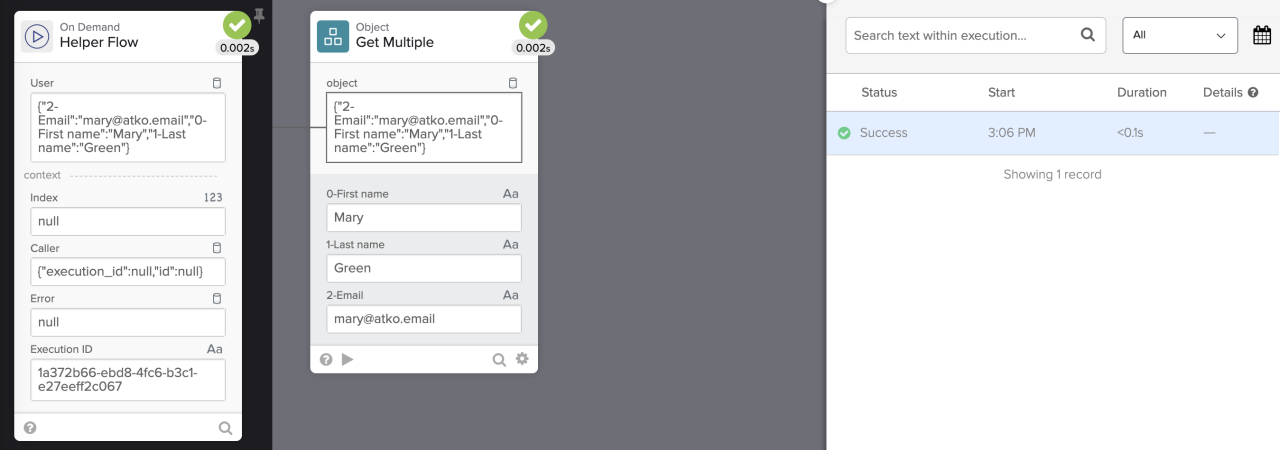 Testing the Create User flow.
You can change data in the JSON object and run the flow again. You can see different flow runs with different data.
Creating a user with the Okta – Create User card
You will use the Okta – Create User card to create a user.
- Click Add app action to add the next flow step.
- Find and click on Okta.
- Find and select the Create User action (you can also search for it).
Obtaining API Credentials
Before setting up the connection, retrieve your OAuth credentials:
- From Workflows, click the four squares (upper right corner) and select Okta Dashboard.
- Open the Admin console.
- Navigate to Applications > Applications, select the Okta Workflows OAuth application, and open the Sign On tab. You will need the information from this page in the next step.
Connecting to Okta
- Return to the Workflows tab and click + New Connection.
- For Connection Nickname, keep Okta.
- For Client ID, copy and paste the Client ID from the page you opened in the last section.
- Repeat the same steps for Client Secret.
- For Domain, enter trial-<ID>.okta.com (without the http://). For example: trial-6093533.okta.com.
- Click Create.
Configuring Card Options
- For the Option field, select without Credentials and click Save.
- On this view, you can set what fields to show on the card. Keep the default values and click Save.
Next, you need to pass data to the Create User card.
Create the following connections:
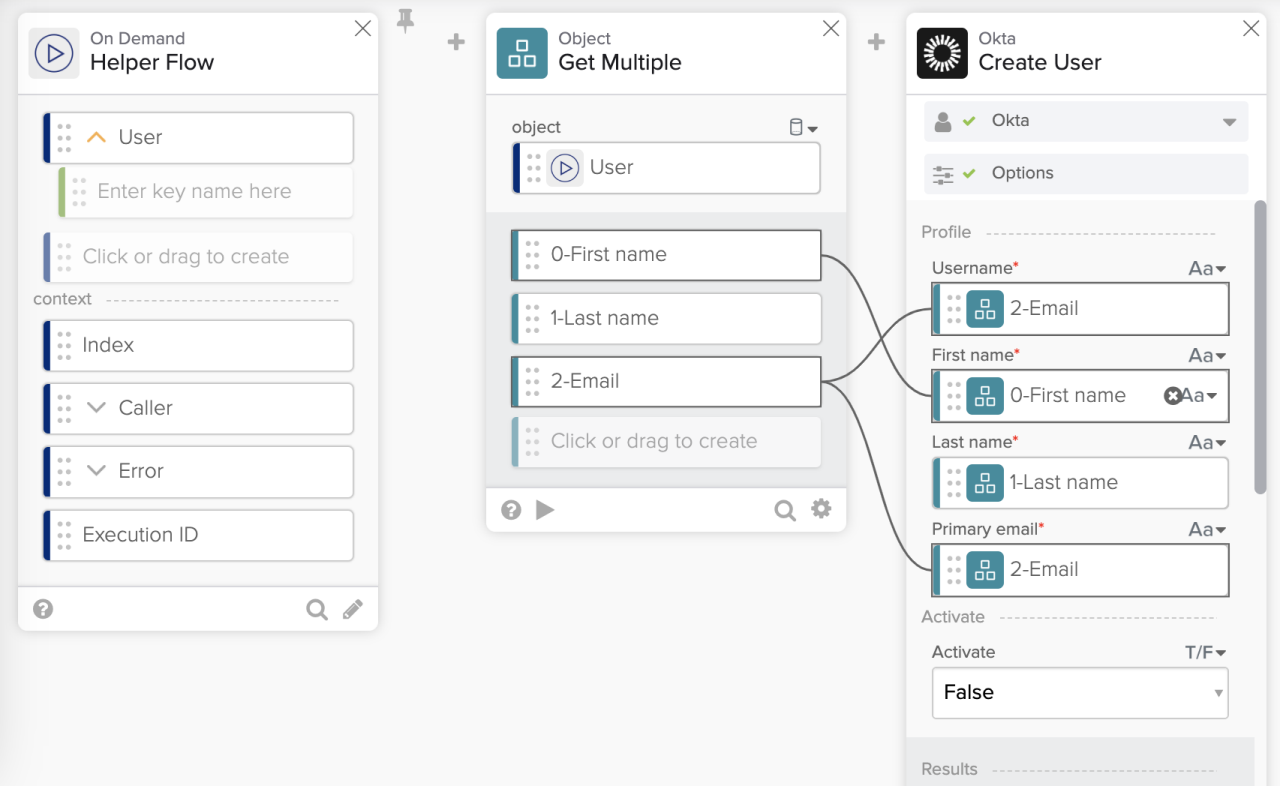 Passing data to the Create User card.
Testing the Create User card
If you would like, you can test the Create User card.
- Click the ▶️ on the Create User card.
- Enter sample user information and click Test to test the card.
- A user is created in Okta. To see the new user, in the admin console, navigate to Directory > People.
Testing the helper flow
You can also test the entire flow.
- Click the flow Run button to test this flow.
- The JSON is pre-filled. If not, paste the JSON used above.
- Click Run Test.
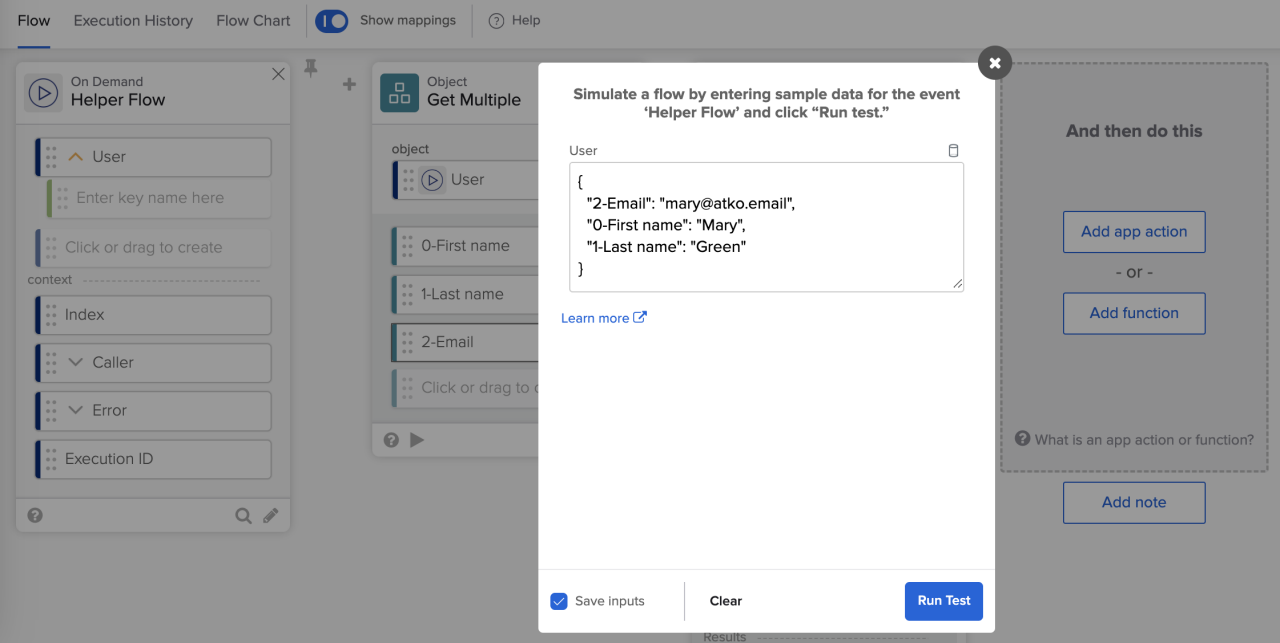 Testing the helper flow with simulated data.
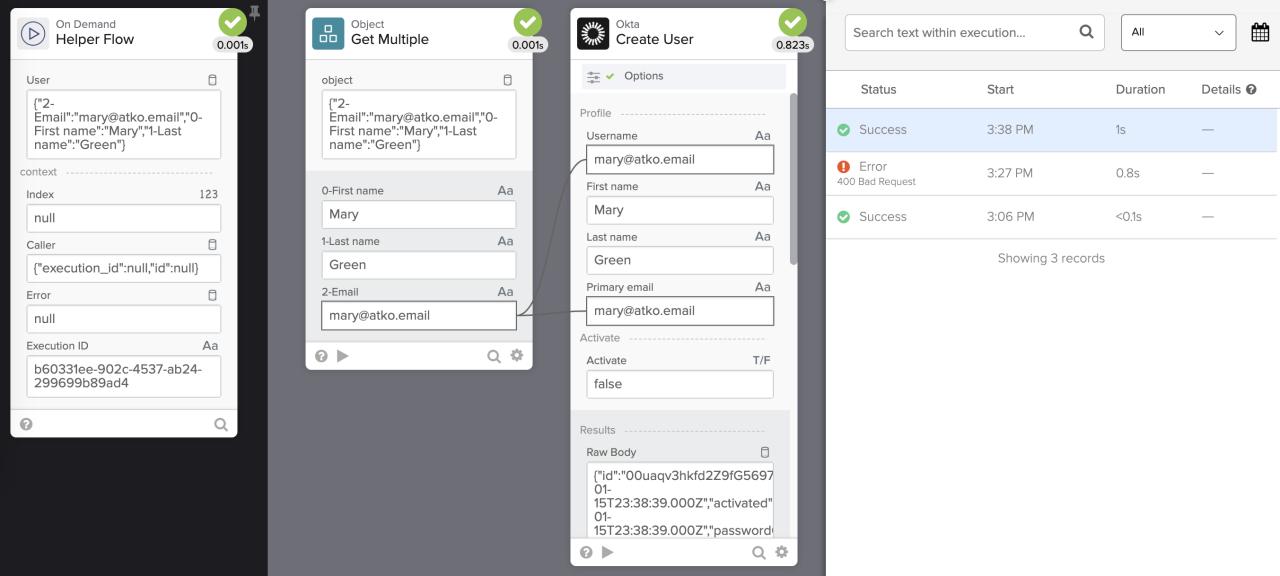 Flow test with simulated data.
To see the new user, in the admin console, navigate to Directory > People.
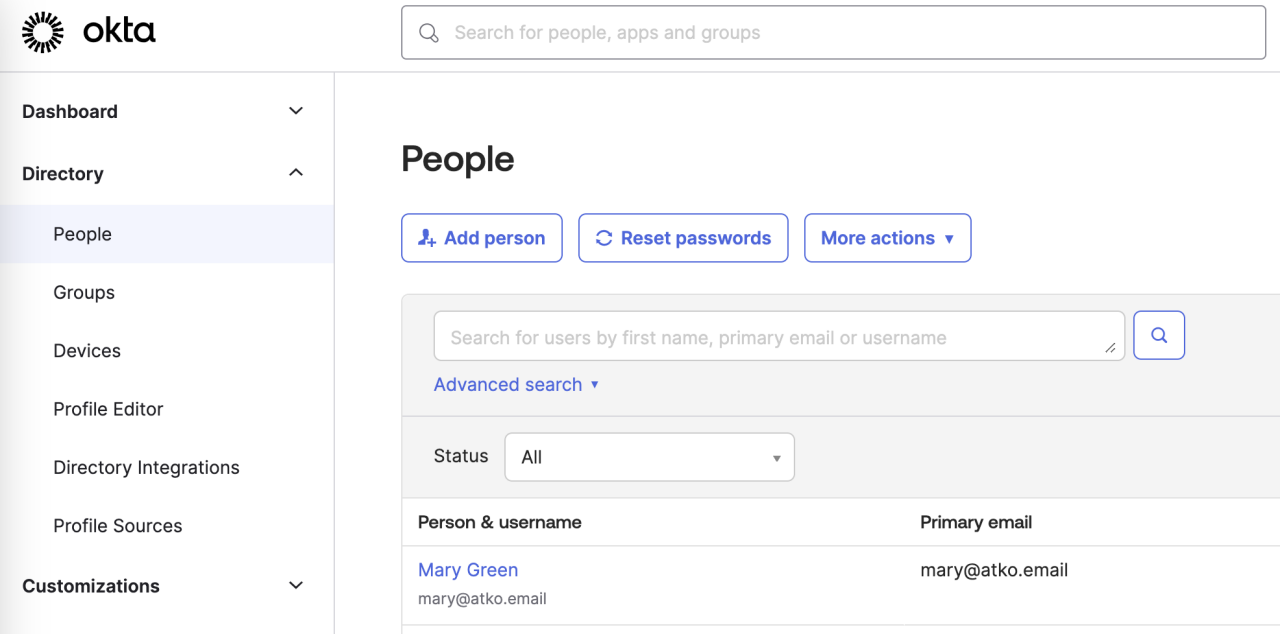 New user.
Now that you know the helper flow works, you can finish building the Import Users flow.
Deleting users
Before you do that, delete the user(s) you created. When you test the complete flow, you will get an error if a user exists.
You will get an error message if creating a user who already exists in your organization:
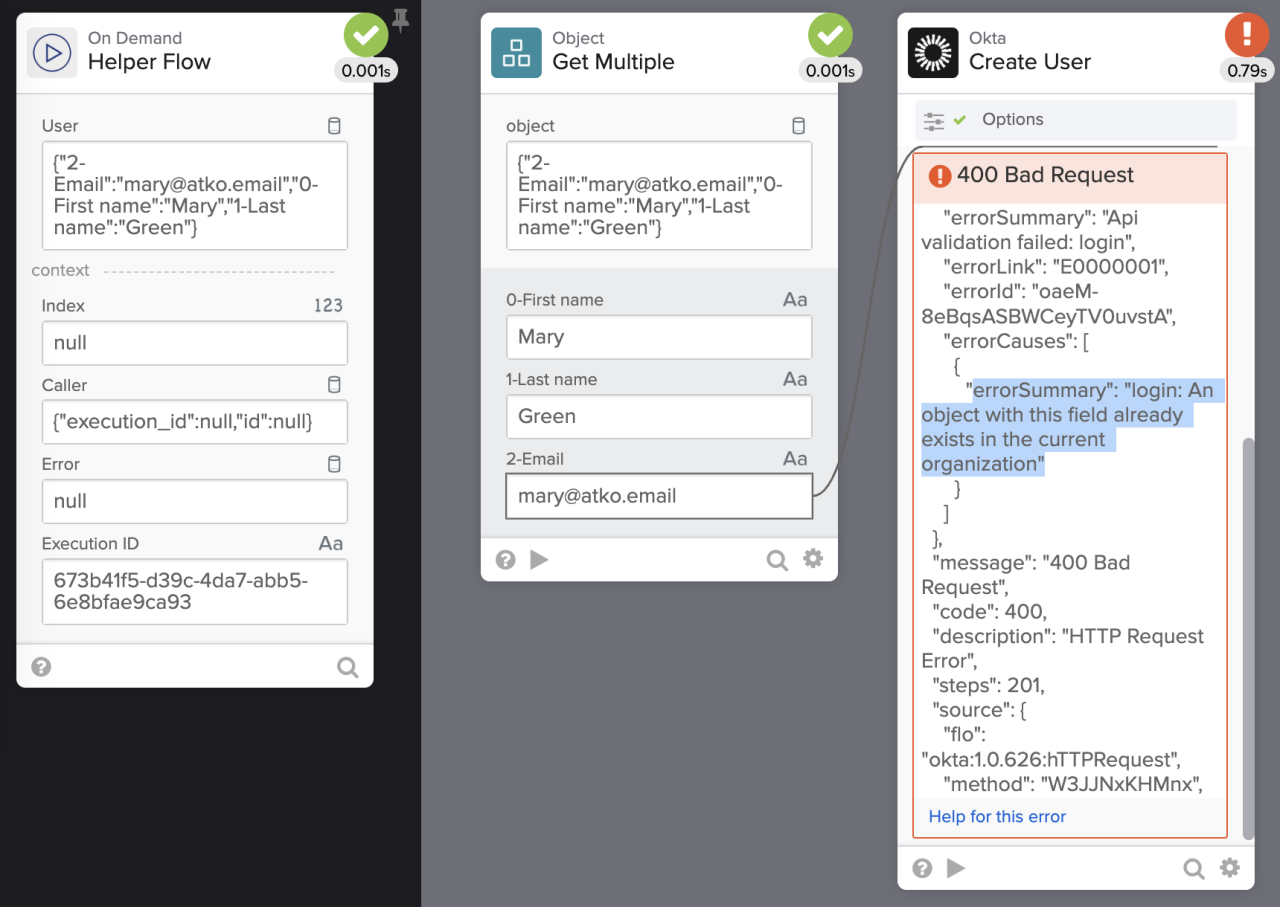 User exists error message.
- Click the user name.
- Select More Actions > Deactivate > Deactivate.
- Click Delete > Delete to delete the user.
Building the import users flow (part 2)
Open the Import Users flow.
Processing the list
You need to pass each user from the list to the Create User flow.
- Click Add function.
- Go to the List category and click on the For Each function.
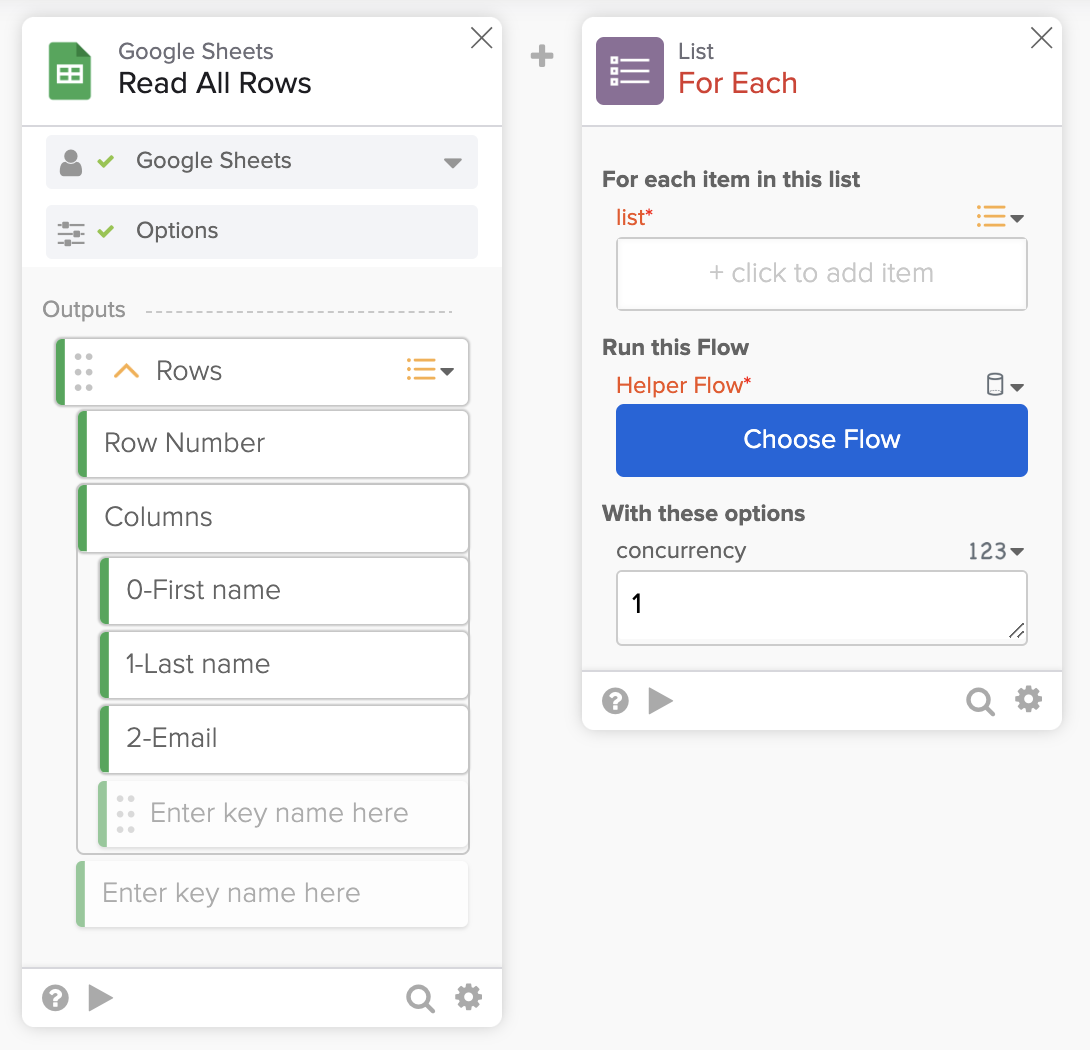 Adding the For Each card.
- Connect the Rows field to the list field on the List – For Each card.
- Click Choose Flow to choose a helper flow to process each record in the list.
- Click the Default Folder and choose the Create User helper flow.
- In the With the following values section, for the User field, click the arrow on the right side, and select Item > Columns. This passes each user's information (as JSON) to the helper flow.
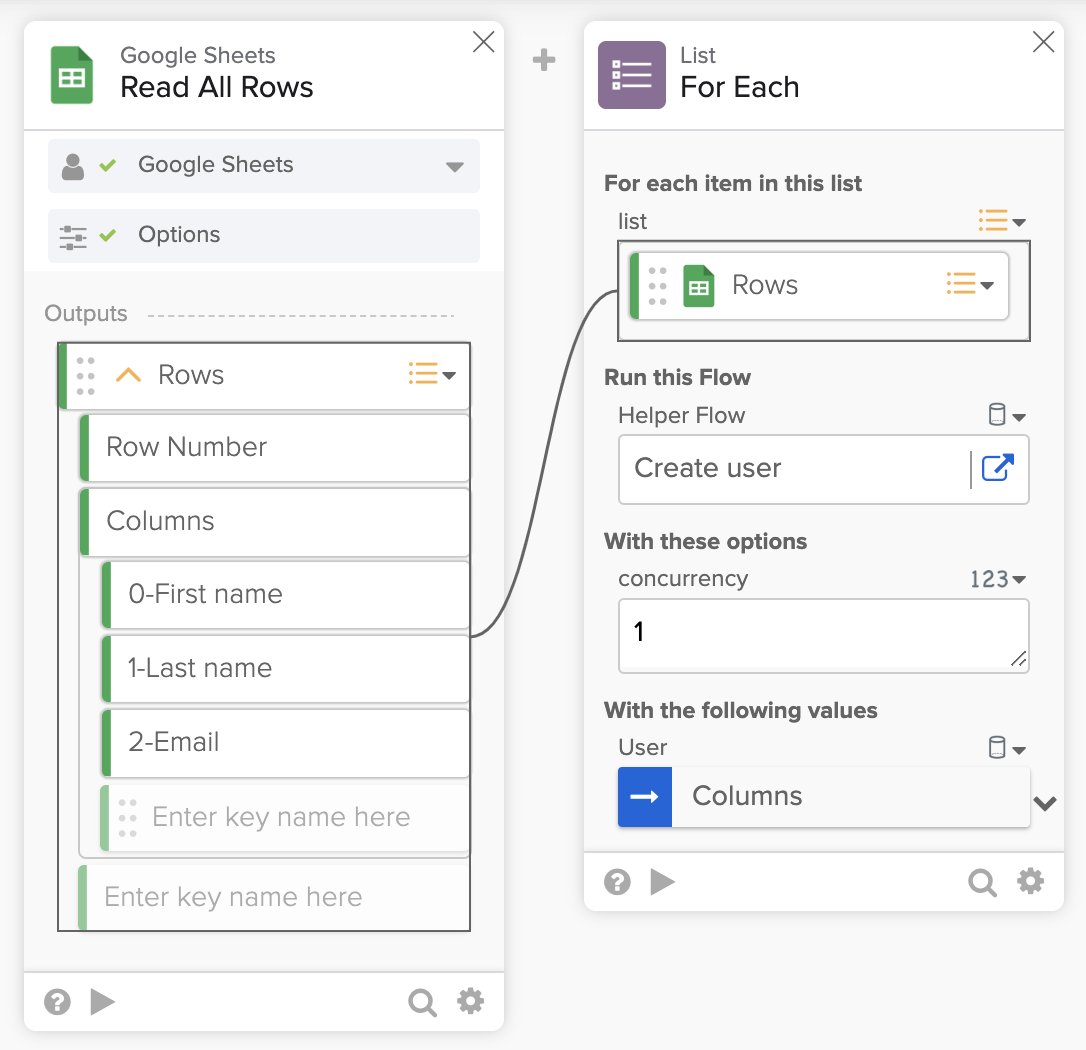 Passing data to the For Each card.
Testing the completed flow automation
- Open both flows in different browser tabs next to each other. To open the helper flow, you can click the arrow next to the helper flow name:
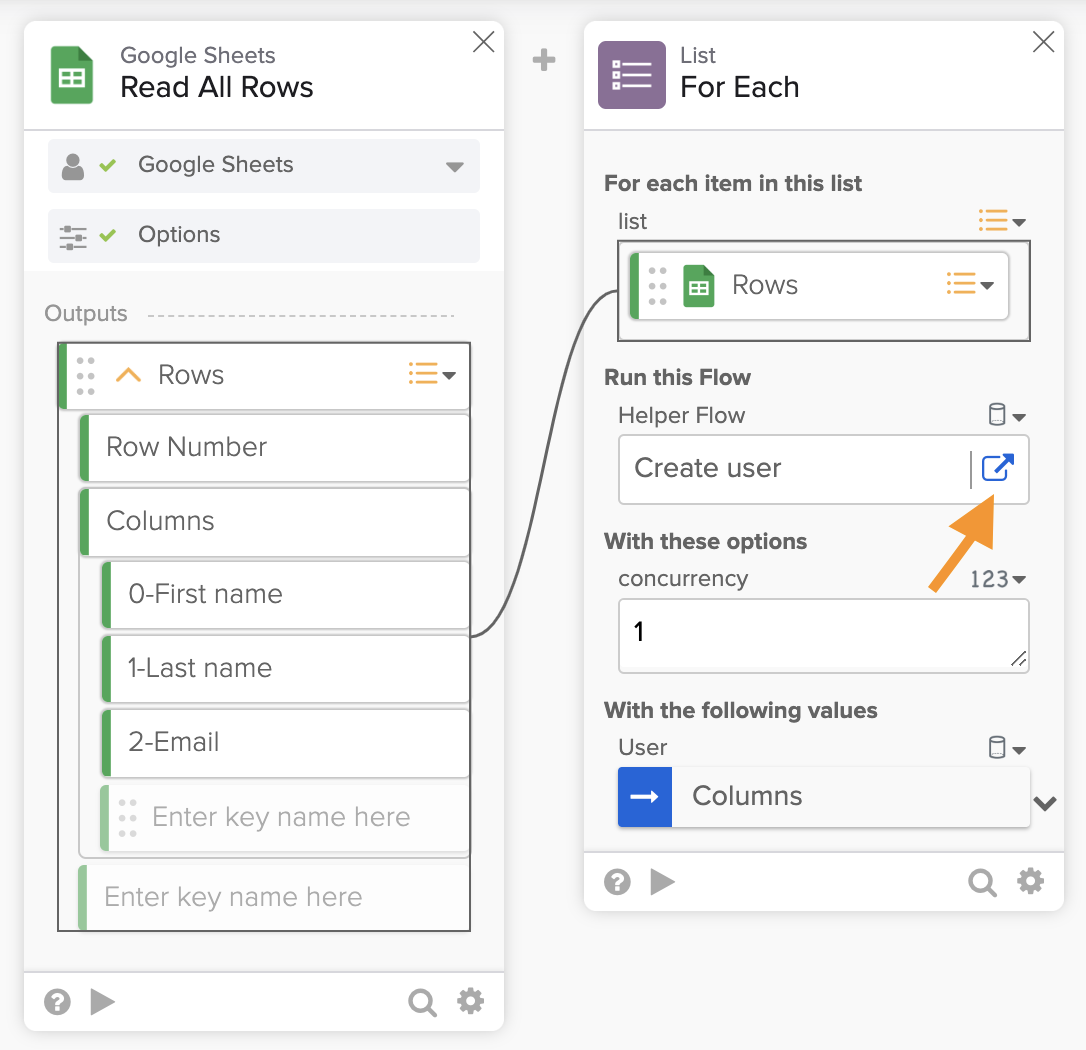 Opening the helper flow.
- Check that both flows are turned on:
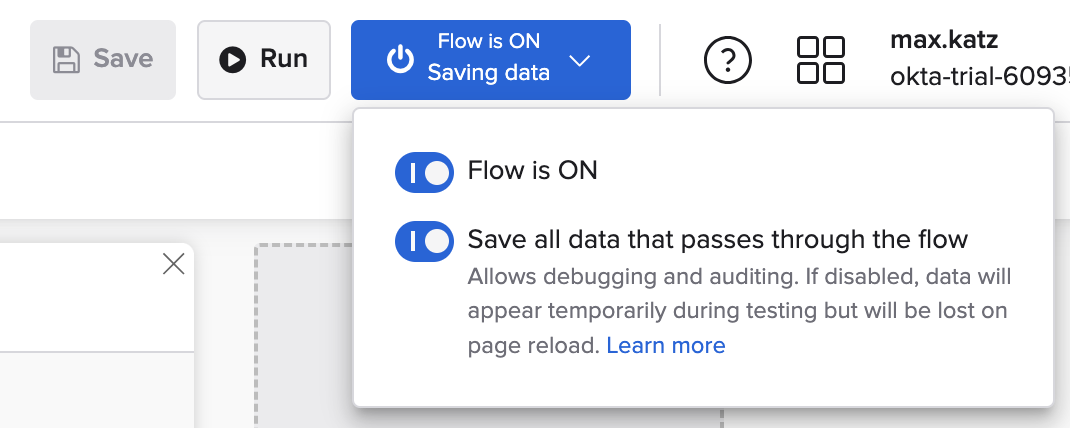 Turning the flow on.
- In the Import Users flow, click Run to test.
In the Execution History tab, the Import Users flow runs one time:
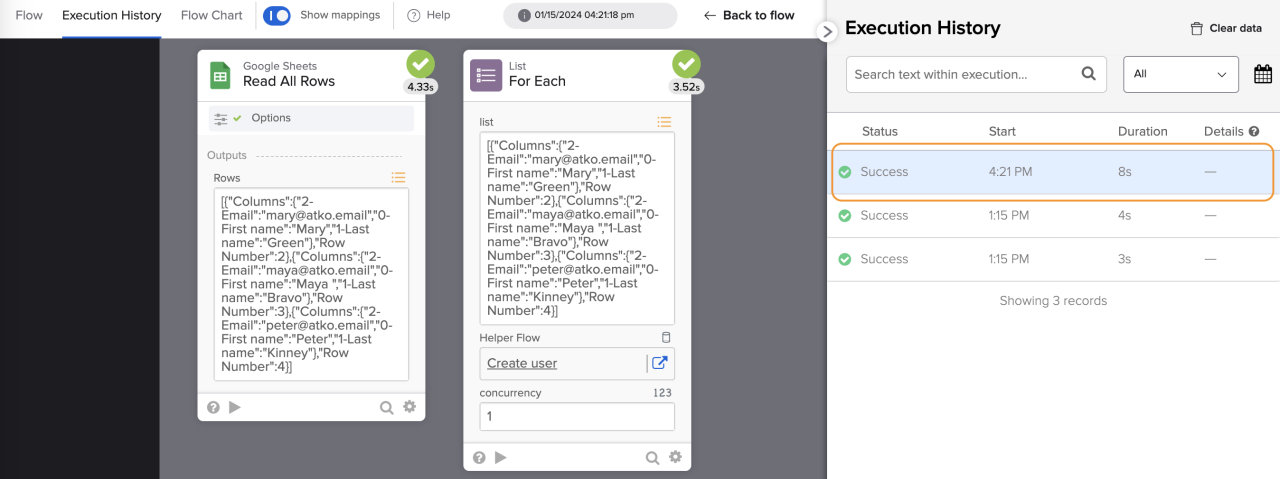 Import Users execution history.
The Create User flow runs three times, once for each user in the spreadsheet:
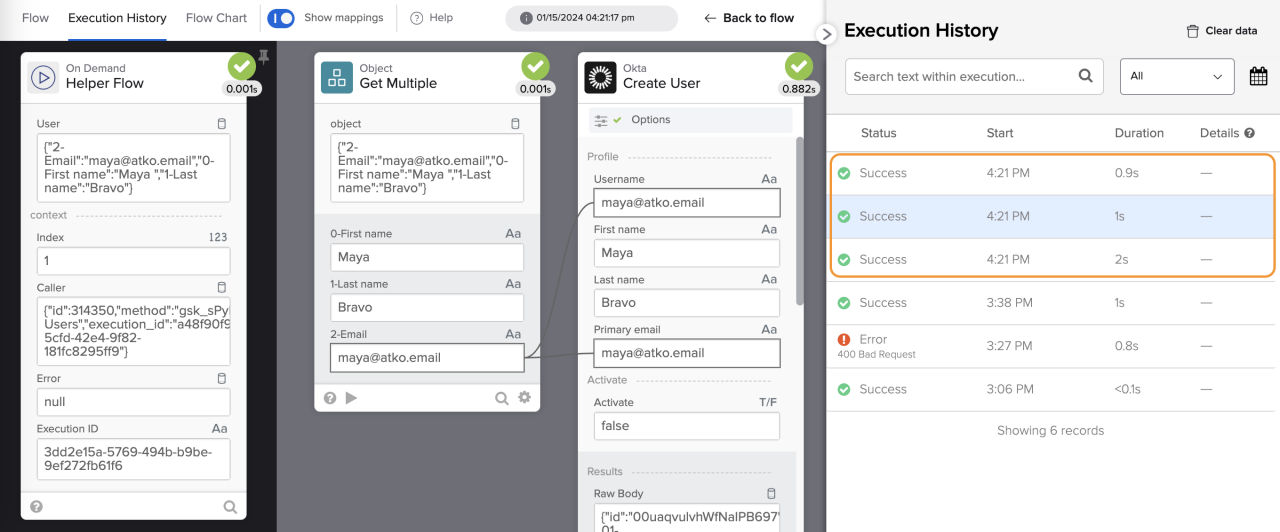 Create User execution history.
Viewing different flow executions
Since you enabled the Save all data that passes through the Flow option, you can select a different flow execution and see the data passed in that flow run.
Setting up a schedule to run the flow
The last remaining step is to set up to run the flow on schedule.
- In the Import Users flow, click Add event in the first card.
- Choose the Schedule card.
- Set the schedule you need this flow to run and click Save.
- The Summary field shows when the flow will run.
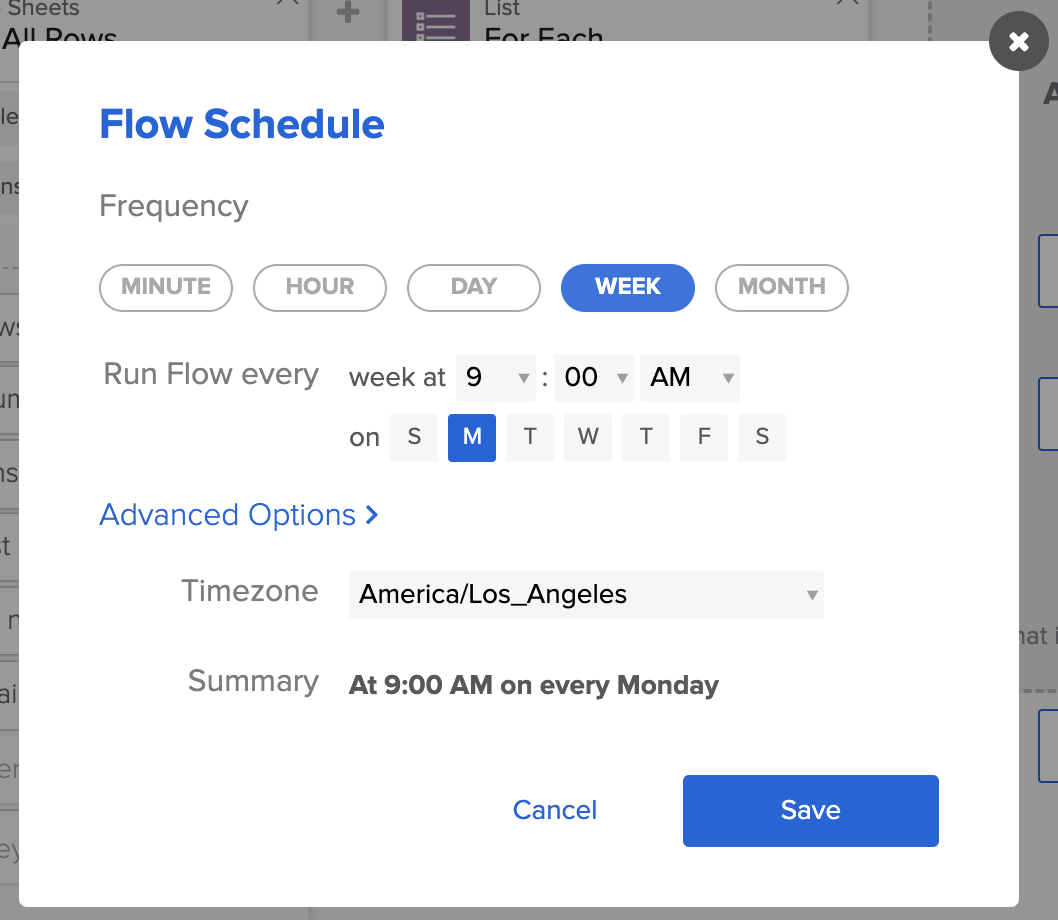 Setting flow schedule.
The flow on button shows when the flow will run next:
 Flow next run.
The Import Users flow with the Schedule card:
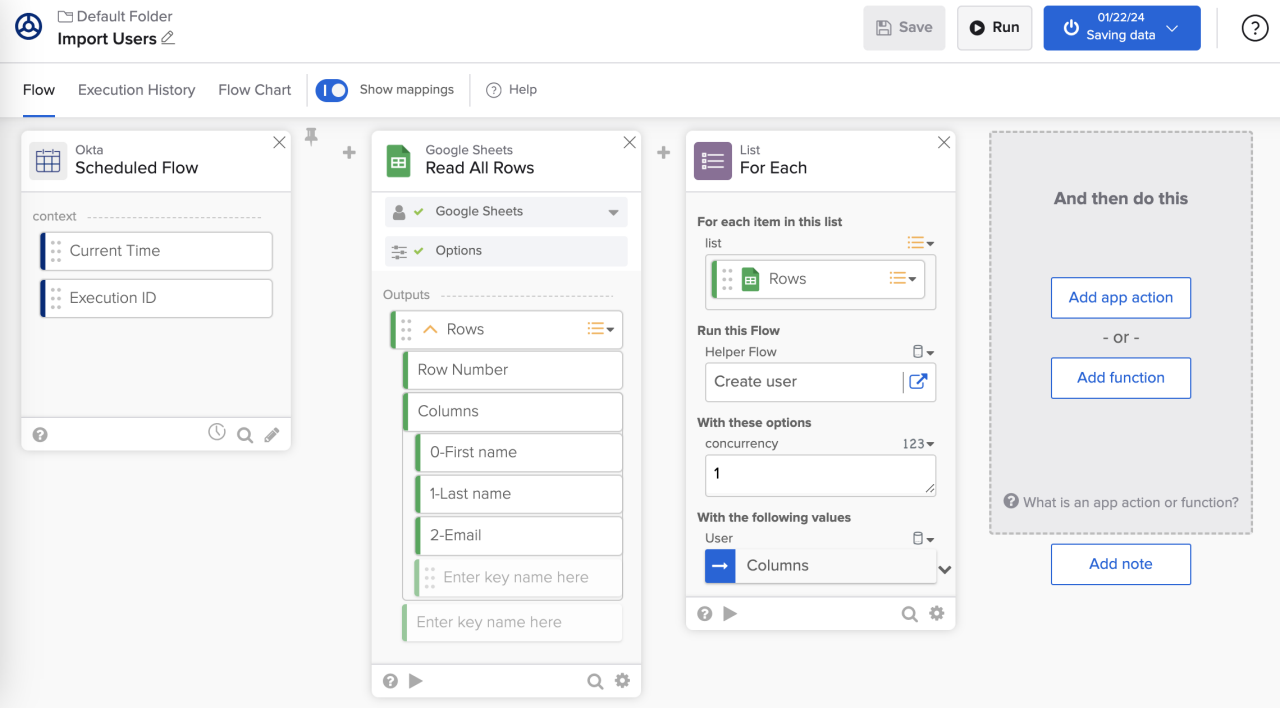 The final Import Users flow with the Schedule card.
To edit the schedule, click the 🕔 on the Schedule card.
To test the schedule, set the flow to run every five minutes.
Note: You need to delete users in the admin console between flow runs.
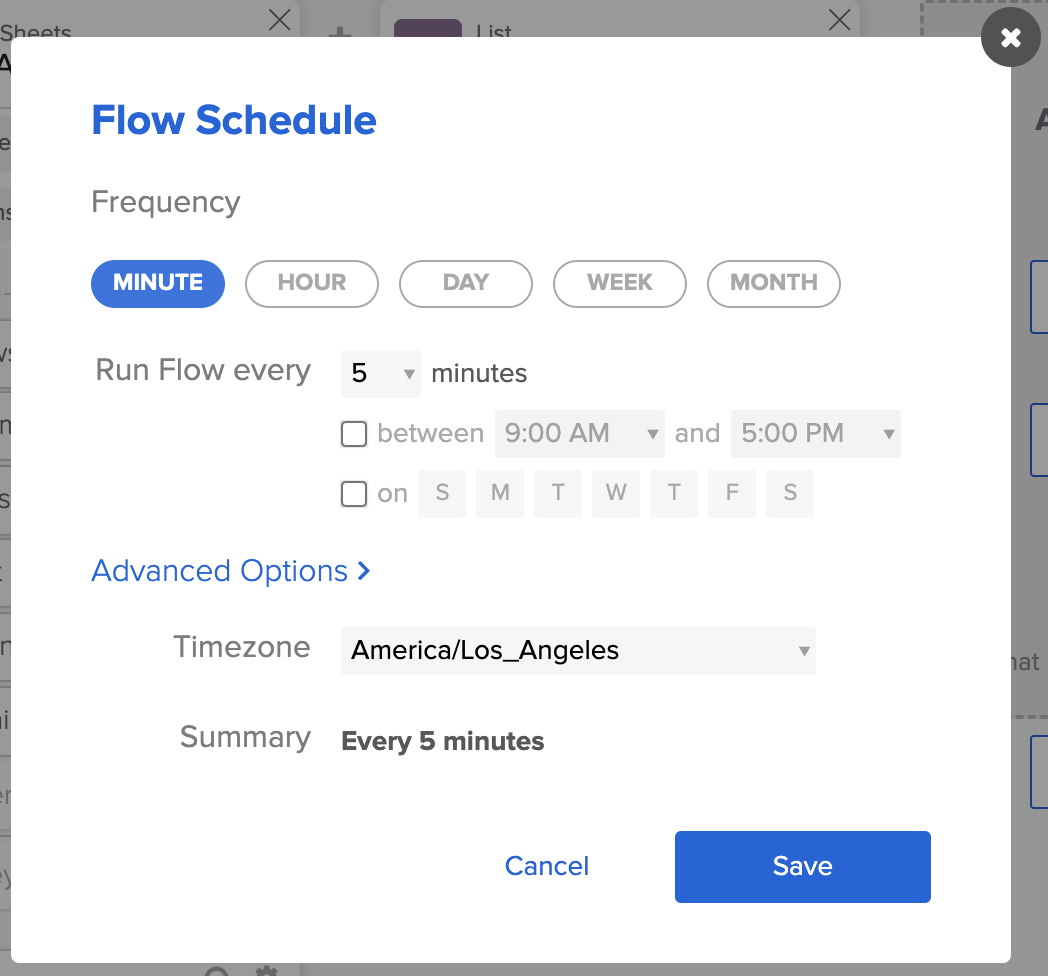 Running the flow every five minutes.
Things you learned
In this tutorial, you learned how to build a complete flow:
- How to connect and import data from Google Sheets.
- How to use a helper flow to create for-each logic.
- How to create users in Okta.
- How to test individual cards and the flow.
- How to set up a flow to run on schedule.
The final Import Users flow:
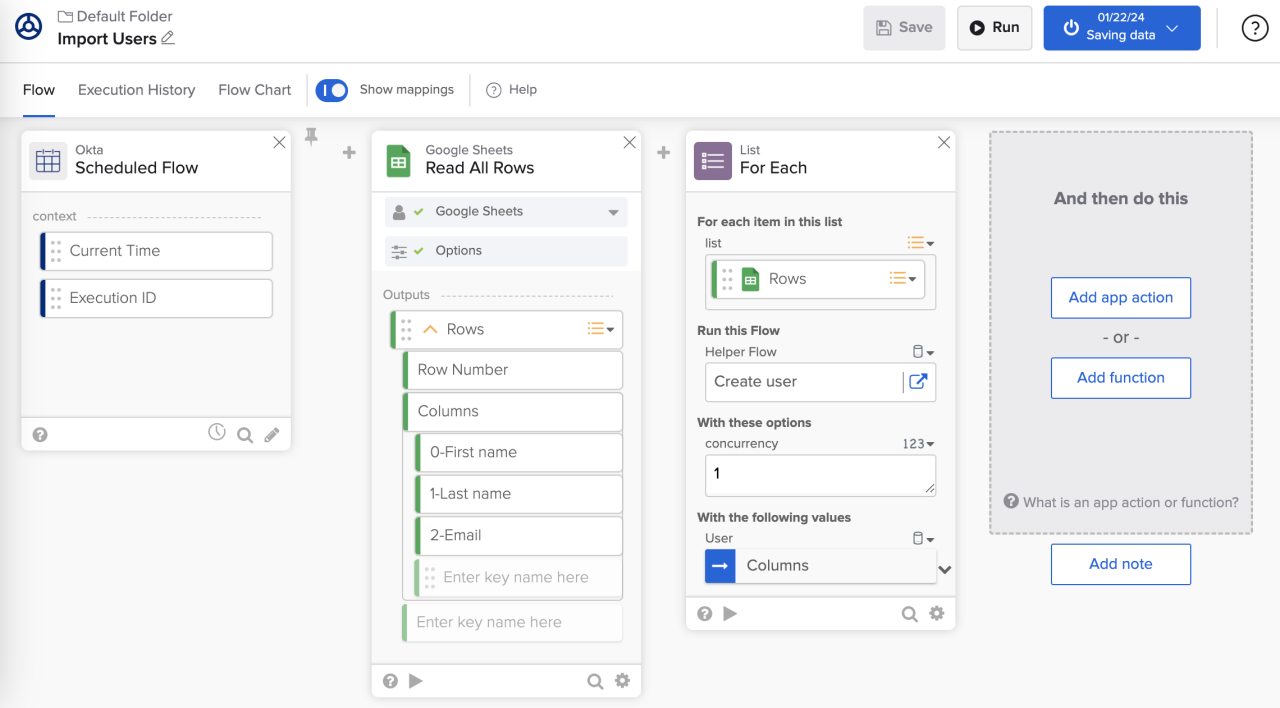 The Import Users flow.
The final Create User flow:
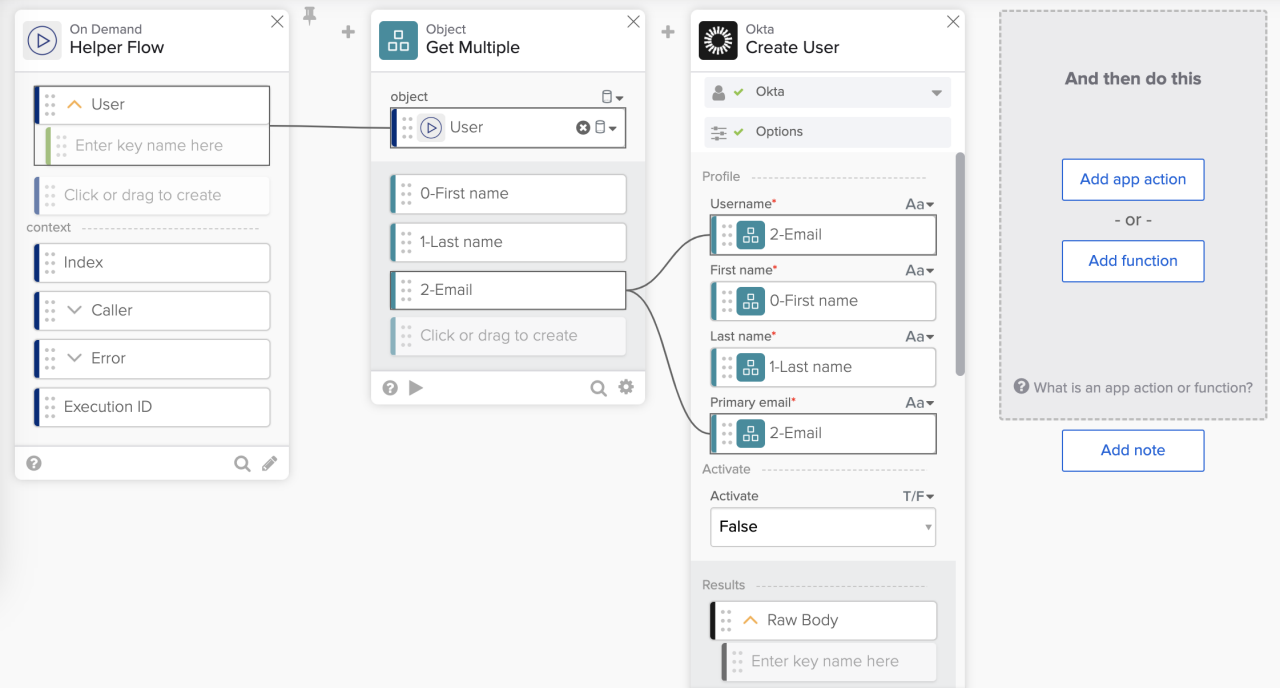 The Create User flow.
Okta Workflows resources
- Get help from Workflows specialists during weekly community office hours.
- Learn from Workflows videos.
- Get help from support: discuss a Workflows topic or ask a question.
- Get help from the community: join the #okta-workflows channel on MacAdmins Slack.


