




Executive summary
Okta Privileged Access (OPA) Workload Identity for Automation integrates with Google Cloud Platform (GCP) by exchanging platform-signed OIDC JSON Web Tokens (JWTs) for short-lived, ephemeral SSH certificates. An automated runner VM queries its local GCP metadata server for a Google-signed JWT, submits it to OPA through the sft CLI to authenticate, and receives a time-based SSH certificate to access target servers—eliminating static SSH keys, API tokens, and service account JSON files.
Every automation engineer has faced the same uncomfortable moment: you need your script to connect to a server, so you generate a credential, paste it into a config file, and move on. Weeks later, that credential is in three config files, two CI/CD pipelines, and a Slack message someone sent to "just test something quickly." Nobody knows which ones are still active. Nobody wants to be the one who breaks production by rotating them.
In this blog post, we walk through a complete working solution: using Okta Privileged Access (OPA) Workload Identity for Automation with Google Cloud Platform (GCP) to enable an automation script to Secure Shell (SSH) into a target server without storing a single credential on disk.
How OPA and GCP workload identities eliminate static credentials
Core objective: Eliminate static credentials (API keys, static SSH keys, and service account JSON files) in automated server access by leveraging platform-signed identity proofs.
Zero stored credentials: No secrets residing on disk, in configs, or within CI/CD variables.
Short-lived ephemeral certificates: Issuance of SSH certificates valid for 15 minutes, removing rotation operational risk.
End-to-end cryptographic validation: Okta Privileged Access, validating as a trust broker that validates GCP-issued JSON Web Tokens (JWTs).
Automated audit logging: Complete identity traceability across token exchange and SSH session activity in the Okta System Log.
The problem: Static credentials are security debt, not infrastructure features
When an automated job—an Ansible playbook, a deployment script, or a CI/CD runner—needs to access a privileged resource, it requires a way to prove its identity. The traditional approach hands it a static credential: an API key, an SSH private key, or a service account JSON file. That credential gets stored somewhere, and that somewhere becomes a target.
The consequences play out in predictable ways:
Credentials outlive their purpose: A service account key created for a one-off deployment task remains valid for years. The engineer who created it leaves. The key stays. Nobody audits it. It accumulates permissions over time because it is easier to add access than to investigate what is safe to remove. These are the "zombie credentials" that live in your environment long after the workload that needed them is gone.
Rotation becomes a crisis drill: When a credential is embedded across dozens of pipelines and config files, rotating it means finding every reference first. Teams discover references by watching things break after the rotation. This is not a rotation strategy; it is a controlled outage.
The underlying issue is architectural: static credentials are an identity model designed for humans, not machines. A human can rotate their password and remember the new one. A machine just needs to know: "Am I who I say I am?"—and a cloud platform can answer that question cryptographically, without any stored secret.
The solution: Short-lived tokens, permanent security
Okta Privileged Access Workload Identity for Automation solves the “secret zero” problem of needing an initial key to fetch other secure credentials by replacing static credentials with platform-signed identity proofs.
The insight is straightforward: a GCP virtual machine (VM) already has a cryptographic identity. When you attach a service account to a VM, GCP can issue a JWT signed with Google's private key that says, in effect, "I am this VM, running as this service account, and I was issued this token at this specific moment." No one can forge that token without Google's private key. It expires automatically and cannot be reused on a different system.
OPA acts as the trust broker. You configure it once to say: "I trust JWTs signed by Google for service account X." From that point forward, any workload running as that service account can prove its identity to OPA by presenting its GCP-issued JWT, and OPA will exchange it for a short-lived access token. That token is then used to obtain an ephemeral SSH certificate valid for minutes, not years to connect to a target server.
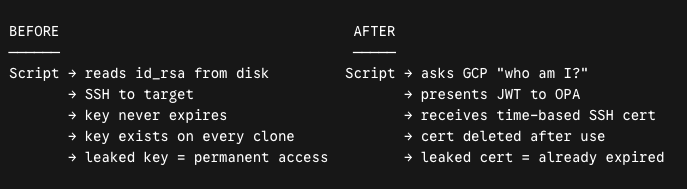
This is not a change to how SSH works. It is a change to how identity is established before SSH begins.
System architecture and component mapping
The authentication workflow relies on a trust-broker design pattern in which OPA validates identity claims cryptographically generated by GCP.
| Component | Security role | Location |
|---|---|---|
GCP metadata server | Internal GCP endpoint that issues signed JWTs to any VM on request | GCP infrastructure (not your VM) |
Workload connection | OPA configuration object that defines trust with GCP, specifying which JWTs to accept and what claims to verify | OPA Dashboard |
Workload role | OPA authorization entity that maps a verified workload identity to a Linux username on target servers | OPA Dashboard |
Policy and rule | Defines which workload roles can access which servers through which method | OPA Dashboard |
sft (OPA client) | Command-line interface (CLI) binary that handles workload authentication and SSH certificate issuance | Runner VM |
sftd (OPA agent) | Daemon that enrolls the target server with OPA and configures SSH to trust OPA's certificate authority | Target VM |
Architecture and authentication flow
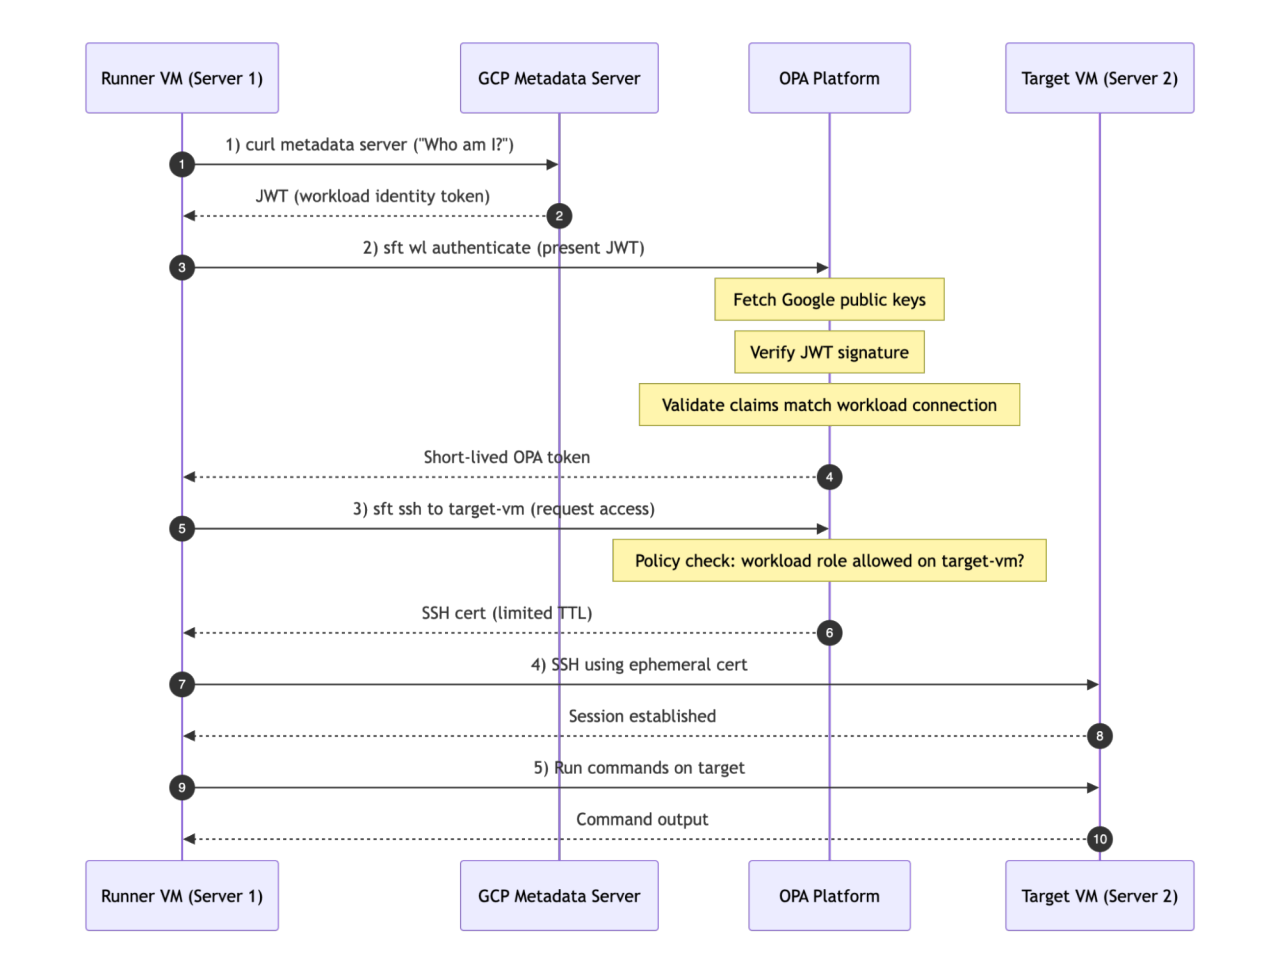
Security design fundamentals
OPA audience binding: The GCP JWT is requested with the OPA URL as the audience. Even if intercepted, it cannot be replayed to any other system.
Cryptographic verification: OPA fetches Google's public keys and verifies the JWT signature before issuing any token. A forged or tampered JWT fails.
Strict time-to-live (TTL) expirations: The GCP JWT expires after one hour. The OPA token lives for the duration of the session. The SSH certificate is valid for the defined period. Nothing persists.
How to configure an Okta Privileged Access workload connection for GCP
Requirements and prerequisites
GCP account: Must have billing enabled and owner or editor rights on the project.
gcloud CLI: Installed and authenticated on the local workstation.
OPA tenant: Okta Privileged Access licensed and accessible through your tenant URL (for example, [https://YOUR-TEAM.pam.okta.com]).
DevOps administrator role: Required in OPA to create the workload connection.
Security administrator role: Required in OPA to activate the connection, create the workload role, and create the policy.
Step 1: Create the GCP infrastructure
Run these commands on your local workstation.
1.1 Create project and enable APIs (GCP)
PROJECT_ID="YOUR_PROJECT_ID"
ZONE="VM_LOCATION"
gcloud projects create "$PROJECT_ID" --name="YOUR_PROJECT_ID"
gcloud config set project "$PROJECT_ID"
gcloud services enable compute.googleapis.com iam.googleapis.com
11.2 Create a service account for runner VM (GCP)
This service account is the machine identity of the runner. No key file is generated—the VM's attachment to this account at creation time is the identity proof.
gcloud iam service-accounts create opa-runner-sa \
--display-name="OPA Runner Service Account" \
--project="$PROJECT_ID"
Generated service account email: opa-runner-sa@<YOUR_PROJECT_ID>.iam.gserviceaccount.com
1.3 Create runner and target compute instances (GCP)
# Runner VM
gcloud compute instances create runner-vm \
--zone="$ZONE" \
--machine-type=e2-medium \
--image-family=ubuntu-2204-lts \
--image-project=ubuntu-os-cloud \
--service-account=opa-runner-sa@${PROJECT_ID}.iam.gserviceaccount.com \
--scopes=https://www.googleapis.com/auth/cloud-platform \
--tags=opa-runner
# Target VM
gcloud compute instances create target-vm \
--zone="$ZONE" \
--machine-type=e2-medium \
--image-family=ubuntu-2204-lts \
--image-project=ubuntu-os-cloud \
--tags=opa-target
Note: The servers above are set up using “machine-type” : “e2-medium ” and “image-family” : “ubuntu-2204-lts”. You can choose your own machine type and image family.
1.4 Configure firewall rules (GCP)
# Allow internal SSH access from runner to target
gcloud compute firewall-rules create allow-runner-to-target \
--allow=tcp:22 \
--source-tags=opa-runner \
--target-tags=opa-target \
--project="$PROJECT_ID"
# Allow outbound HTTPS from target for OPA agent communication
gcloud compute firewall-rules create allow-egress-opa \
--direction=EGRESS \
--allow=tcp:443 \
--target-tags=opa-target \
--project="$PROJECT_ID"
Step 2: Set up the runner VM (GCP)
The runner VM requires only the sft binary. It is not enrolled to any users in OPA.
# SSH into Runner VM
gcloud compute ssh runner-vm --zone="$ZONE"
# Install dependencies and sft client binary
# Install repository key and add Okta PAM repository
curl -fsSL https://dist.scaleft.com/GPG-KEY-OktaPAM-2023 | gpg --dearmor | sudo tee /usr/share/keyrings/oktapam-2023-archive-keyring.gpg > /dev/null
echo "deb [signed-by=/usr/share/keyrings/oktapam-2023-archive-keyring.gpg] https://dist.scaleft.com/repos/deb $(lsb_release -cs) okta" | sudo tee /etc/apt/sources.list.d/oktapam-stable.list
# Update repository and install SFT client tools
sudo apt-get update && sudo apt-get install -y scaleft-client-tools
# Confirm attached identity proof
curl -sf -H "Metadata-Flavor: Google" "http://metadata.google.internal/computeMetadata/v1/instance/service-accounts/default/email"
# Expected output: opa-runner-sa@opa-workload-demo.iam.gserviceaccount.com
exit
Step 3: Set up the target VM
3.1 Set up OPA dashboard and generate server enrollment token (Okta)
- Go to OPA Dashboard → Resource Administration → Resource Management → Create Resource Group → Create Project or Existing Resource Group → Save
- Name: GCP_Servers_Proj
- Description: GCP target servers for workload demo
- Navigate to GCP_Servers_Proj → Project → Resource Type - Servers → Settings → Enrollment Token → View → Create Enrollment Token
- Select OS: Linux
- Copy generated enrollment token
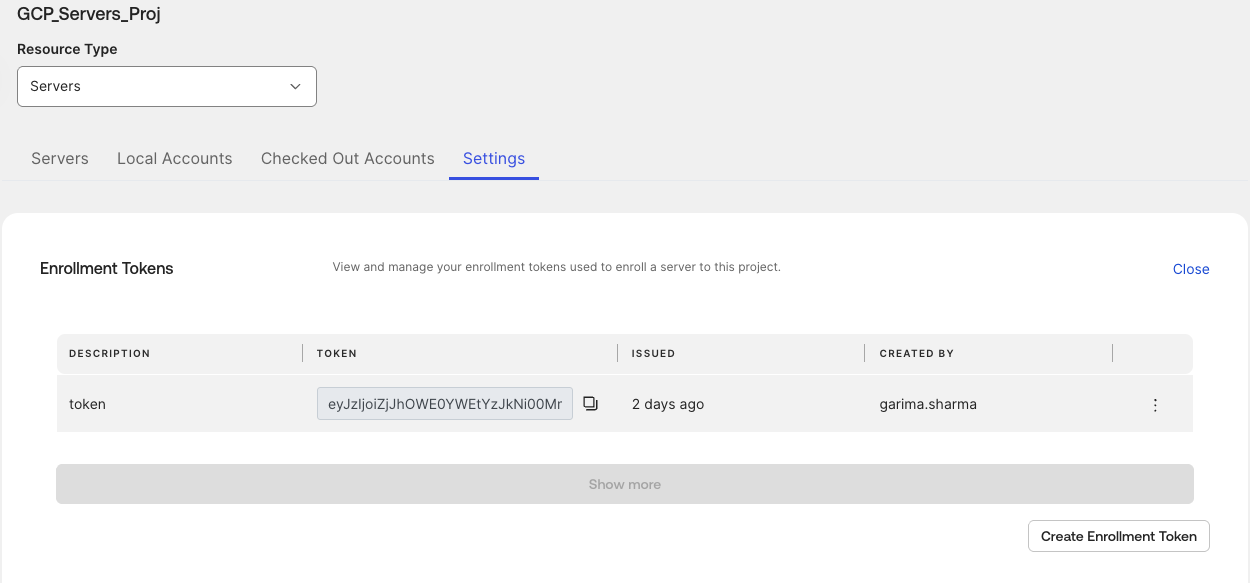
3.2 Install and start sftd agent on target VM (GCP-based)
# SSH into Target VM
gcloud compute ssh target-vm --zone="$ZONE"
# Install dependencies and sftd daemon
# Install repository key and add Okta PAM repository
curl -fsSL https://dist.scaleft.com/GPG-KEY-OktaPAM-2023 | gpg --dearmor | sudo tee /usr/share/keyrings/oktapam-2023-archive-keyring.gpg > /dev/null
echo "deb [signed-by=/usr/share/keyrings/oktapam-2023-archive-keyring.gpg] https://dist.scaleft.com/repos/deb $(lsb_release -cs) okta" | sudo tee /etc/apt/sources.list.d/oktapam-stable.list
# Update repository and install SFT server tools
sudo apt-get update && sudo apt-get install -y scaleft-server-tools
# Save enrollment configuration token
sudo mkdir -p /var/lib/sftd
echo "YOUR_ENROLLMENT_TOKEN_HERE" | sudo tee /var/lib/sftd/enrollment.token > /dev/null
# Restrict file permission for security
sudo chmod 600 /var/lib/sftd/enrollment.token
# Enable & verify daemon status
sudo systemctl enable sftd && sudo systemctl start sftd
sleep 5
sudo systemctl status sftd --no-pager
exit
3.3 Verify enrollment
Check the OPA Dashboard to verify that the status shows Enrolled: OPA Dashboard → GCP_Servers_Proj → Servers → target-vm (Status: Enrolled) ✓
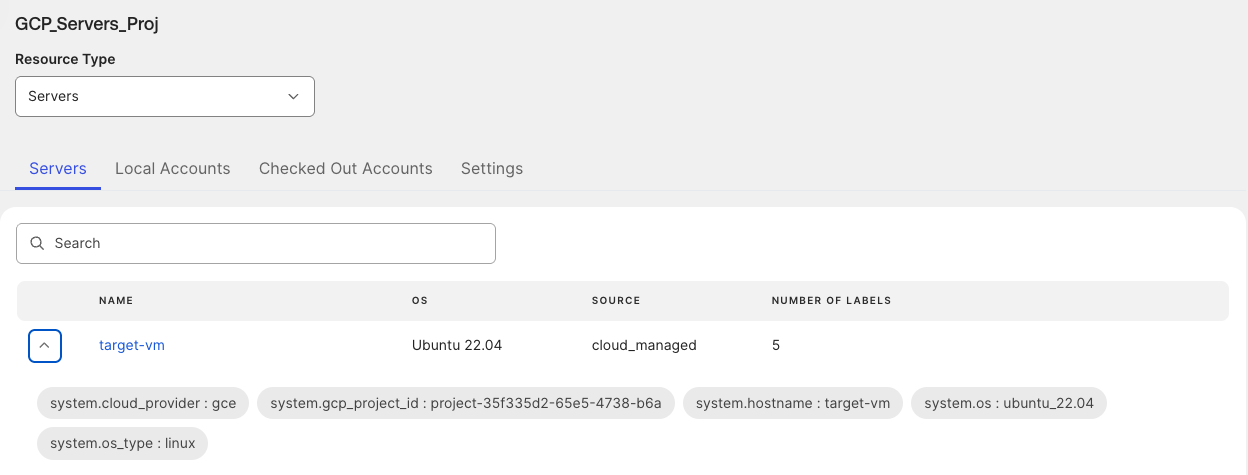
Step 4: Configure OPA workload connection and roles (Okta)
4.1 Create and activate Workload Connection (DevOps admin and security admin)
In the OPA Dashboard, navigate to DevOps Administration → Workload connections → Create Workload Connection.
Choose Google Cloud Provider.
Enter app client ID details:
App client ID: Enter your app client ID (the service account created in the previous step inside the GCP project)
Check Scope to Email (Email is auto-generated)
Define parameters:
Connection name: OKTA-OPA-Demo
Token TTL: 3600 seconds
Required claims: aud = [https://YOUR-TEAM.pam.okta.com] and iss = [https://accounts.google.com]
Click Create Workload Connection.
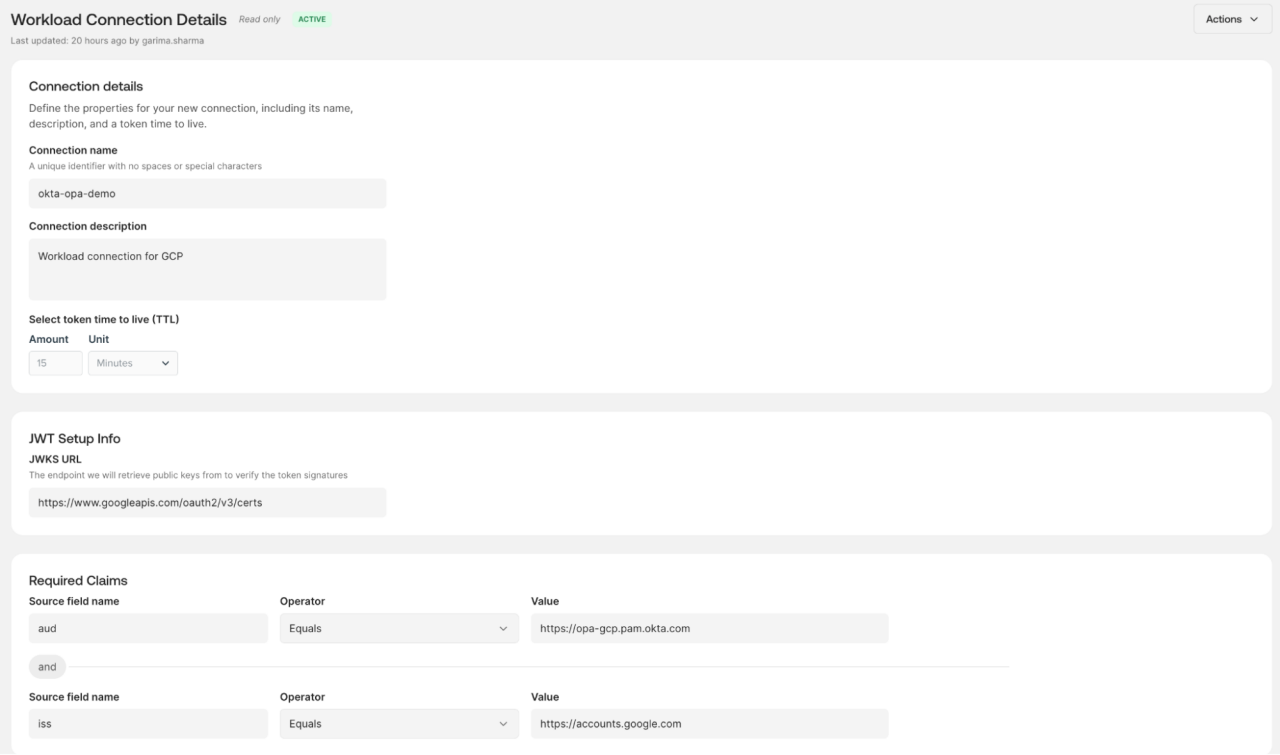
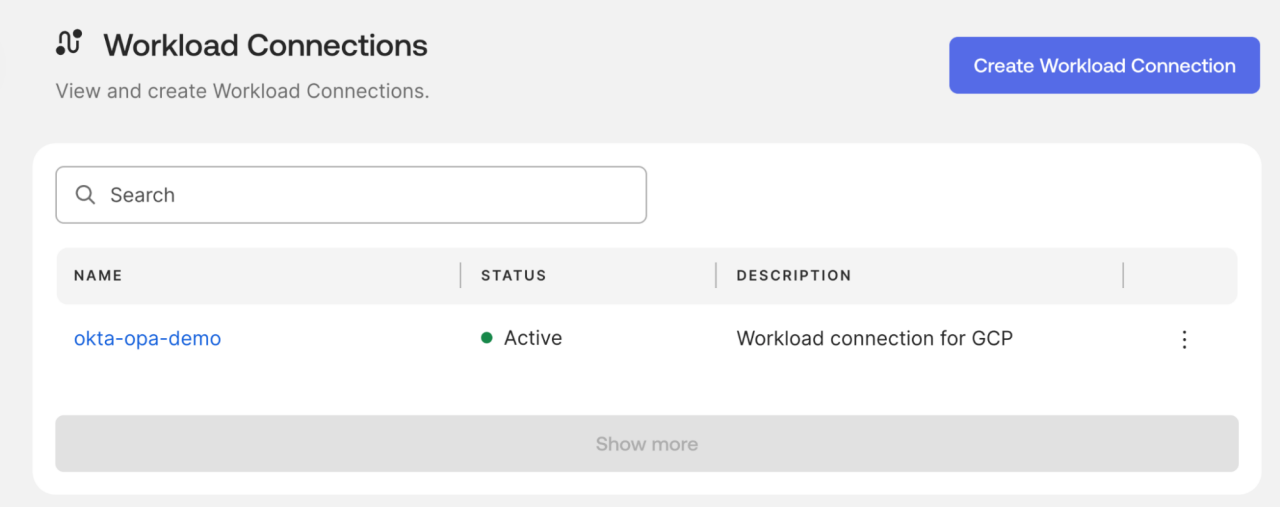
- Switch to DevOps administrator: Open OKTA-OPA-Demo → Actions → Activate.
4.2 Create workload role (Security admin)
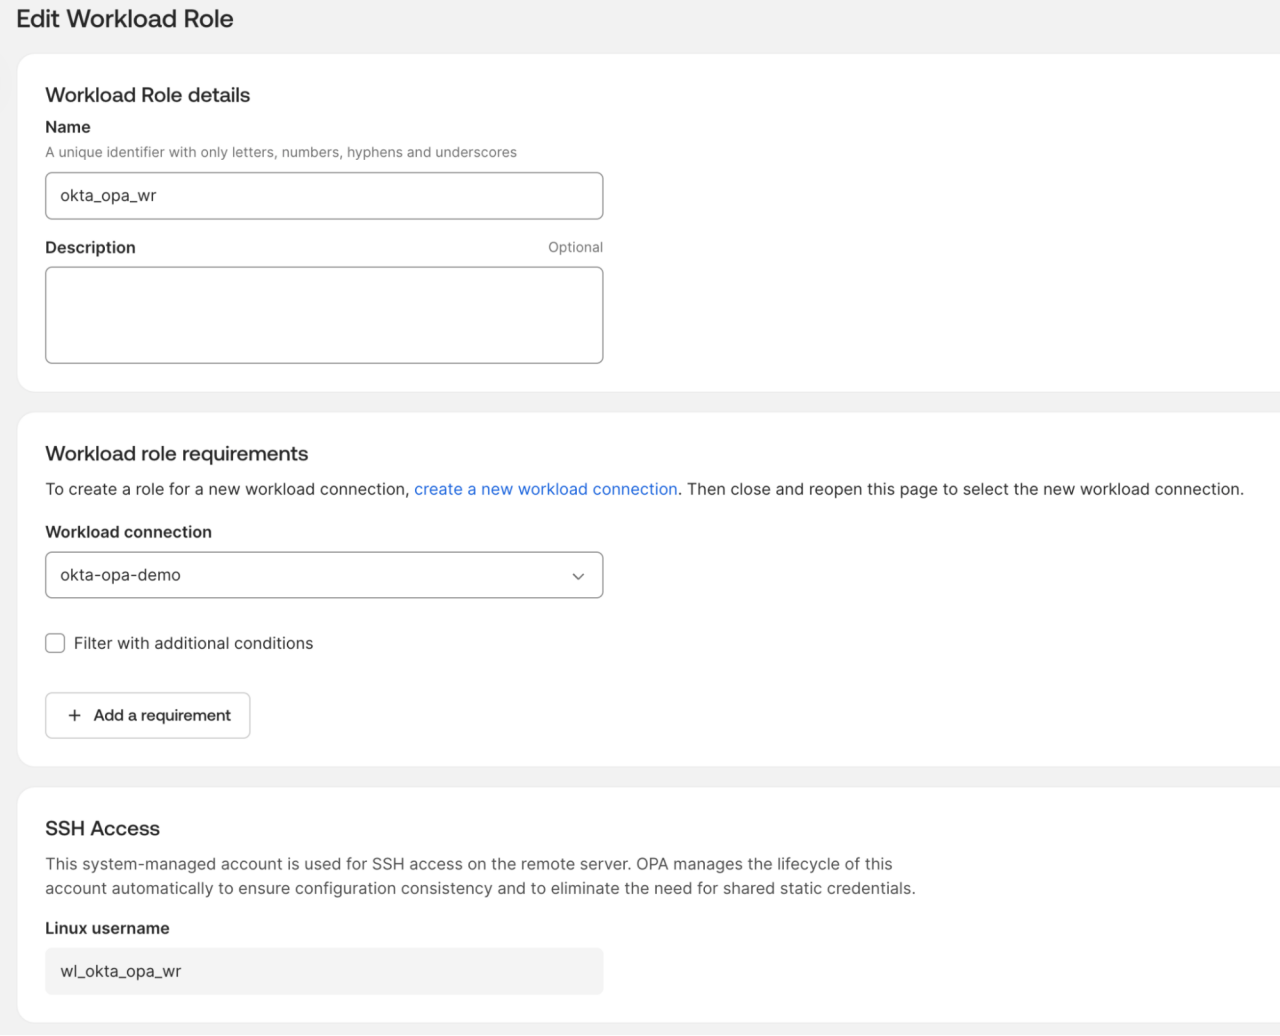
Go to Security Administration → Workload roles → Create Workload Role.
Configure attributes:
Name: OKTA-OPA-WR
Workload connection: OKTA-OPA-Demo
Click Save Workload Role. OPA assigns an automatic Linux username (wl_okta_opa_wr).
4.3 Configure policy and rules (Security admin)
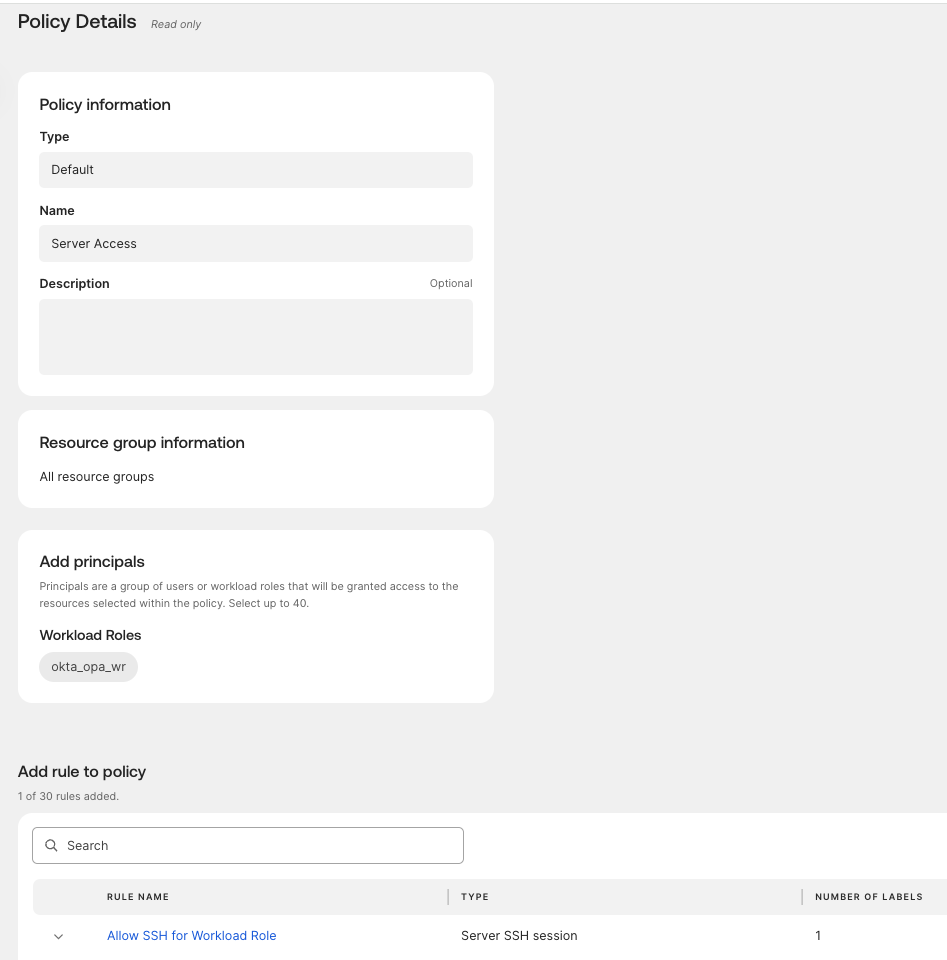
Go to Security Administration → Policies → Create Policy → Default
Name: NHI Server Access
Select resource groups: All resource groups
Under Add principals, add Workload Role OKTA-OPA-WR.
Under Add rule to policy, select Server Rule:
Rule name: Allow SSH for Workload Role
Session type: Server SSH session
Accounts: Enable Select accounts by name → Target: target-vm / root
Crucial: Do NOT enable MFA or Access Requests (headless jobs cannot answer interactive prompts).
Click Save Policy, and then go to Actions → Publish.
Step 5: Verify and test execution (GCP-based)
5.1 Prepare the verification automation script
SSH back into runner-vm and prepare the automation script:
gcloud compute ssh runner-vm --zone="$ZONE"
#!/bin/bash
#
# OPA Workload Identity Demo Script
# Based on: Okta Privileged Access - Introduction to Workload Identities
#
# ─── SET ENVIRONMENT VARIABLES ───────────────────────────────────────────────
# Audience = your OPA address (must match aud claim OPA expects)
AUDIENCE="https://opa-gcp.pam.okta.com"
# GCP metadata URL to get the JWT
METADATA_URL="http://metadata.google.internal/computeMetadata/v1/instance/service-accounts/default/identity?audience=${AUDIENCE}&format=full"
# OPA team and address (sft reads these from environment)
export SFT_TEAM="opa-gcp"
export OPA_ADDR="https://demo-opa-gcp-demo.pam.okta.com"
# Names must match exactly what you created in the OPA dashboard
CONNECTION_NAME="okta-opa-demo"
ROLE_NAME="okta_opa_wr"
# Target server name (as enrolled in OPA — the hostname)
TARGET_SERVER="target-vm"
# ─── STEP 1: GET GCP IDENTITY JWT ────────────────────────────────────────────
echo "------------------------------------------------------------"
echo "STEP 1: Getting JWT from GCP metadata server"
echo "------------------------------------------------------------"
ID_TOKEN=$(curl -s -H "Metadata-Flavor: Google" "$METADATA_URL" | tr -d '\n\r')
if [[ "$ID_TOKEN" == eyJ* ]]; then
GCP_JWT="$ID_TOKEN"
# Decode and show the validity window
PAYLOAD=$(echo "$GCP_JWT" | cut -d. -f2 | base64 --decode 2>/dev/null)
EXP=$(echo "$PAYLOAD" | jq -r '.exp')
ISS=$(echo "$PAYLOAD" | jq -r '.iss')
EMAIL=$(echo "$PAYLOAD" | jq -r '.email')
NOW=$(date +%s)
DIFF=$((EXP - NOW))
echo "Issuer : $ISS"
echo "Email : $EMAIL"
echo "Audience : $AUDIENCE"
echo ""
echo "VALUE OF GCP_JWT:"
echo "${GCP_JWT:0:80}... (truncated)"
echo ""
echo "Success: JWT obtained."
echo "Token is valid for another $DIFF seconds (approx $((DIFF / 60)) minutes)."
else
echo "ERROR: Failed to fetch JWT from metadata server."
echo "Ensure this script is running on a GCP VM with a service account attached."
exit 1
fi
# Export for use by sft
export GCP_TOKEN="$GCP_JWT"
echo ""
# ─── STEP 2: EXCHANGE GCP JWT FOR OPA TOKEN ──────────────────────────────────
echo "------------------------------------------------------------"
echo "STEP 2: Authenticating workload with OPA to get OPA_TOKEN"
echo "------------------------------------------------------------"
echo "Running:"
echo "sft wl authenticate --team $SFT_TEAM \\"
echo " --connection $CONNECTION_NAME \\"
echo " --role-hint $ROLE_NAME \\"
echo " --jwt-env GCP_TOKEN"
echo ""
OPA_TOKEN=$(sft wl authenticate \
--team "$SFT_TEAM" \
--connection "$CONNECTION_NAME" \
--role-hint "$ROLE_NAME" \
--jwt-env GCP_TOKEN 2>&1 | tr -d '\n\r')
export OPA_TOKEN
if [[ "$OPA_TOKEN" == *"error"* ]] || [[ -z "$OPA_TOKEN" ]]; then
echo "ERROR: Failed to obtain OPA_TOKEN."
echo "Detail: $OPA_TOKEN"
echo ""
echo "Checklist:"
echo " 1. Is the Workload Connection status ACTIVE (not Draft)?"
echo " 2. Does the connection name '$CONNECTION_NAME' match exactly?"
echo " 3. Does the aud claim equal '$AUDIENCE'?"
echo " 4. Does the email claim match the SA in the Workload Connection?"
exit 1
else
echo "SUCCESS: OPA_TOKEN obtained."
echo ""
echo "VALUE OF OPA_TOKEN:"
echo "${OPA_TOKEN:0:80}... (truncated)"
fi
echo ""
# ─── STEP 3: USE OPA TOKEN TO ACCESS THE TARGET SERVER ───────────────────────
echo "------------------------------------------------------------"
echo "STEP 3: Testing OPA_TOKEN with sft commands"
echo "------------------------------------------------------------"
echo ""
echo "3a. Listing servers this workload can access:"
sft list-servers
echo ""
echo "3b. Connecting to $TARGET_SERVER as root and running a command:"
sft ssh --command "hostname && whoami && date && echo 'Workload access SUCCESS'" \
"$TARGET_SERVER"
echo ""
echo "------------------------------------------------------------"
echo "DONE: Workload identity demo complete."
echo "Check Okta system log for two events:"
echo " 1. Token exchange (authentication)"
echo " 2. SSH login to server"
echo "------------------------------------------------------------"
5.2 Run the automation script
Run the automation script:
$ bash ~/opa-workload-test.sh
5.3 Expected output and audit logs
Upon execution, the terminal returns:
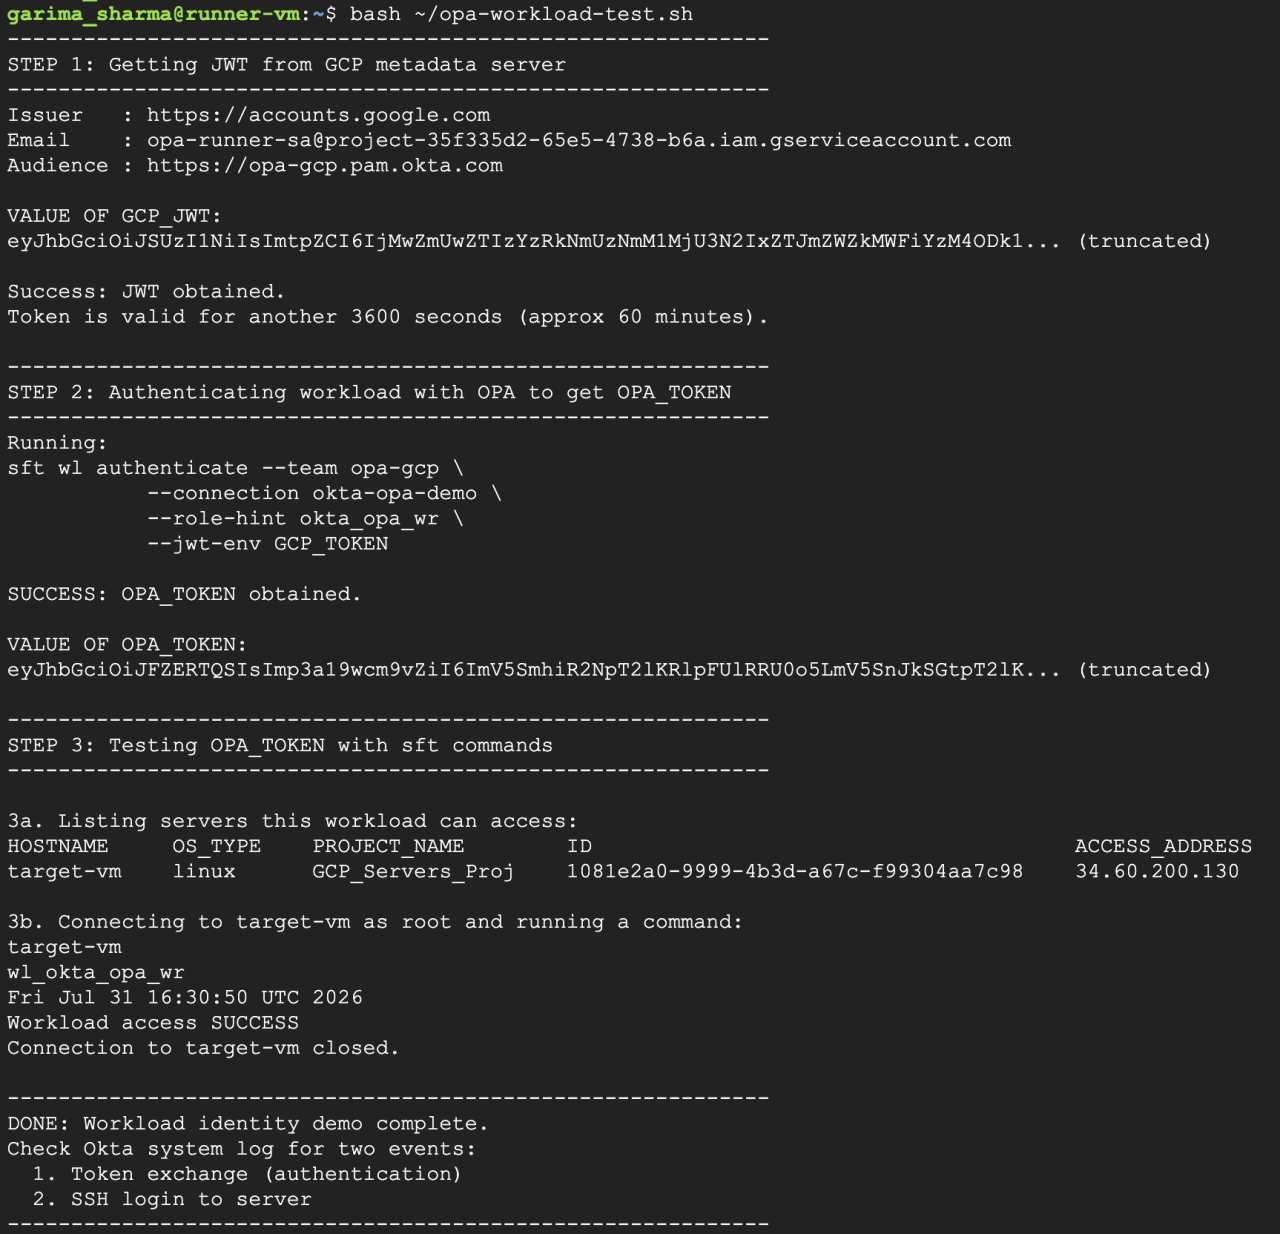
The output demonstrates a complete zero-credential SSH authentication flow in three steps:
GCP identity retrieval: The runner VM requests a platform-signed JWT directly from Google Cloud metadata (accounts.google.com) for service account opa-runner-sa, establishing its identity without stored secrets.
SToken exchange: The script passes the GCP JWT to Okta Privileged Access through sft wl authenticate. OPA verifies Google's cryptographic signature and issues an OPA_TOKEN mapped to the okta_opa_wr role.
Passwordless execution: OPA discovers target-vm and uses a time-based ephemeral SSH certificate to execute commands on the remote server.
The target server's response displays its hostname (target-vm), system-assigned workload user (wl_okta_opa_wr), and execution timestamp. This confirms full, auditable SSH access driven entirely by runtime platform proofs rather than static keys.
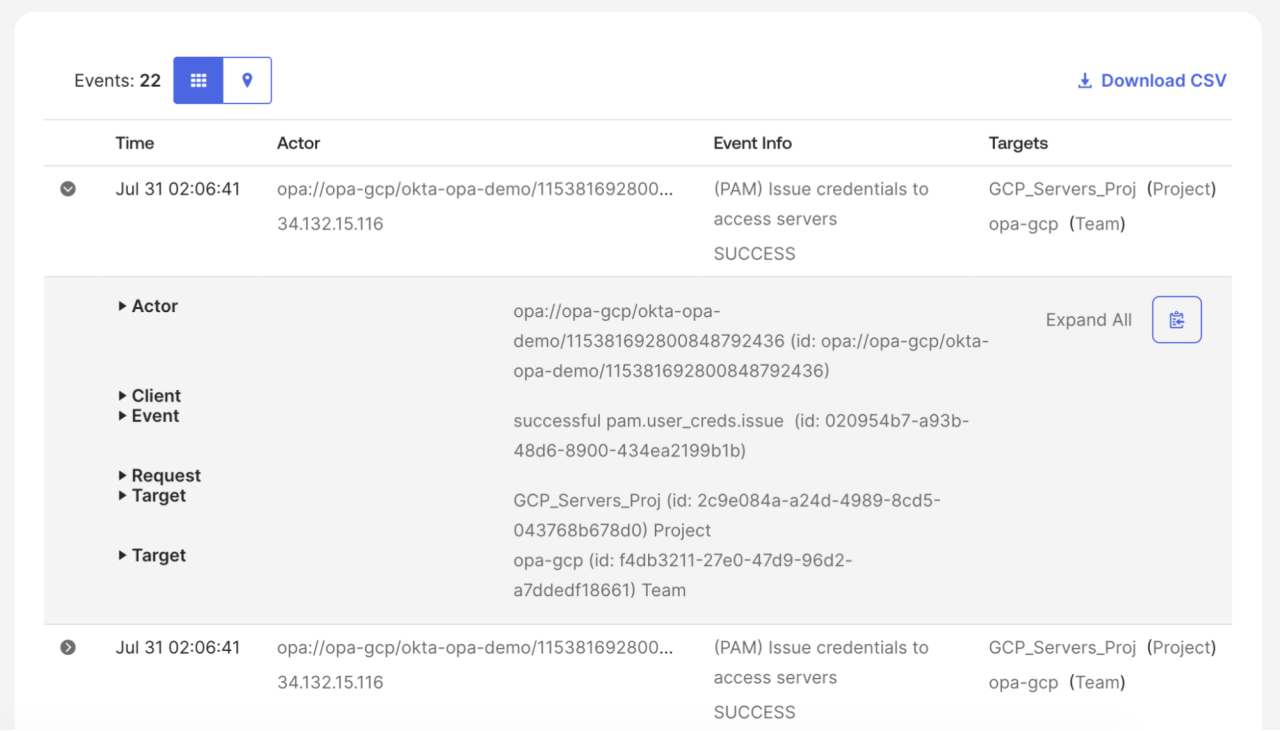
Auditability and system logs
Every authentication cycle generates structured events in the Okta System Log (Okta Admin Console → Reports → System Log).
You can apply the following filter to view the required system logs:
eventType eq "pam.user_creds.issue" and actor.type eq "WorkloadPrincipal"
Eliminate static secrets from your automation infrastructure
By replacing permanent SSH keys and service account files with cryptographic, platform-signed identity proofs, your security and engineering teams can achieve true zero-trust server access without interrupting automation pipelines. Okta Privileged Access simplifies non-human identity and access management by uniting dynamic workload federation, ephemeral certificate issuance, and comprehensive auditability into a single control plane.
Explore how Okta Privileged Access secures machine and human identities across all your cloud resources.


