


This tutorial will teach you how to build an automation that runs only when a user is added to a particular group using an Event Hook with a filter.
Notify when a user is added to a group
Before starting the tutorial, let’s review how you would do without an Event Hook.
Use the User Added to Group event
The following flow shows how to add a user to a group using the Okta—User Added to Group event card.
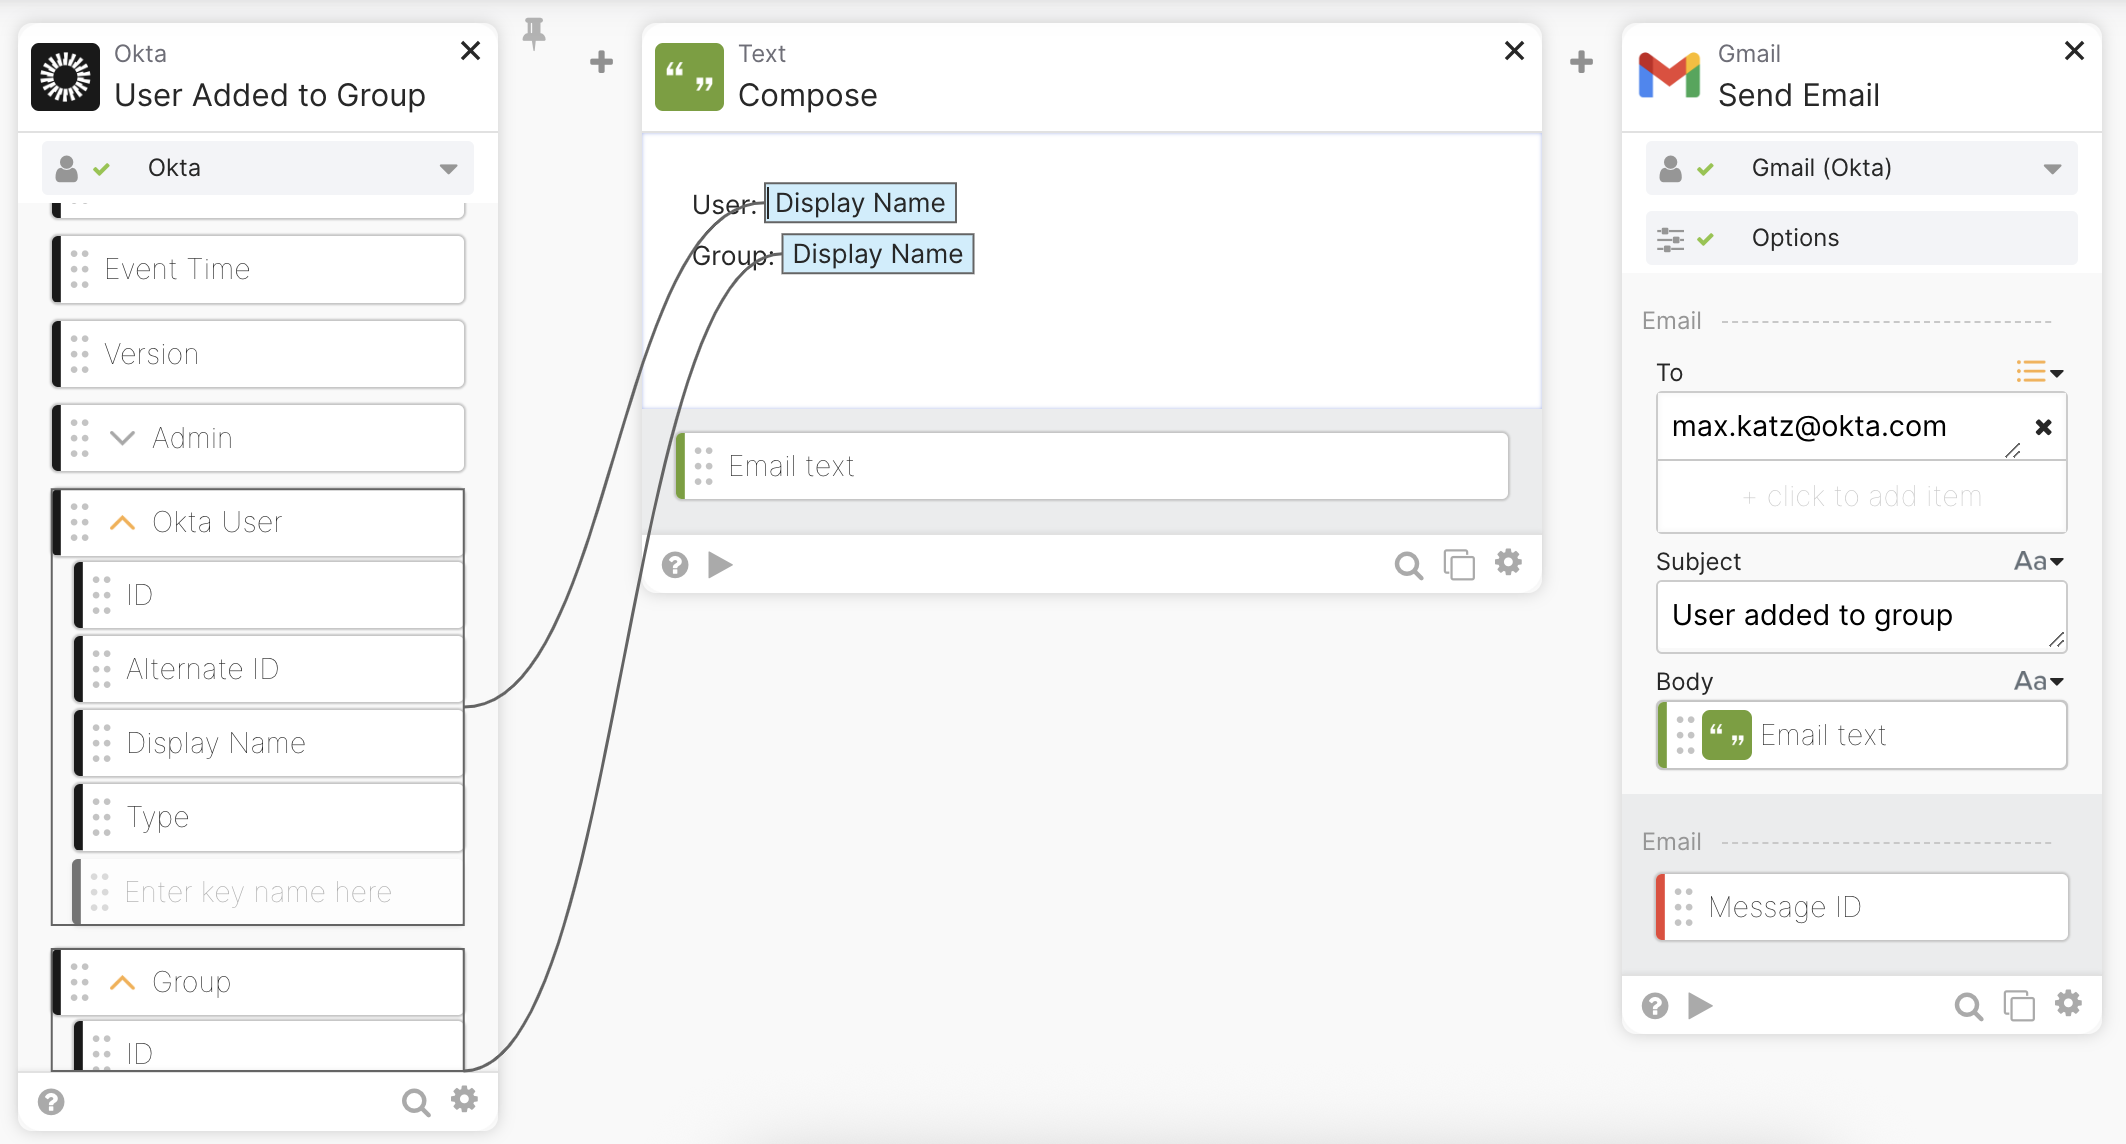
User added to a group flow.
This solution works, but it will run when a user is added to any group. You must create a flow that runs only when a user is added to a specific group.
You can modify the flow to check if a user is added to a specific group. The flow will continue if a user is added to the Automation Learners group. If not the exact group, then stop the flow.`
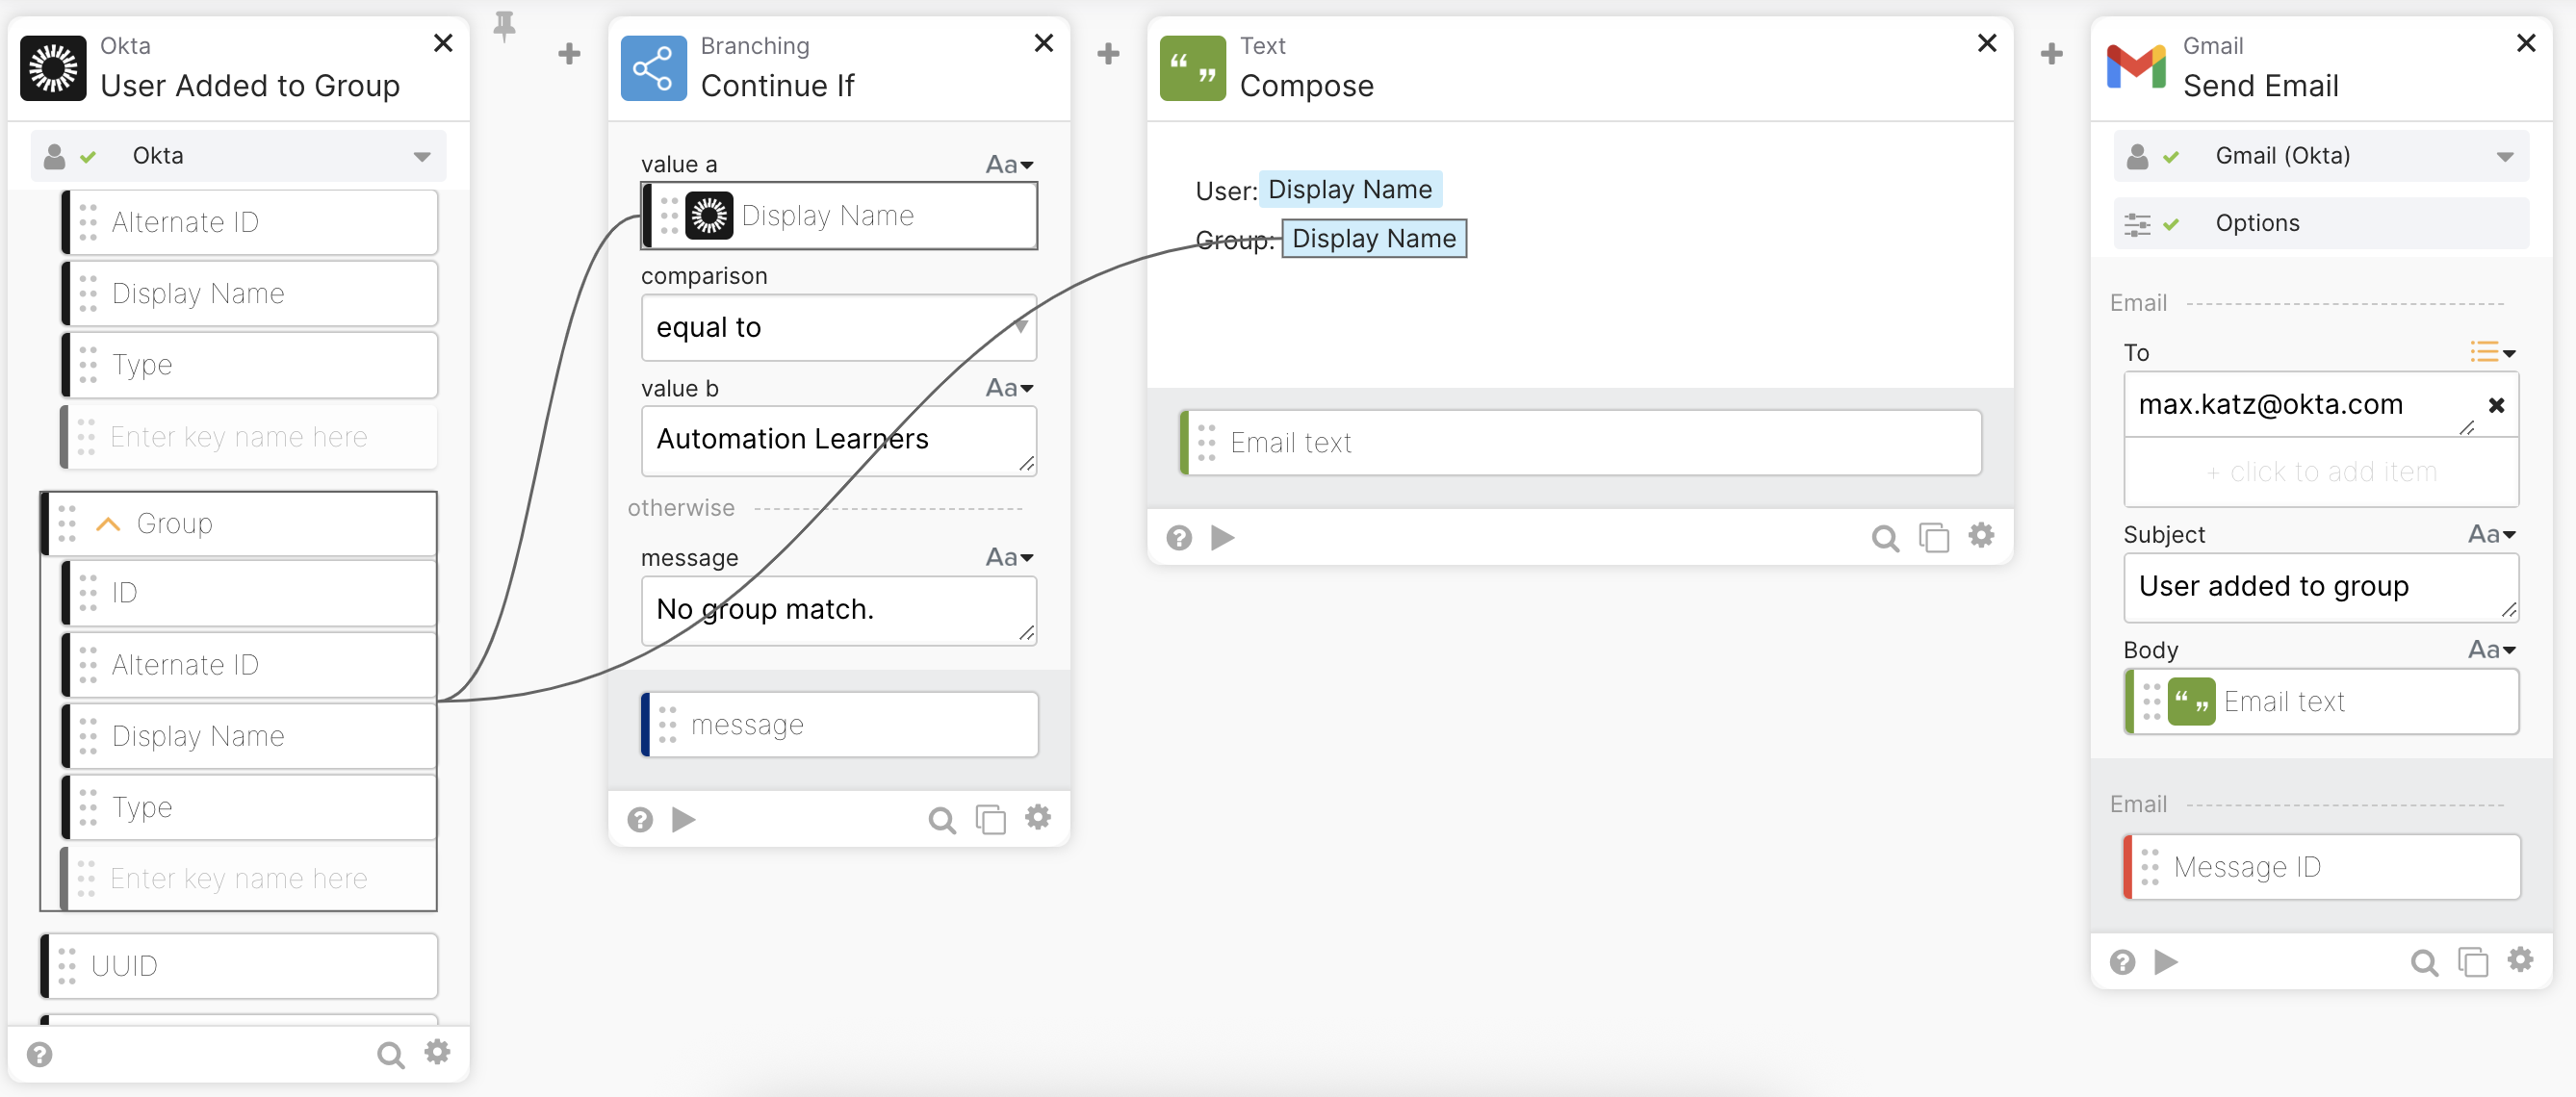
User added to a group with group check flow.
The above solution requires extra logic to check for the group and will not prevent the flow from running whenever a user is added.
The group check logic will prevent the flow from continuing to run if the user is not added to the right group; however, the flow will still run every time a user is added to any group.
Using an event hook with a filter allows you to check for the group before triggering a flow.
Set up an event hook with a filter
An Okta event hook works like a webhook. The event hook allows it to call an API endpoint when an event occurs. You can invoke a Workflows flow via an API endpoint. You will use the Invoke a flow with an API endpoint capability to run a flow when an event occurs in Okta.
Create a flow
- Open Workflows.
- Click New Flow inside a folder to create a new flow.
- Enter Notify user added to group for Flow name.
- Enter This flow sends a notification when a user is added to the Automation Learners group, for the Description. You can use any other group name.
- Check Save all data that passes through the Flow?
- Click Save to create a flow.
Set up as an API endpoint
The API Endpoint card allows you to create a flow invoked through a URL.
- Click Add event and select API Endpoint from the Built-in triggers.
- Select Secure with client token under Security level in the API endpoint settings.
- Click Close and then save the flow.
- Click </> at the bottom of the API Endpoint card. You will see the URL you can use to invoke this flow.
- Click copy for Invoke URL. You will need this URL in the next step.
- Click Close.
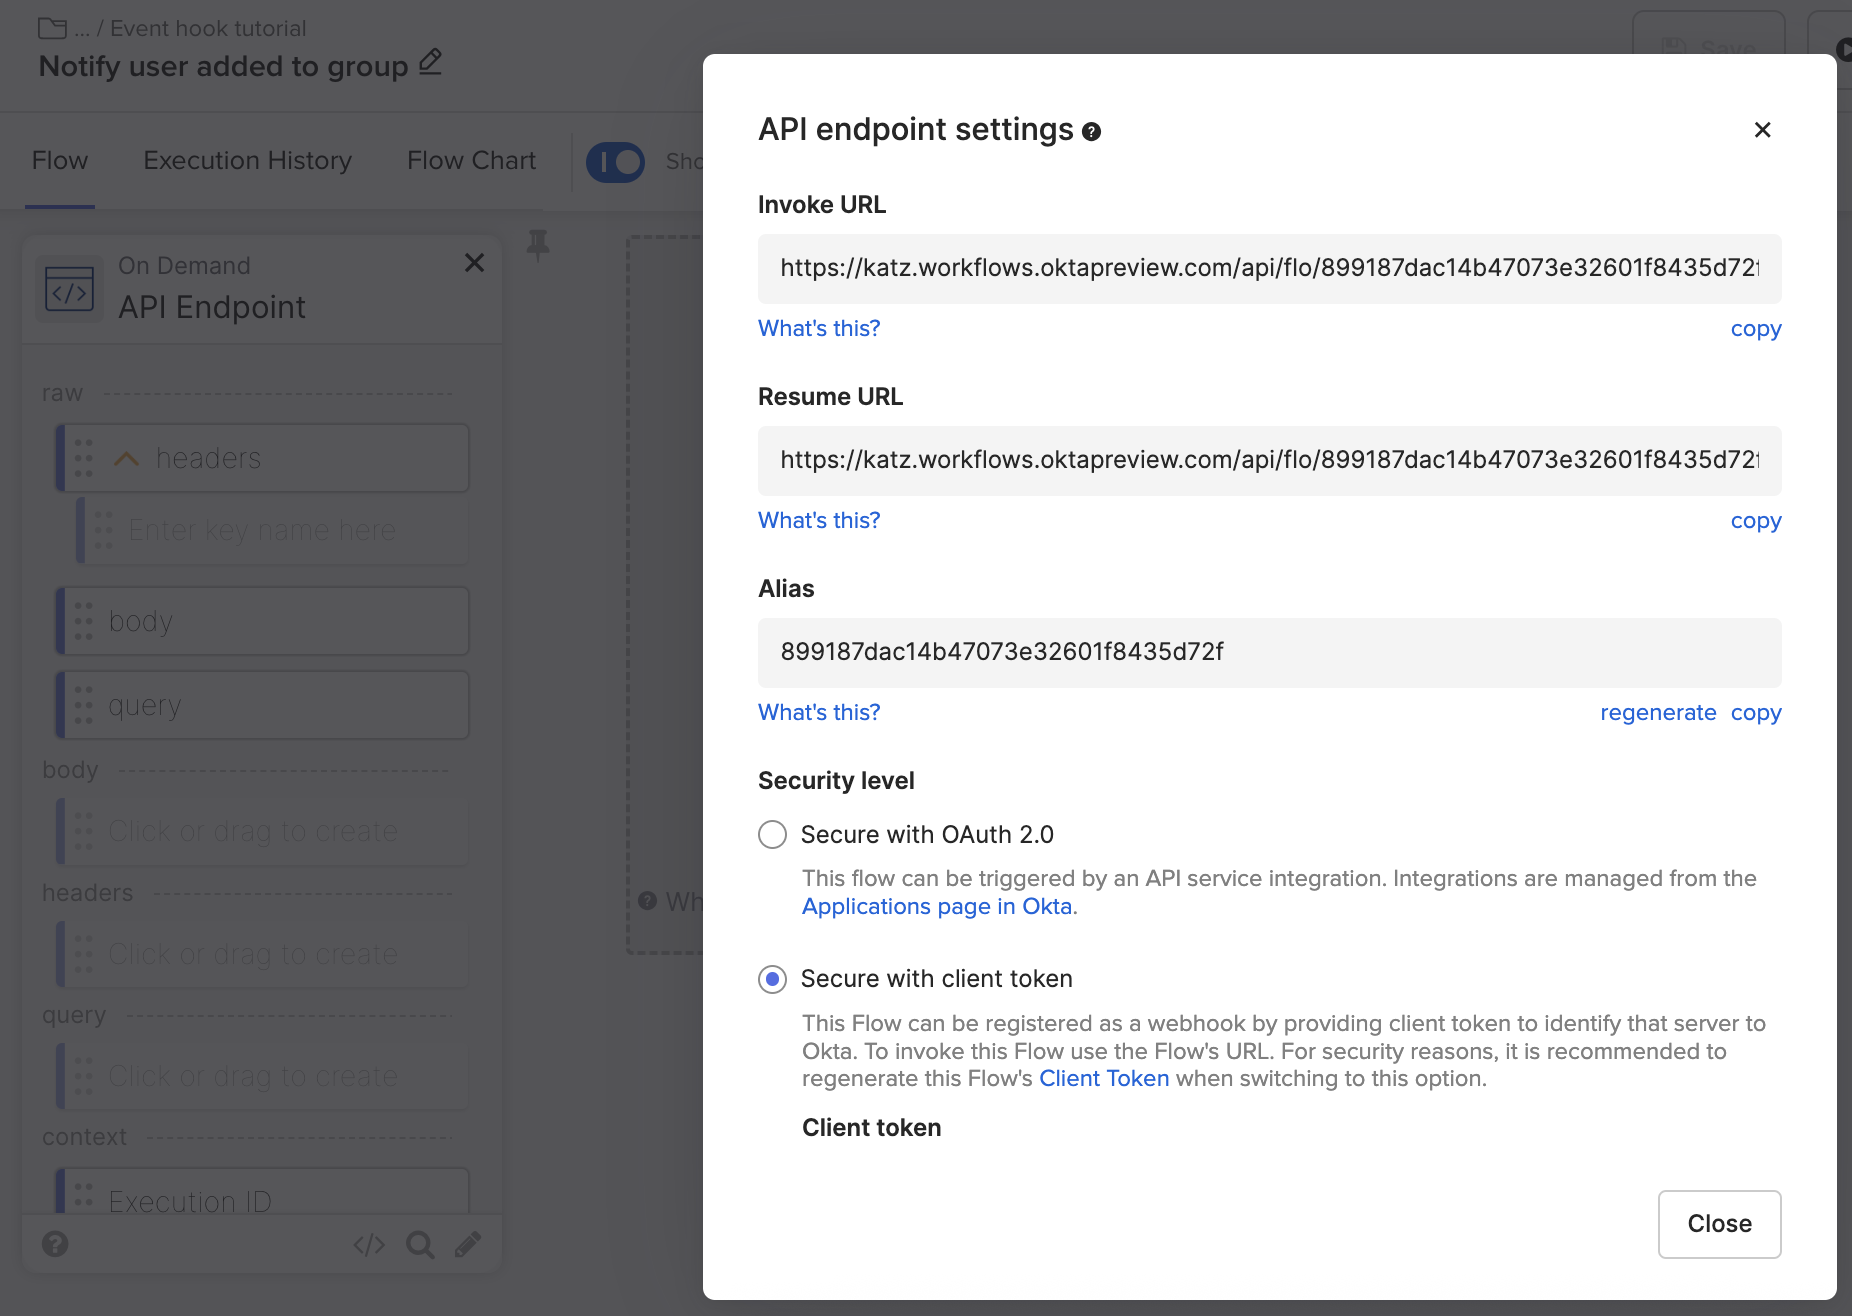
API endpoint settings.
This is sufficient to create and test an event hook. After you set up the event hook, you will finish building the flow.
Create Event Hook
- Open the Okta Admin Console.
- Open Workflow > Event Hook.
- Click Create Event Hook.
- Paste the Invoke URL from the previous step into the Endpoint URL field.
- Enter New user in Automation Learners group for the Event Hook name.
- Enter Call a flow to notify when a user is added to the Automation Learners group for the Description.
- Scroll to the end of the page and set the User added to group event under Select Events.
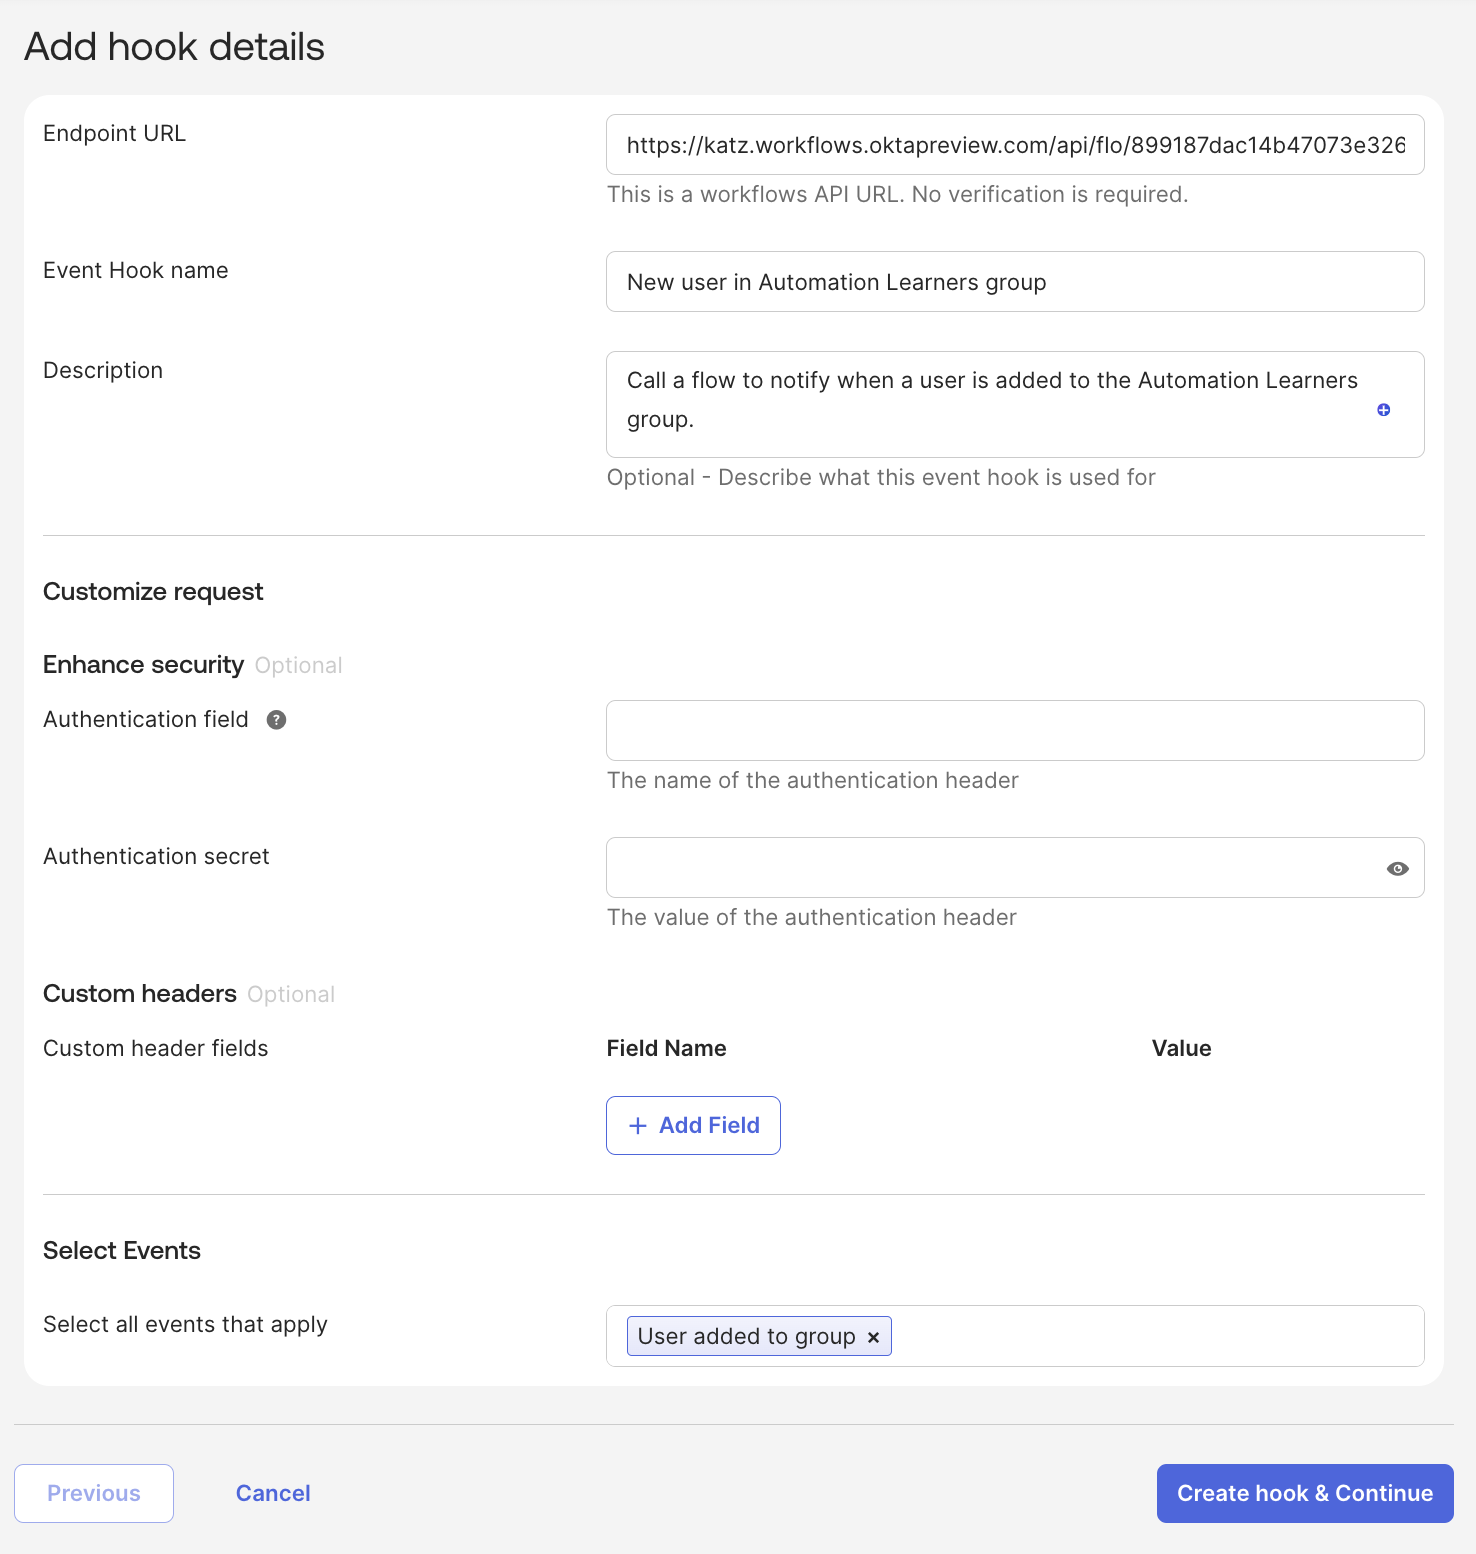
Event Hook settings.
- Click Create hook & Continue.
Apply a filter to Event Hook
In this step, you will apply an event hook filter so that the flow runs only when a user is added to the Automation Learners group. Without the filter, the event hook would run when a user is added to any group.
- Check Apply filter.
- Event Hook Filtering is an Early Access release. You can enable it in Settings > Features in your Okta Admin Console.
- You will build the filter query in this step.
- Select target.displayName for the Field.
- Enter Automation Learners for the Value. If you used a different group name, enter it here.
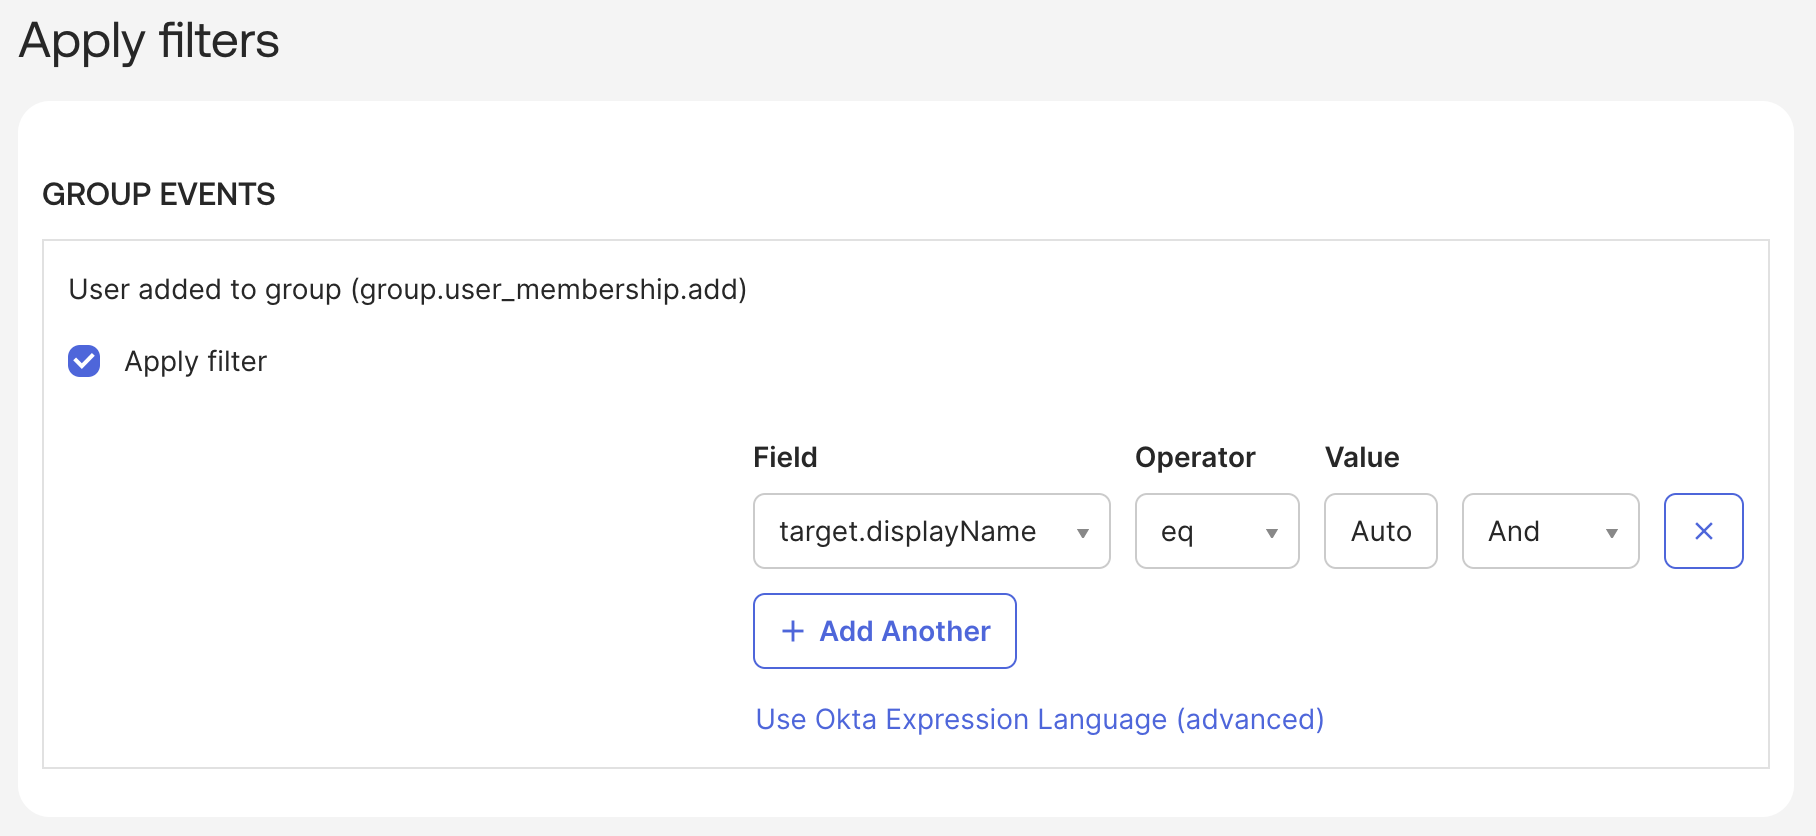
Event Hook filter.
- Click Save & Continue to go to the next page.
To see or modify the filter expression directly, click Use Okta Expression Language (advanced).

Event Hook filter advanced editing.
Preview the Event Hook
You can preview and test the Event Hook in this step.
- Select the User added to the group event from Event Type.
- Select an event (date) for System Log Event. If no events are available, the preview uses sample JSON.
- Click Deliver Request to test the Event Hook. The Event Hook preview function bypasses any event hook filters.
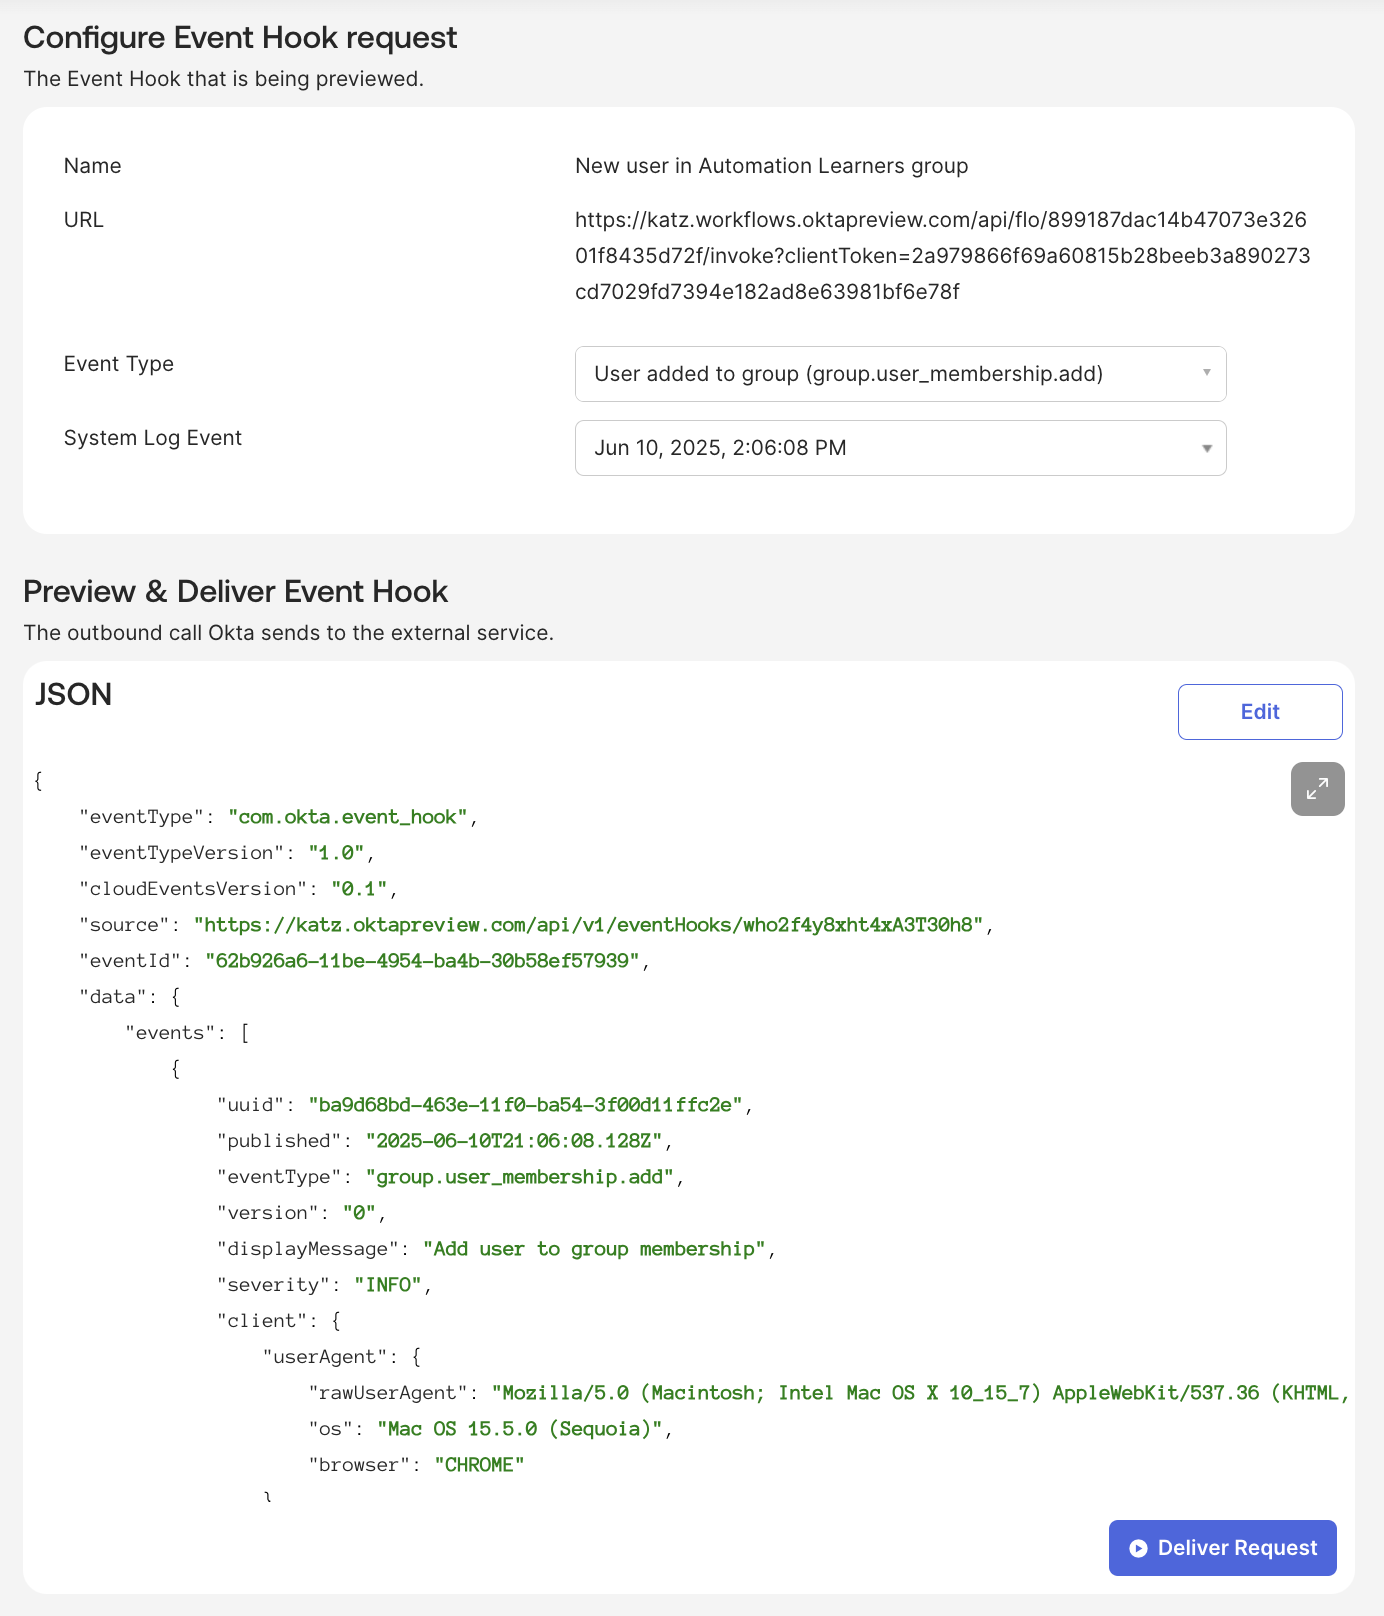
Event Hook preview and test.
- Return to the flow and open the Execution History view. You will see the execution you triggered from the Event Hook preview page.
- Return to the Event Hook set up and click Next.
- You don’t need to verify the endpoint since it’s an Okta Workflows API endpoint. Click Do it later.
In the next section, you will finish building the flow to send a notification.
Finish building the notification flow
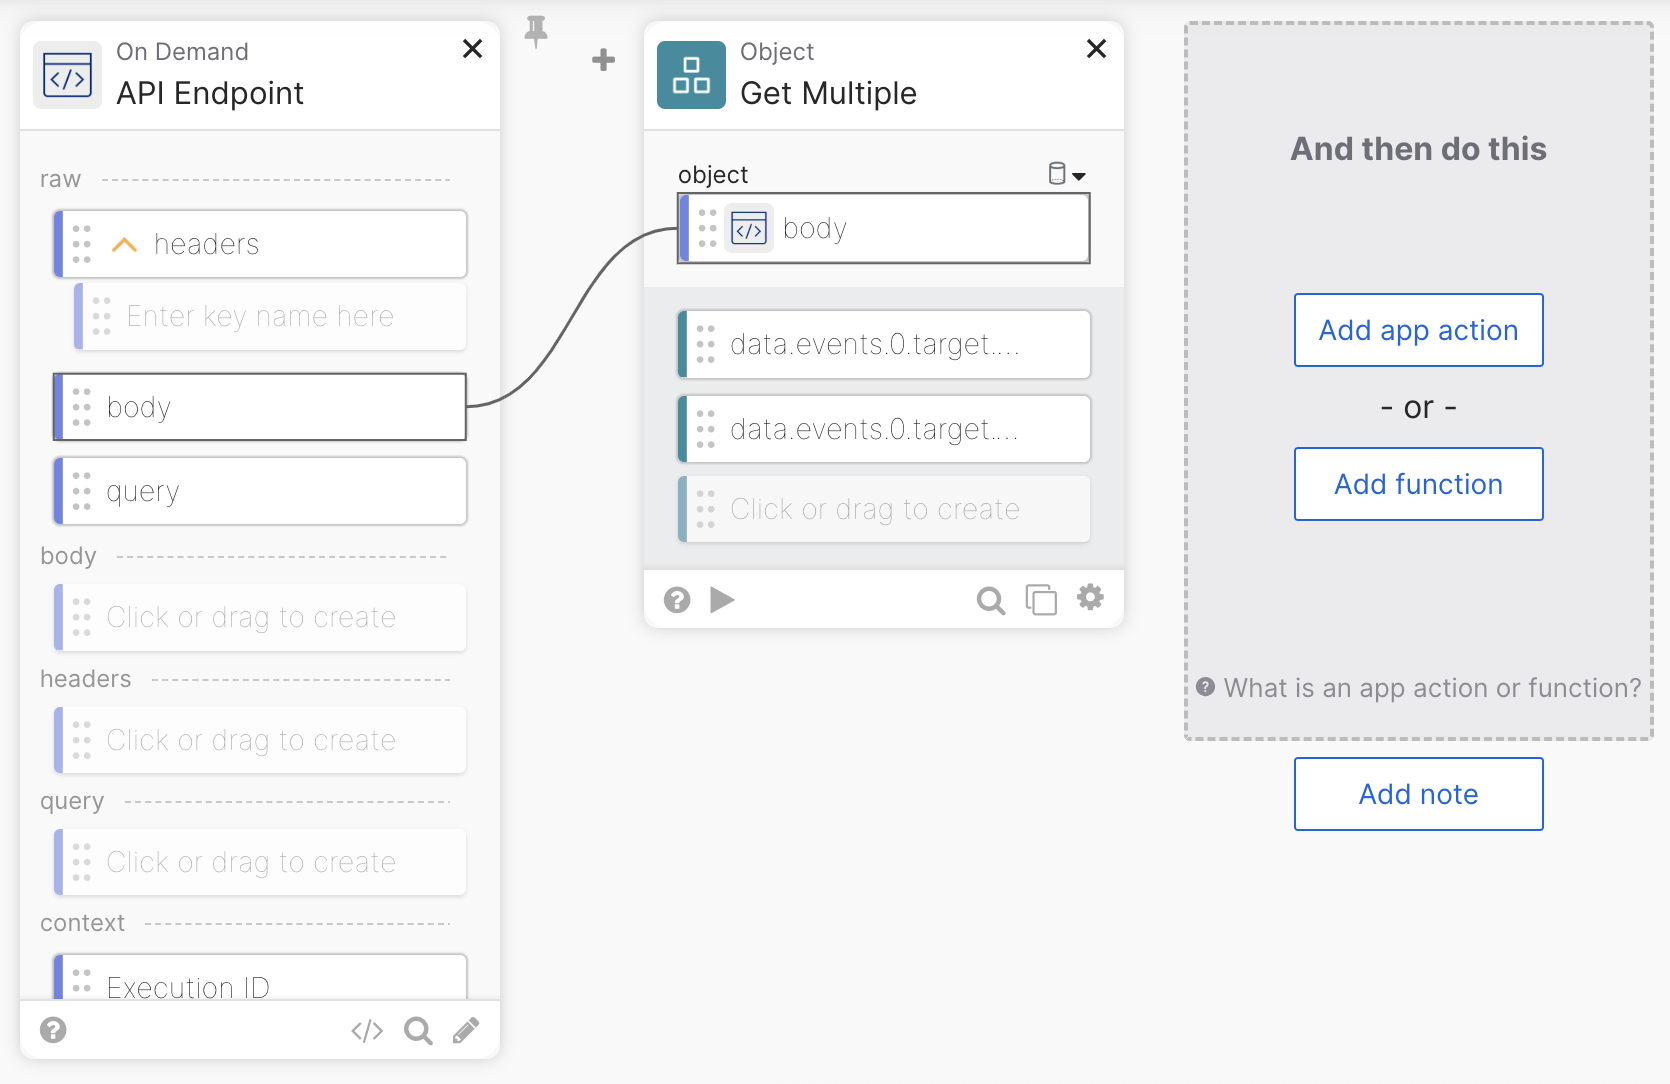
The API Endpoint card's body field contains information about the user and group. To use that information, you must first extract it, create a message, and send an email.
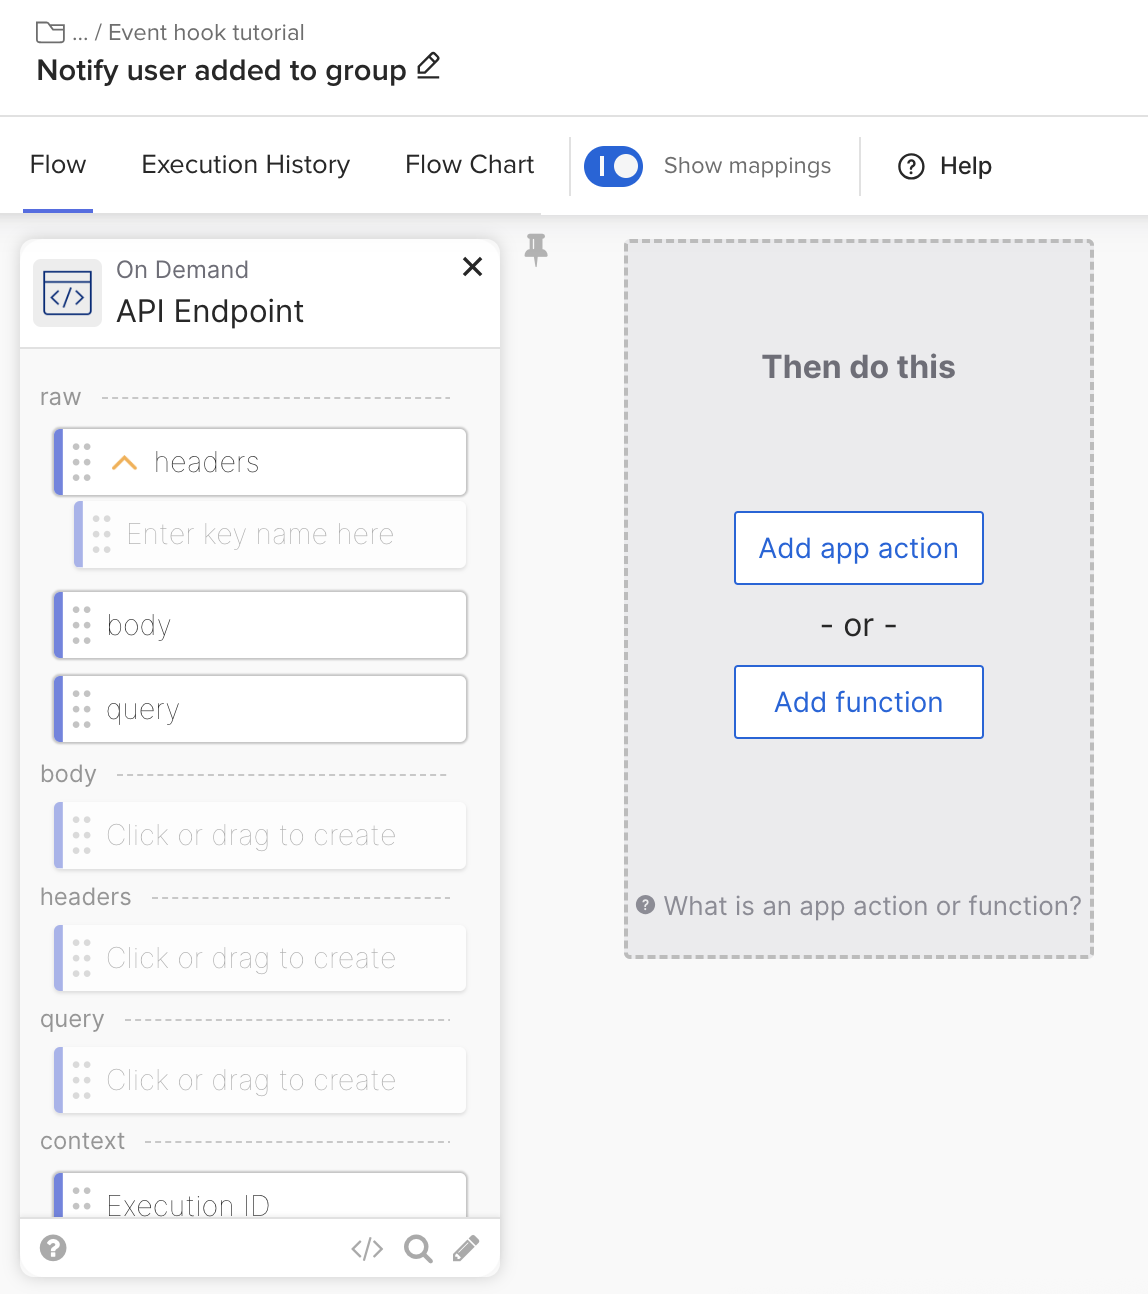
Flow with API Endpoint.
Extract user and group information
- Return to the flow and click Add function.
- Select Get Multiple from the Object category. The Object – Get Multiple card allows extracting multiple keys from a JSON object.
- Connect the body field from the API Endpoint to the object field in the Get Multiple card.
- Click in the Get Multiple card's output area and enter a key to extract the user’s display name and the group’s display name from the body field.
- data.events.0.target.0.displayName
- data.events.0.target.1.displayName
- This is an optional step. You can test how the Get Multiple card works.
- Copy the body field JSON (inside the field, click the arrows in the upper right corner to expand the JSON).
- Click the Get Multiple card’s ▶️ button.
- Paste the JSON into the object field.
- Click Run to test.
- You will see the values for the two keys on the right side of the Run window.
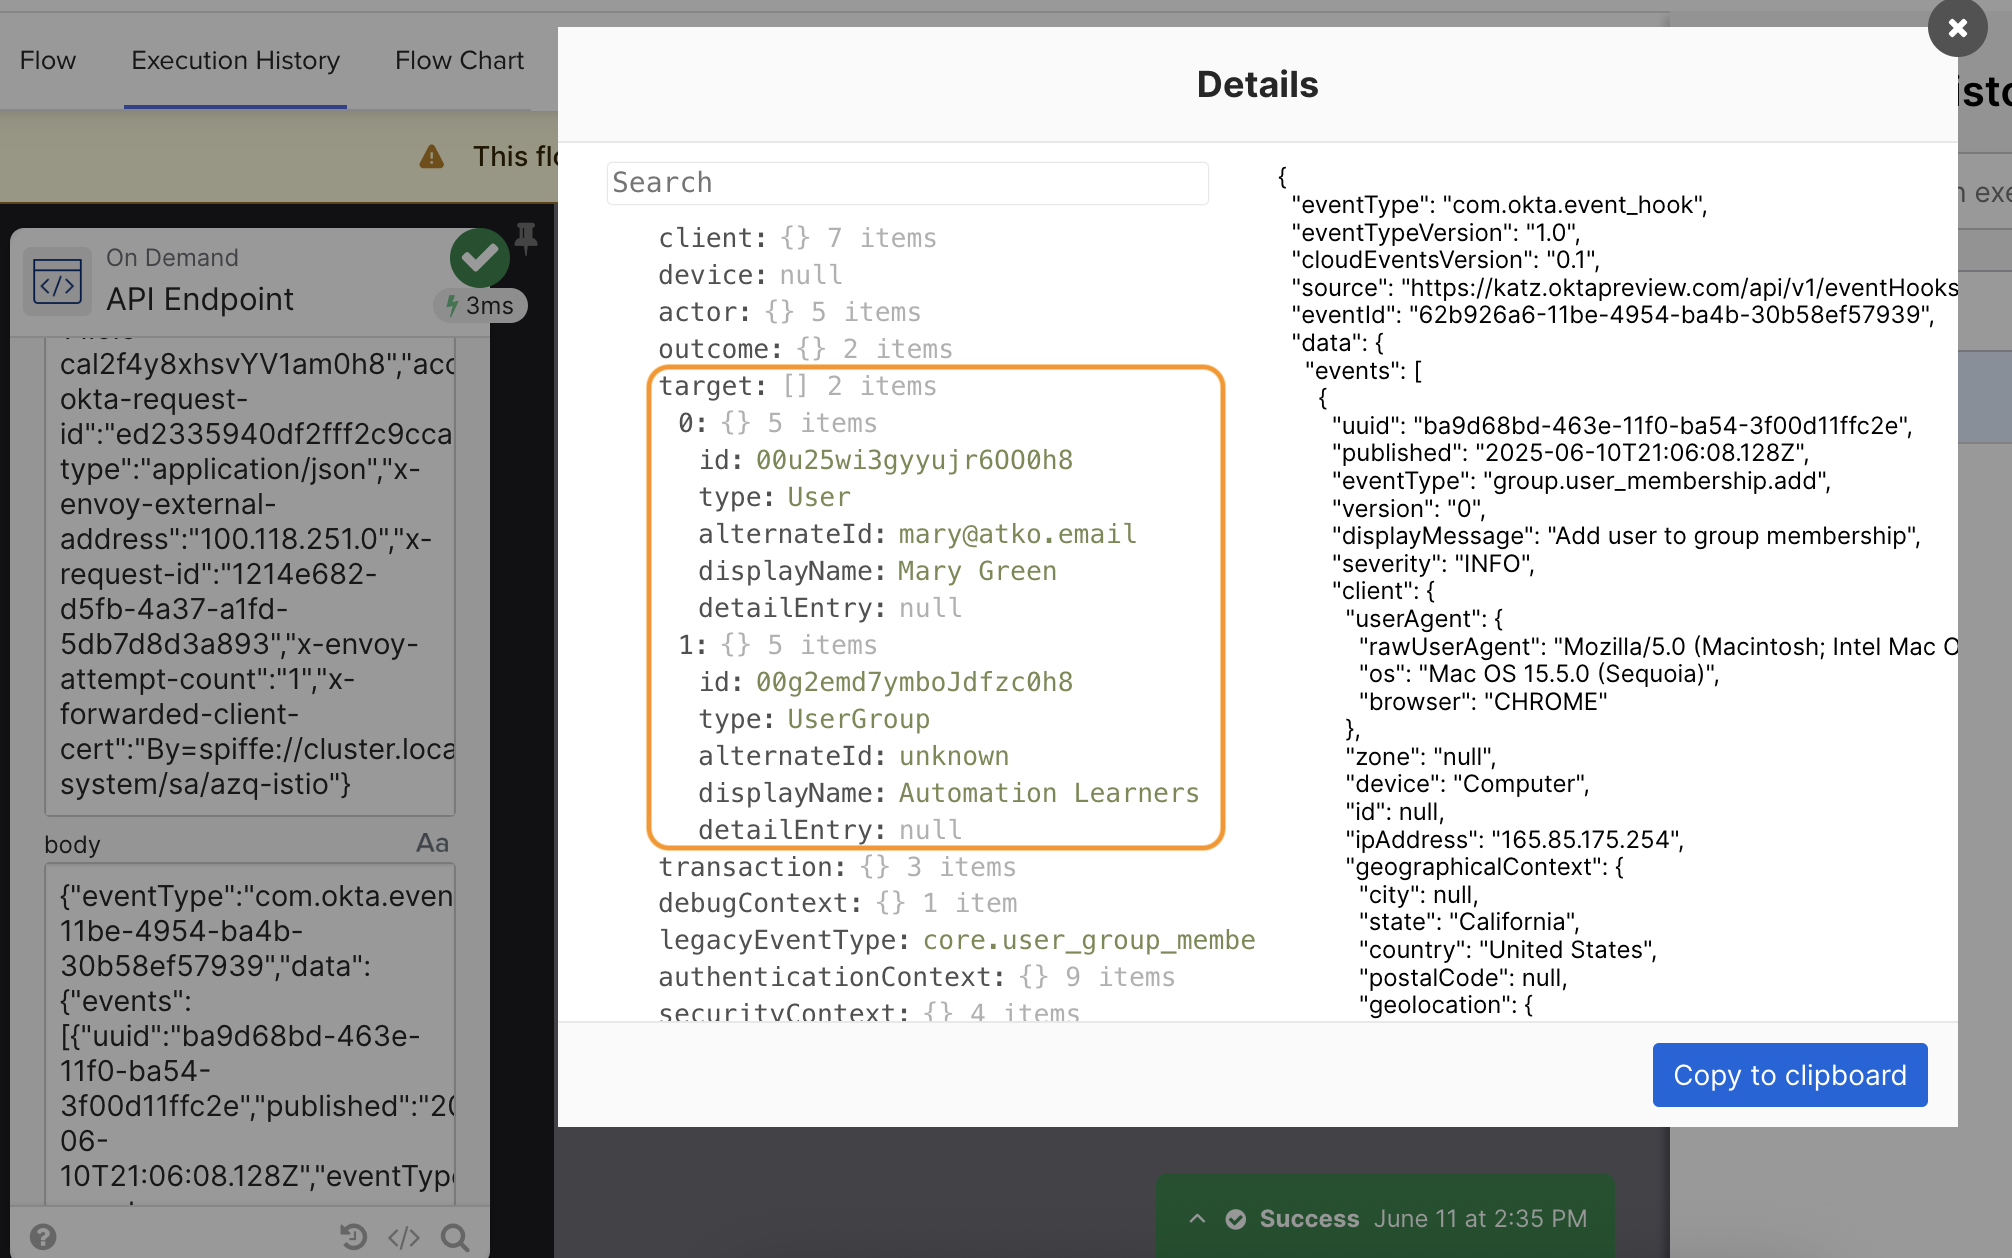
Viewing JSON.
The flow looks like this:
Extract the user’s and group’s display names.
Compose a message
- Click the Add function and add the Compose card under the Most Popular category.
- Enter User: and connect the first output field from the Get Multiple card.
- Enter Group: and connect the second output field from the Get Multiple card.
- It’s a good idea to rename the Compose card’s output field.
- Inside the Compose‘s output field, click on Aa > Customize.
- Enter Email text for Display Name.
- Click Save.
This is how the flow looks:
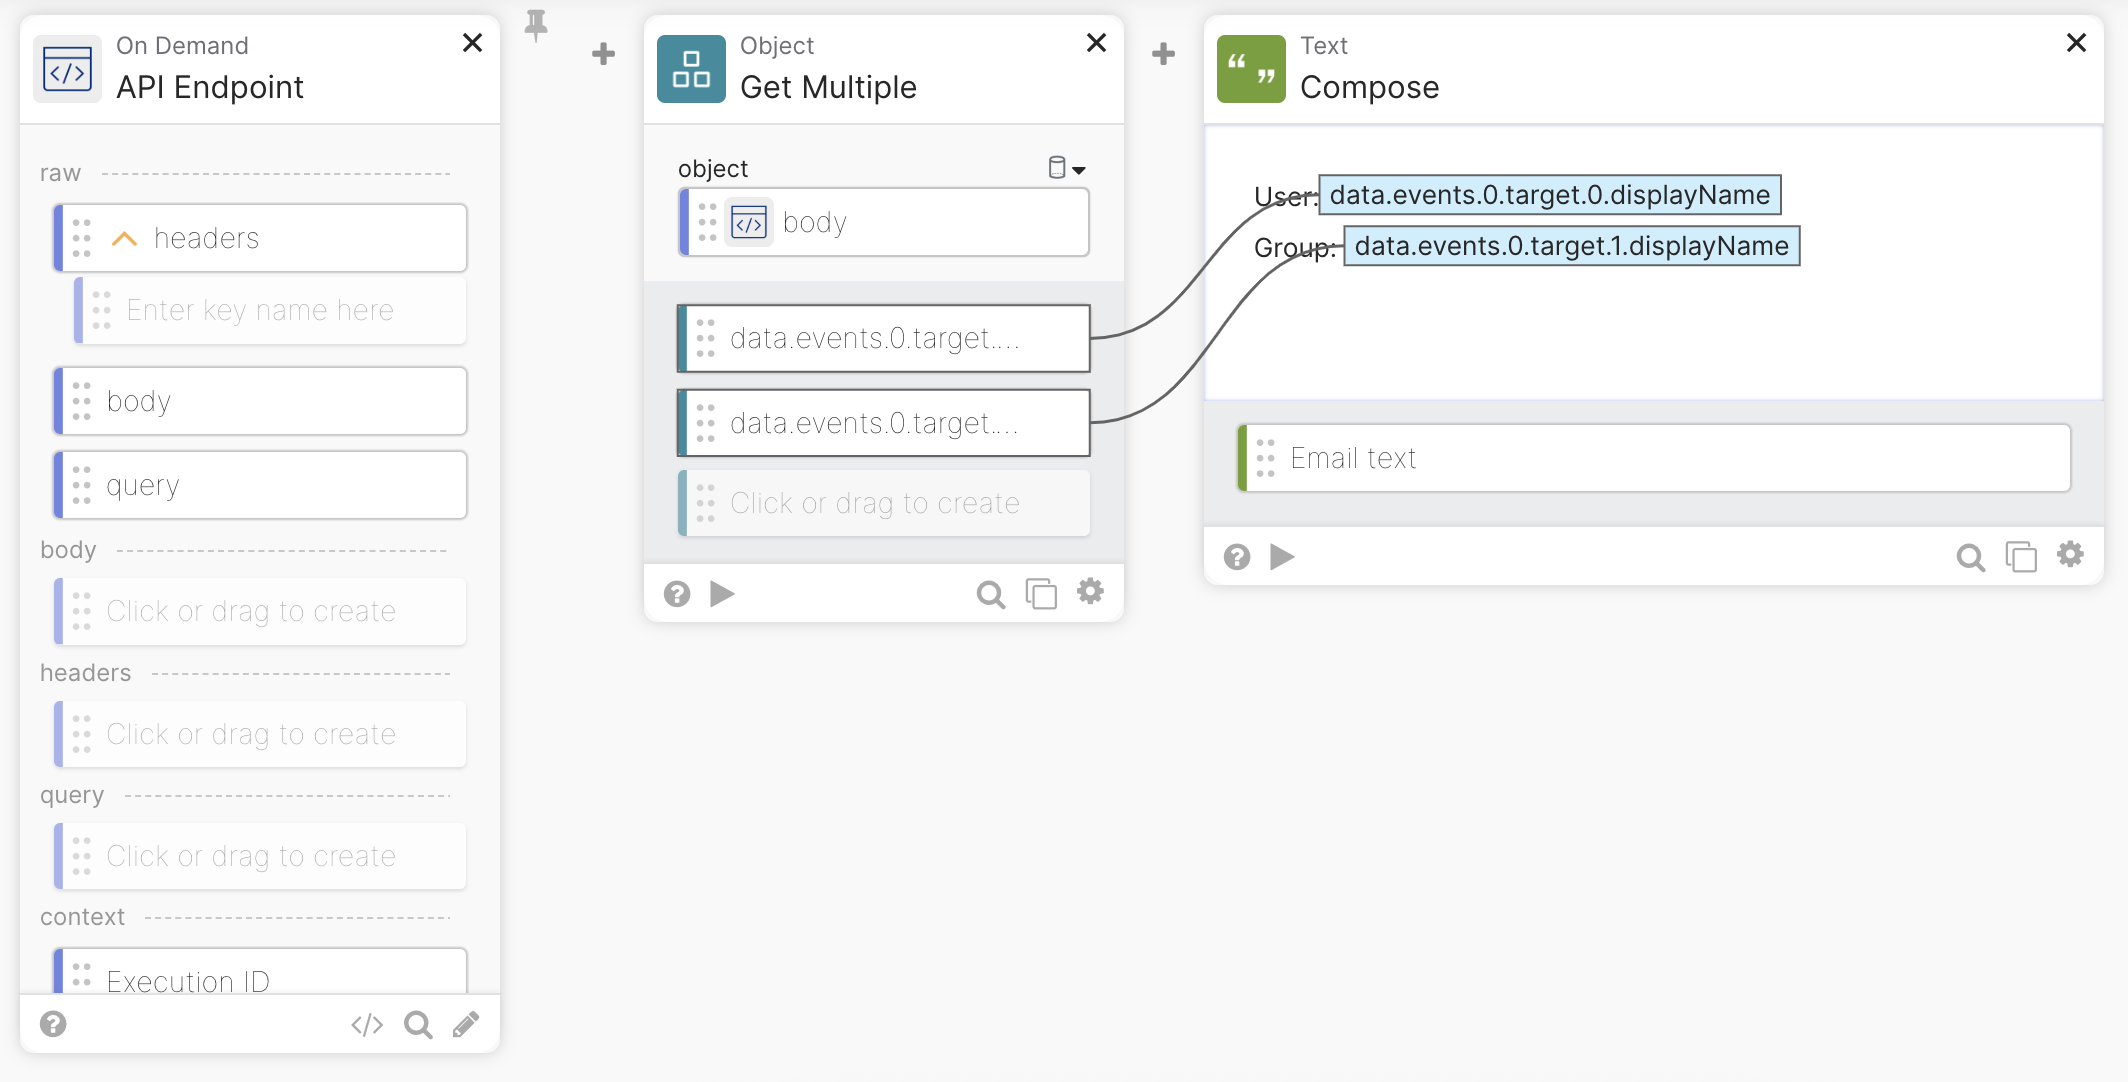
Adding the Compose card.
In the last step, you will use the Gmail - Send Email card to email the message.
Send email message
- Click Add App Action > Gmail > Send Email. Create a Gmail connection if you don’t have one. You must use a Google Workspace account. A personal Gmail account won’t work.
- Enter an email where to send the message for the To field.
- Enter User added to group for the Subject field.
- Connect Email text field from the Compose card to the Body field.
- To hide the other fields, click the ⚙️ > Choose fields. Uncheck the From, CC, and BCC fields. Click Save.
The final flow looks like this:
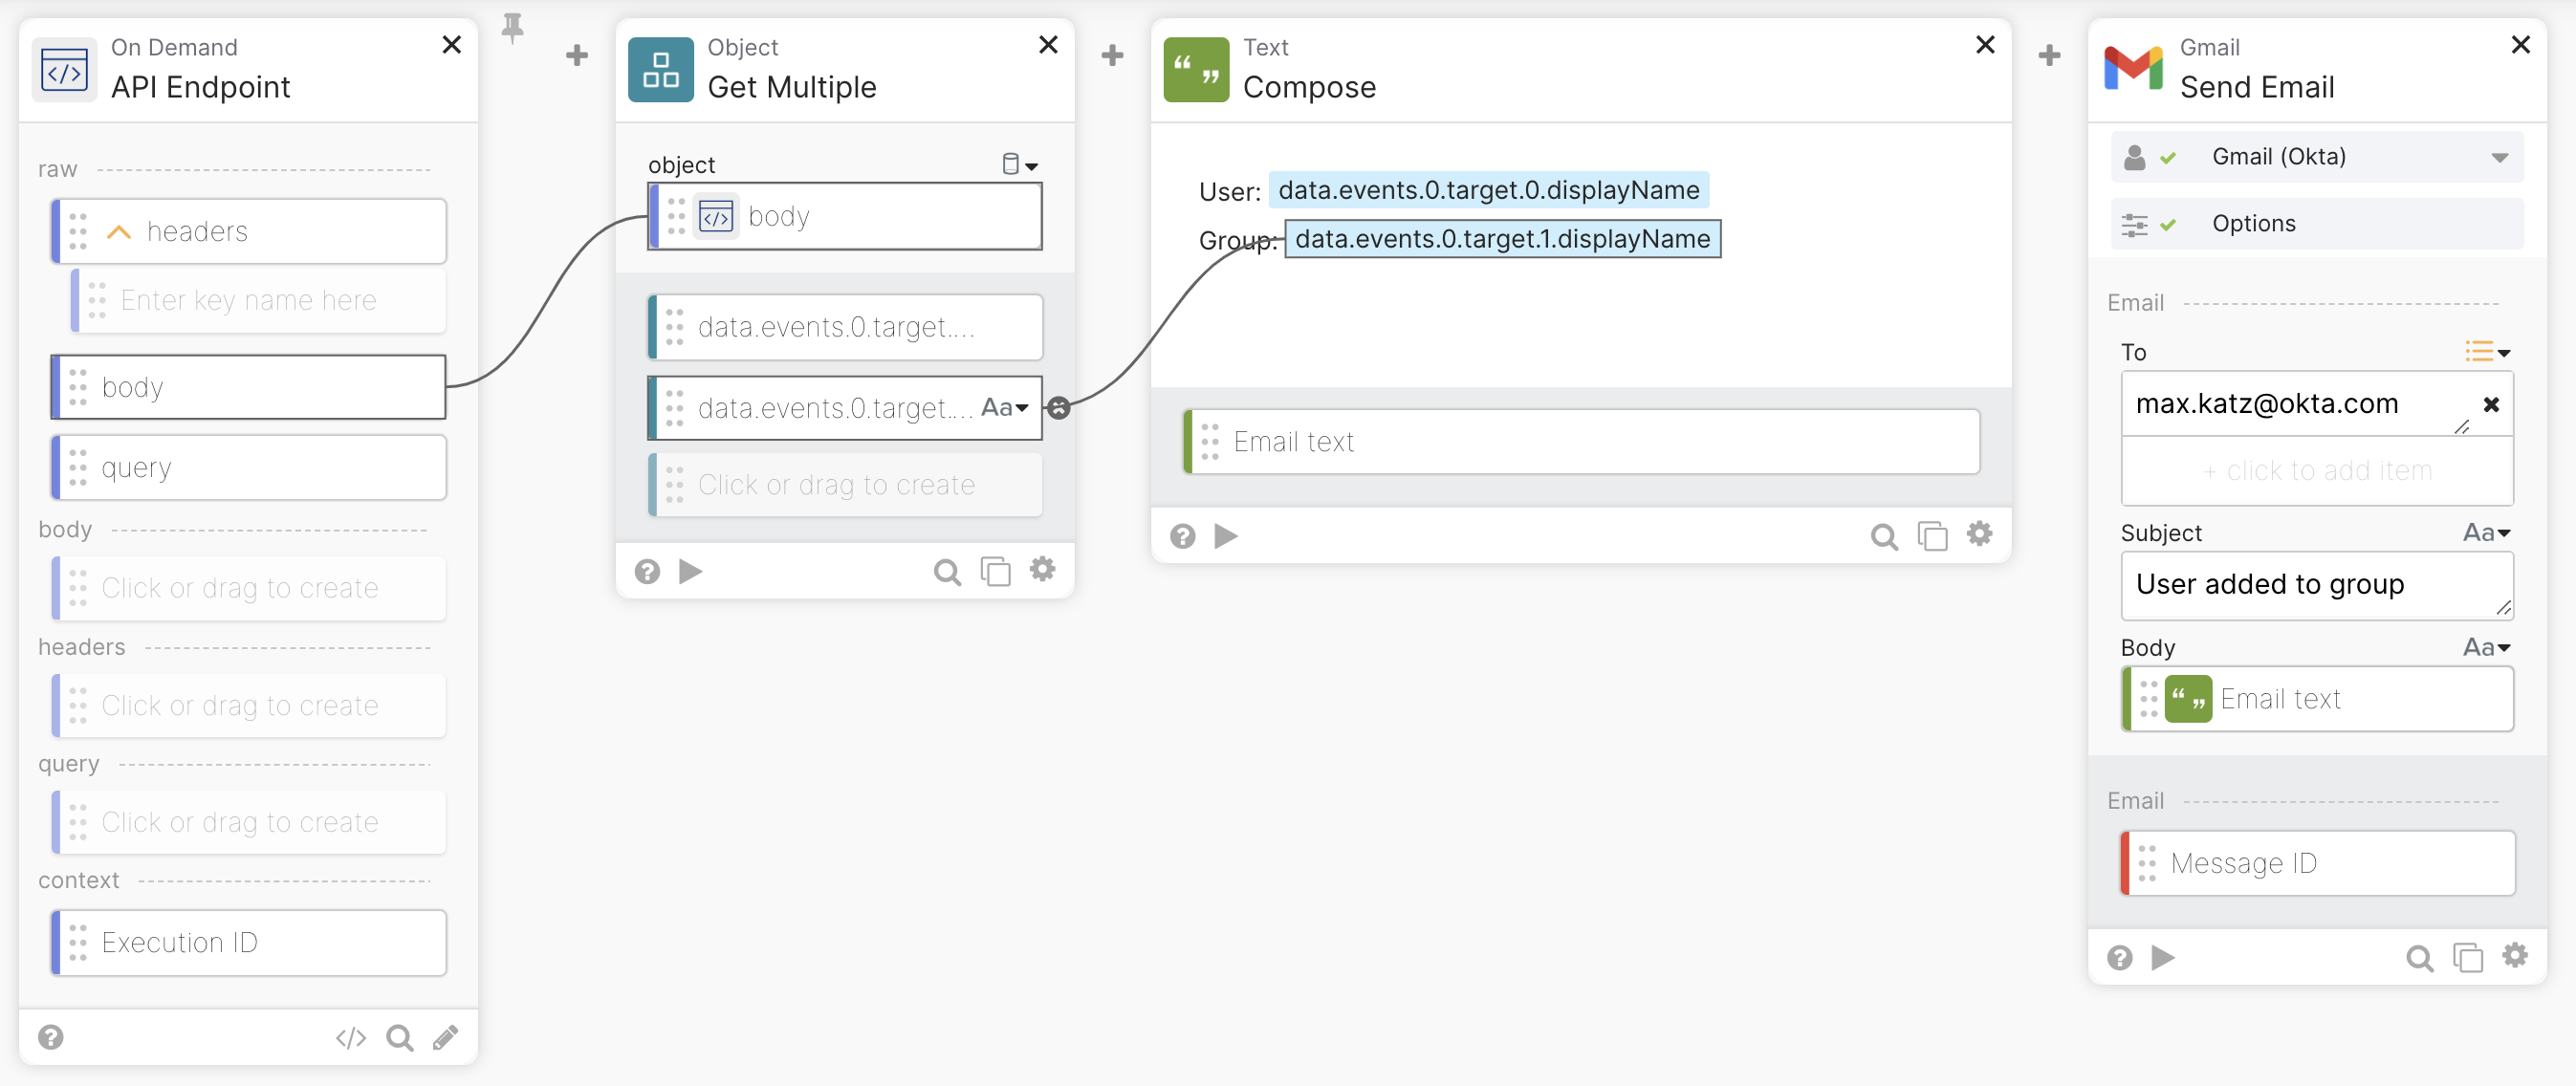
Notify when user is added to group flow.
Test the Event Hook and flow
Add a user to the Automation Learners group and open the flow’s Execution History to inspect the execution. The Event Hook will run on the Add user to group event and after checking the filter condition matches, it will trigger the flow. The flow will send the email notification.
The notification email:
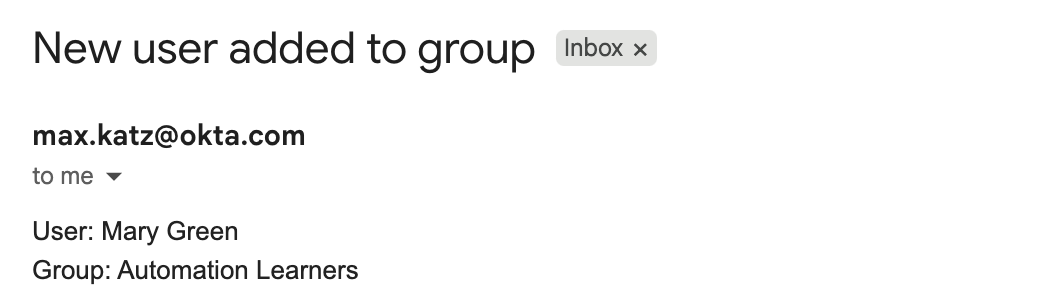
User added to group notification email.
Now, add a use to any other group. The Event Hook will run on the Add user to group event and after checking the filter condition doesn’t match, it will not trigger the flow.
Okta Workflows resources
🚀 New to Okta Workflows? The Getting Started with Okta Workflows page has all the resources to help you get started.
📺 Like learning from videos? Watch Okta Workflows videos.
❓Have a question? Ask during community office hours, post on the community forum, or email me.
🙋🏻♀️ Want to learn from the community? Join the #okta-workflows channel on the MacAdmins Slack.
📖 Want to learn more about identity automation? Take Workflows training on Okta Learning.


