


This tutorial will teach you how to build a connector for the OpenWeather API using the Okta Workflows Connector Builder.
- Connector for OpenWeather API
- What is the Connector Builder
- Build a connector for OpenWeather API
- Resources
Connector for OpenWeather API
You have several email notification flows you built in Okta Workflows. When you activate a user, you want to include weather information in the welcome email.
You want to use OpenWeather for weather information. There is no pre-built connector for the OpenWeather in Workflows today.
Several team members are unfamiliar with setting up API calls. To help them use OpenWeather, you will build a connector for the OpenWeather using the Okta Workflows Connector Builder.
A pre-built connector for OpenWeather will make adding weather information to flows and emails more straightforward.
What is the Connector Builder
Okta Workflows Connector Builder is a no-code tool to create API connectors. A connector will appear in the connector list, and you can use it to build identity automation flows.
The Connector Builder uses Workflows flows and cards (action, function) to build a connector.
Read Understanding Okta Workflows Connectors to learn about several API calling options in Okta Workflows and when to use which option.
A connector consists of several flows:
- A flow to make the HTTP request.
- A flow to check authentication to the service is working.
- One or more action flows. Each action flow calls a service’s API endpoint.
- Custom action flow to allow calling any API endpoint on the service.
A connector can have other flows, such as OAuth authentication. This tutorial will not cover OAuth authentication.
Note: Building a connector in the Connector Builder is an advanced topic. Complete the Getting Started tutorials first if you are new to Okta Workflows.
Build a connector for OpenWeather API
You need OpenWeather API key before you start building the connector.
Get OpenWeather API key
- Create an OpenWeather account to get an API key.
- It is usually faster, but the API key could take up to two hours to activate.
Go to API keys tab to view and manage your API keys.
You will use an API key from this page in the following sections.
Create a connector project
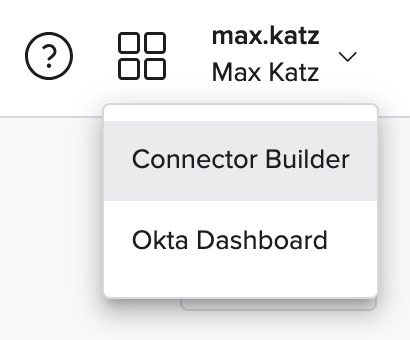
- Click the four squares in the upper-right corner of Workflows and select Connector Builder.
- Click I agree, let me in! to accept the Connector Builder terms.
Launch the Connector Builder.
- Click + New Connector to create a connector project.
- Click the ➕ in the left panel if you created a connector project before.
- Enter OpenWeather for the Connector name.
- Enter The OpenWeather connector provides weather information. for the Connection description.
- Click Save to save the connector project.
You will see the connector’s Overview page.
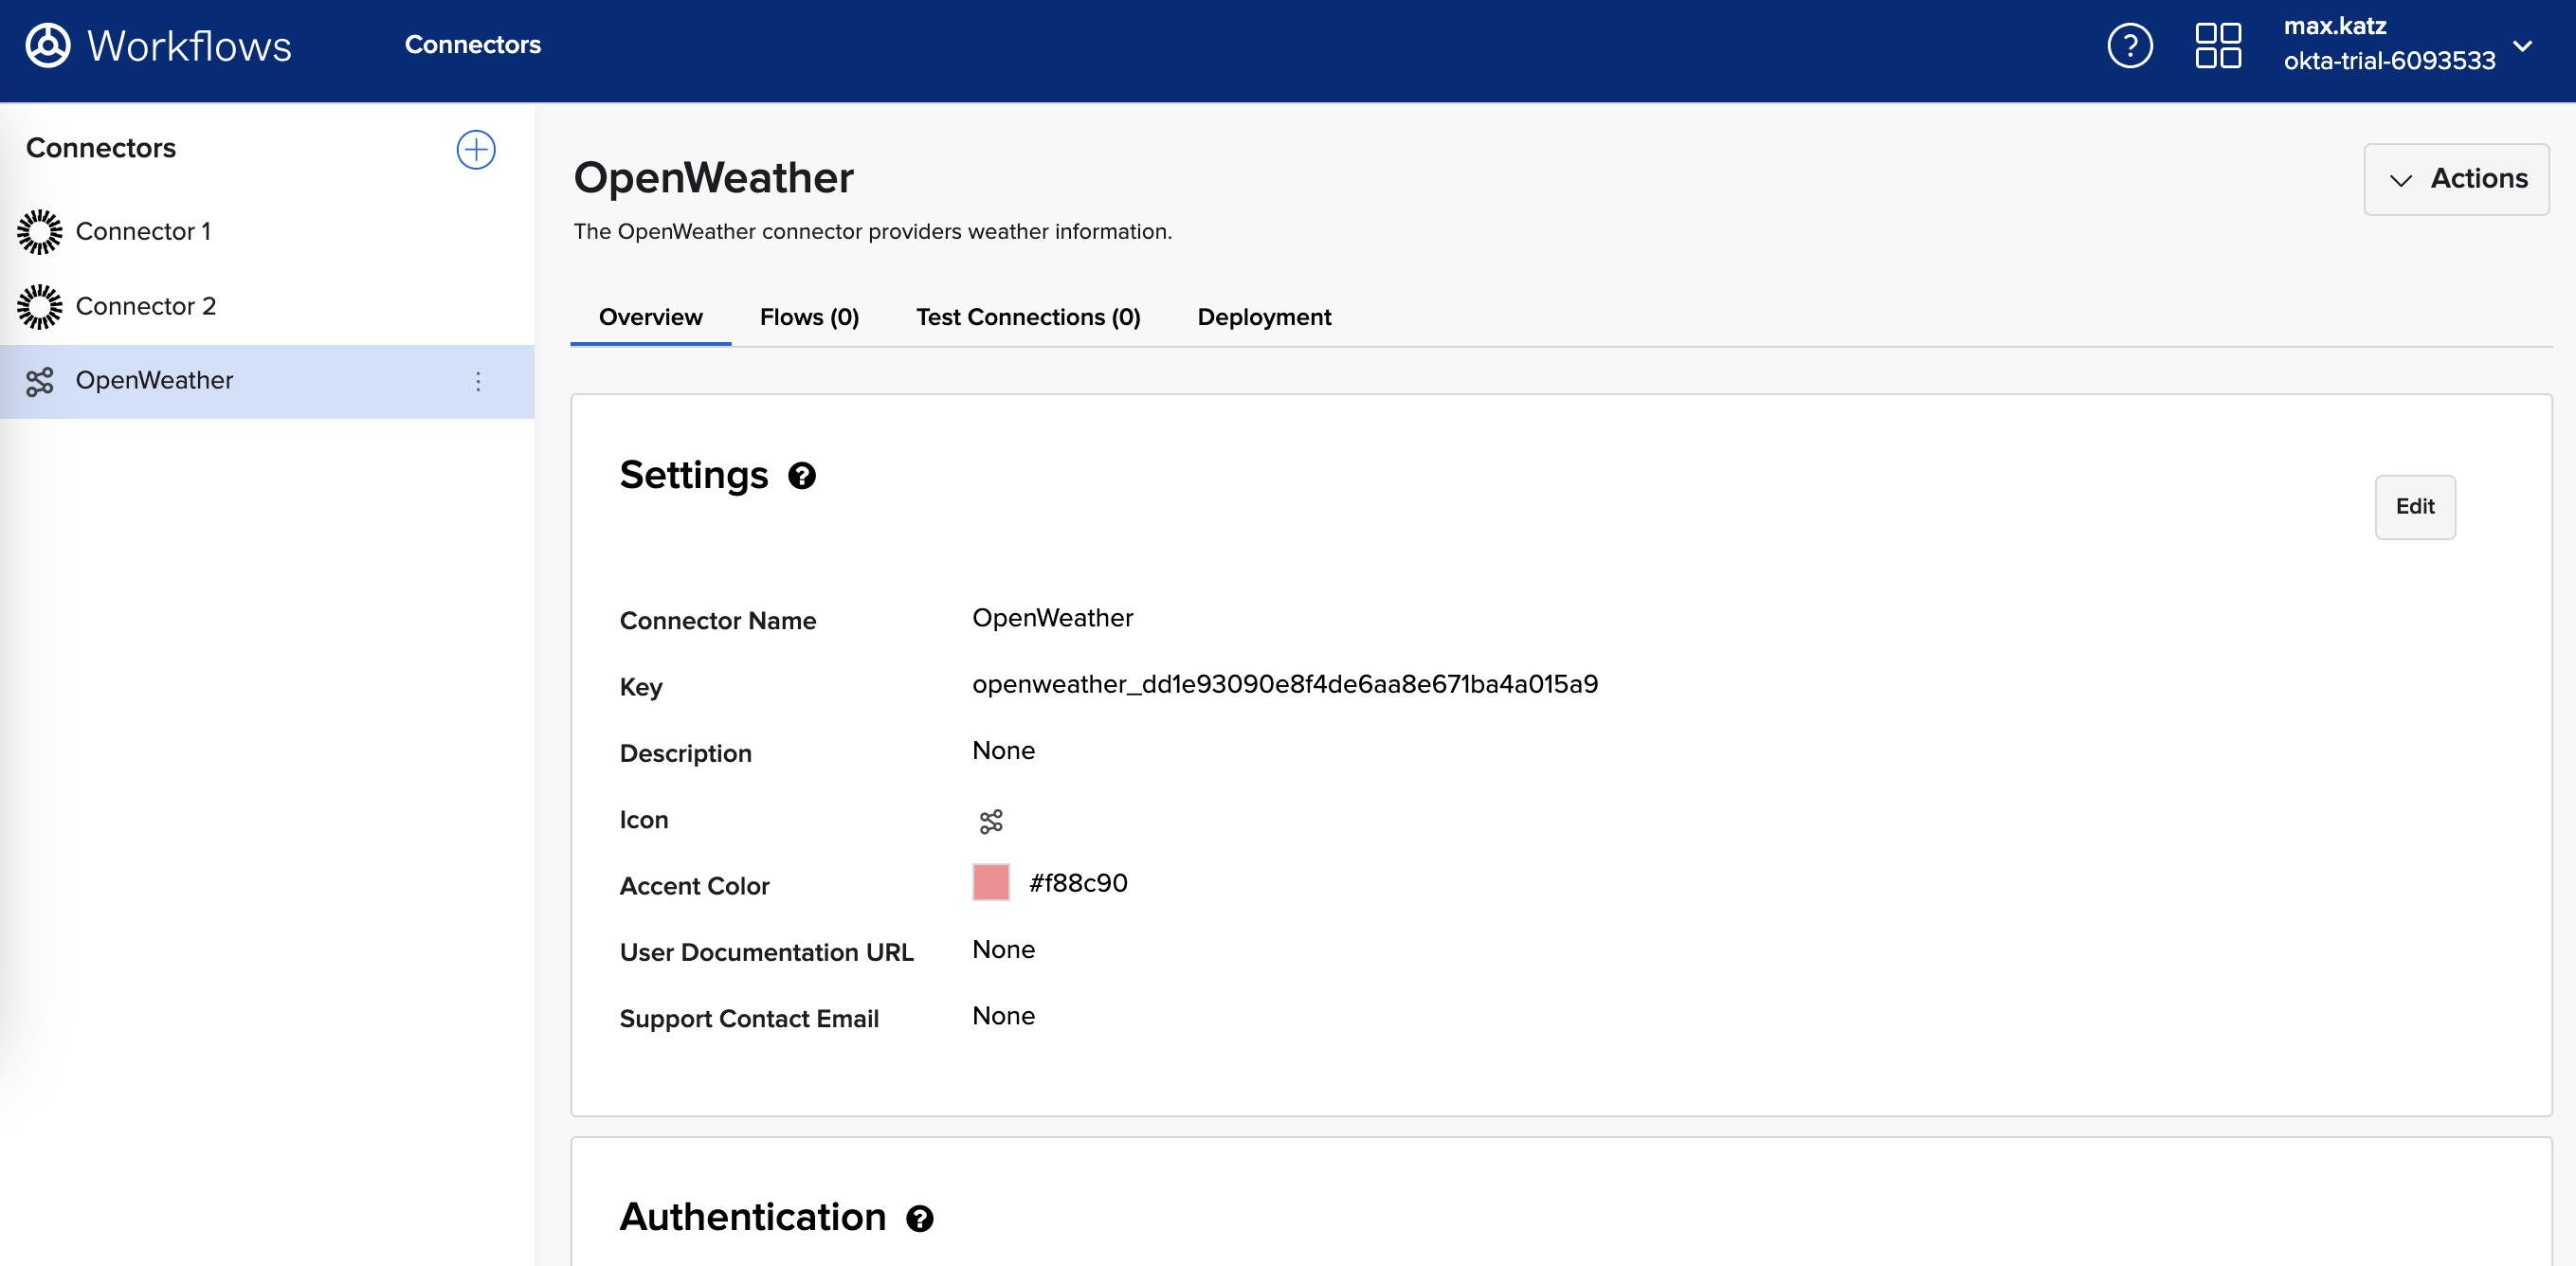
Connector project.
You will return to this page later to set the connector’s icon and other information.
Connector flows and authentication
The connector you will build has five flows:
- httpHelper: manages all authentication and HTTP requests for the connector.
- authPing: checks connection health.
- Current: an action to get the current weather from the current weather API endpoint.
- Forecast: an action to get a five-day weather forecast from the 5-day forecast API endpoint.
- Custom API action: an action to call any API endpoint from OpenWeather API.
The connector also has Authentication.
Authentication is where you define the parameters required to create a secure connection to an API service.
When an end user creates a connection to your service, the New Connection dialog collects the specific authentication details.
There are three authentication types:
- Basic: uses username and password.
- OAuth 2.0: grants limited access to resources to a third party. You can use Authorization Code or Client Credential grant types in a connector.
- Custom: uses API key or other authentication process.
Create authentication for OpenWeather API
The OpenWeather API passes an API key in the request query for authentication. You will set up a custom authentication with an API key for the connector.
- On the Overview page, click Set up authentication to create a connection.
- Select Custom from the Auth Type list.
- Click Add Parameter.
- Enter the API Key for the Label.
- Enter appid for the Key and keep Text for Type.
- Click Save to save the connection information.
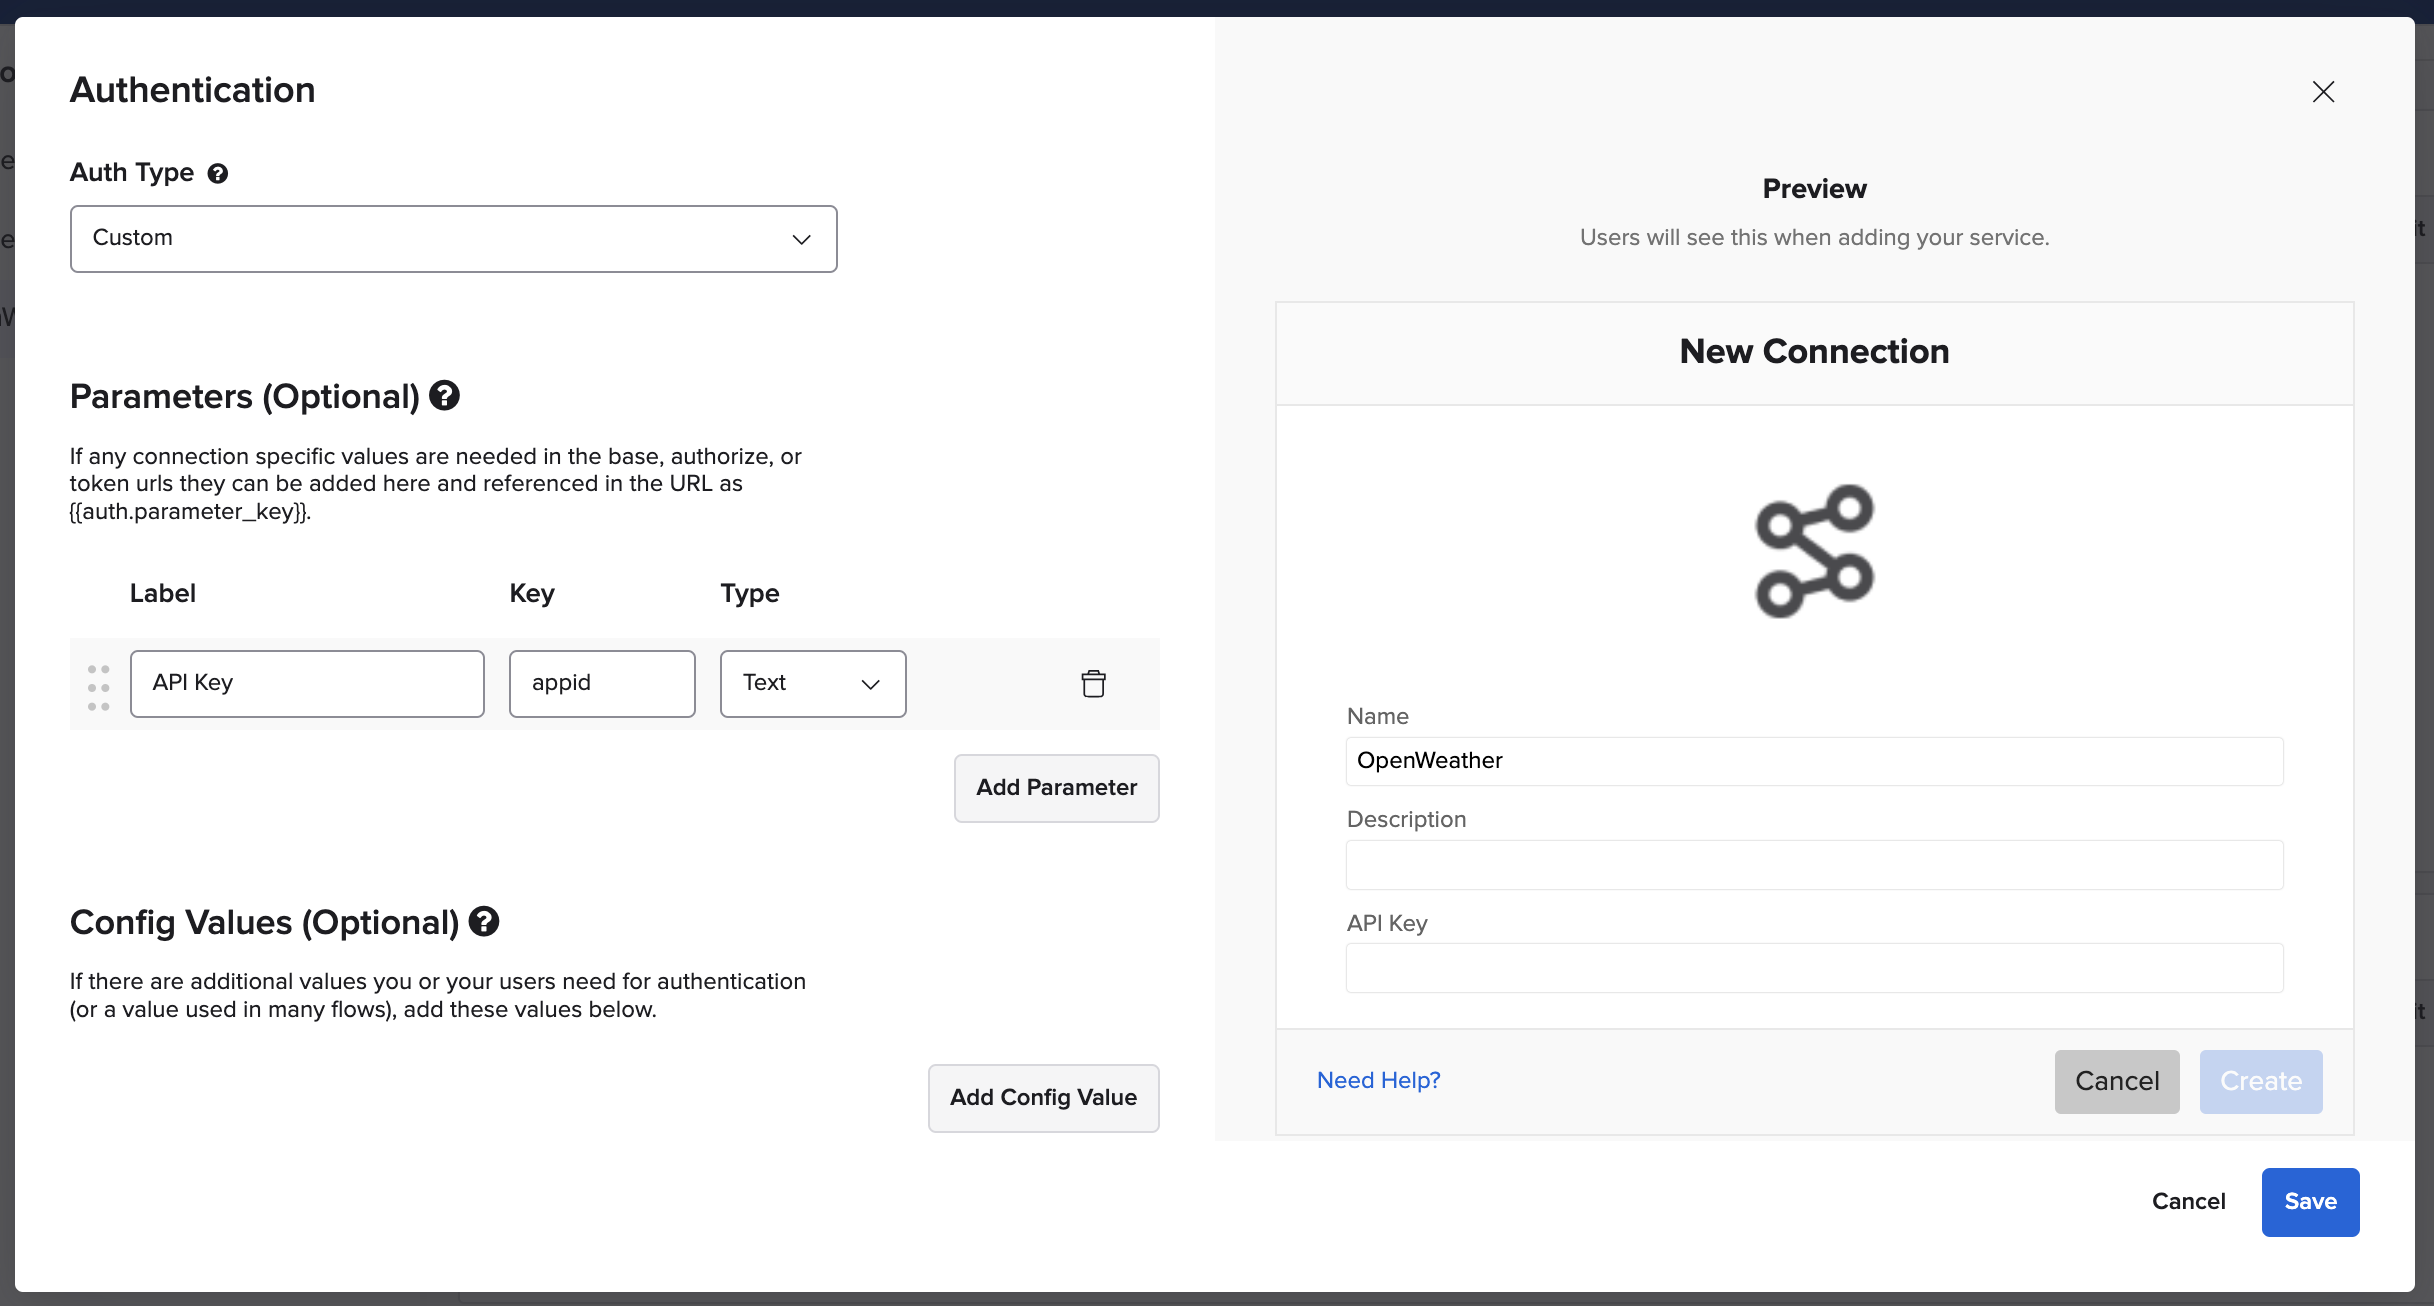
Setting up authentication.
The parameter name (key) is appid because the OpenWeather API call uses that name:
https://api.openweathermap.org/data/2.5/weather?q={city name}&units={units}&appid={API key}
Create a flow to make HTTP requests
You will create a flow named httpHelper.
The httpHelper is a system flow that manages authentication and HTTP requests for the connector. The httpHelper flow is a helper flow; other flows can call it. The flow has:
- Several inputs.
- Function cards to build request query, header, and body information.
- The HTTP – Raw Request card to make a call to an API.
- Several outputs.
Create a flow
- Open the Flows page.
- To create a flow click + New Flow.
- Click Unnamed in the upper left corner to name the flow.
- Enter httpHelper for the Flow name.
- Enter This flow manages all authentication and HTTP requests for the connector. for the Description.
- Check the Save all data that passes through the Flow? option.
- To save the flow, click Save.
Set up flow inputs
- Click Add event and choose Helper Flow.
- Add the following fields on the Helper Flow card:
- relative_url (type: Text).
- request_method (Text).
- query (Object).
- headers (Object).
- body (Object).
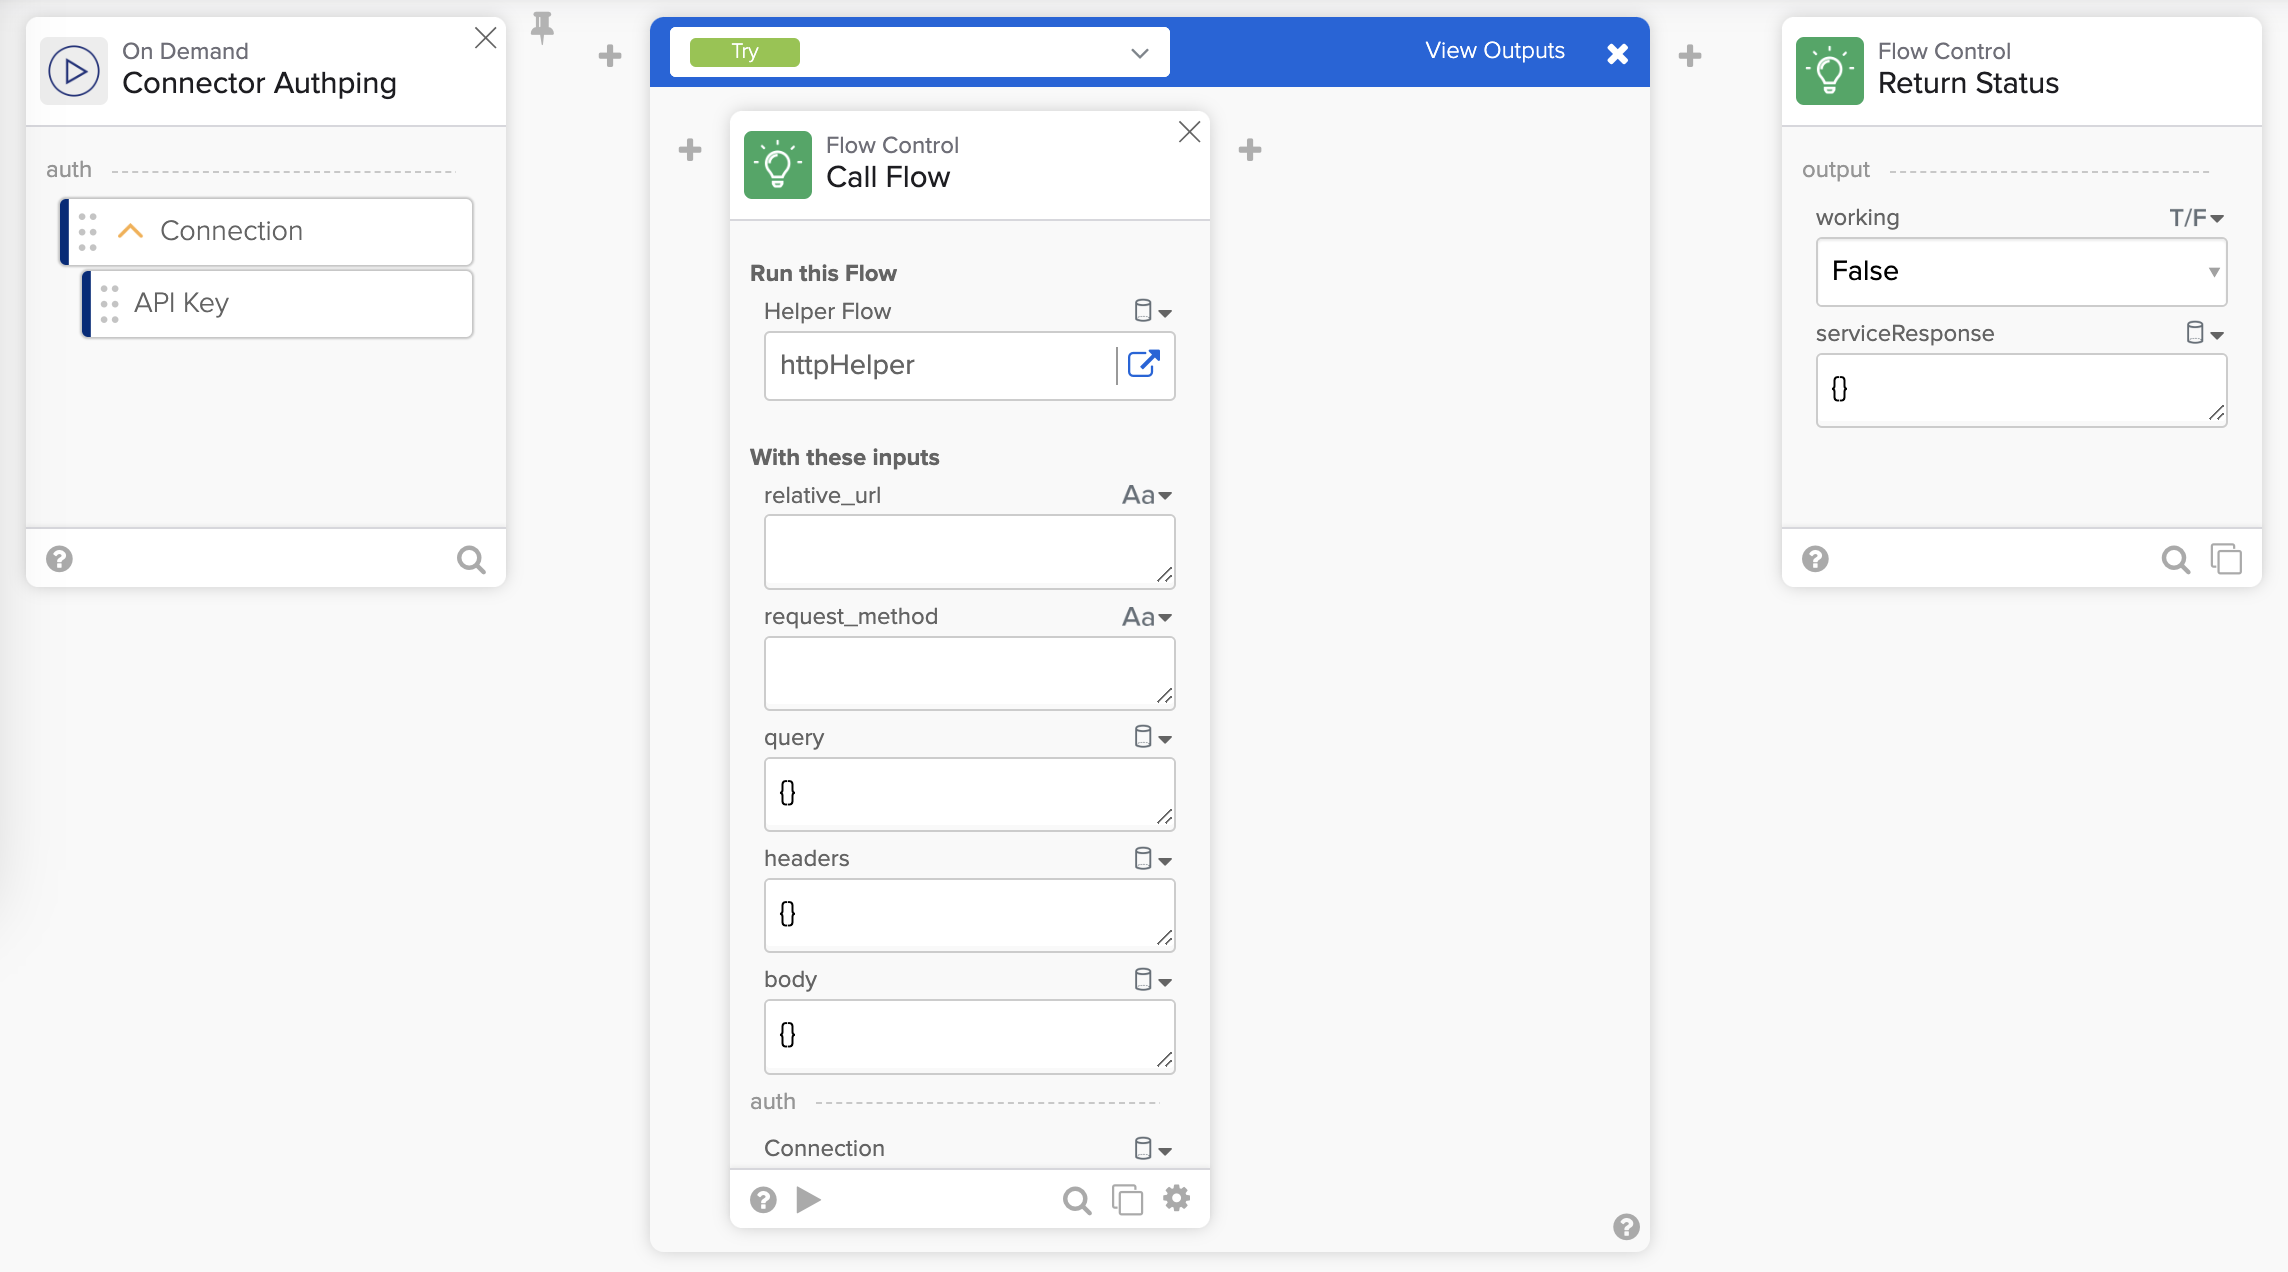
The httpHelper flow looks like this:
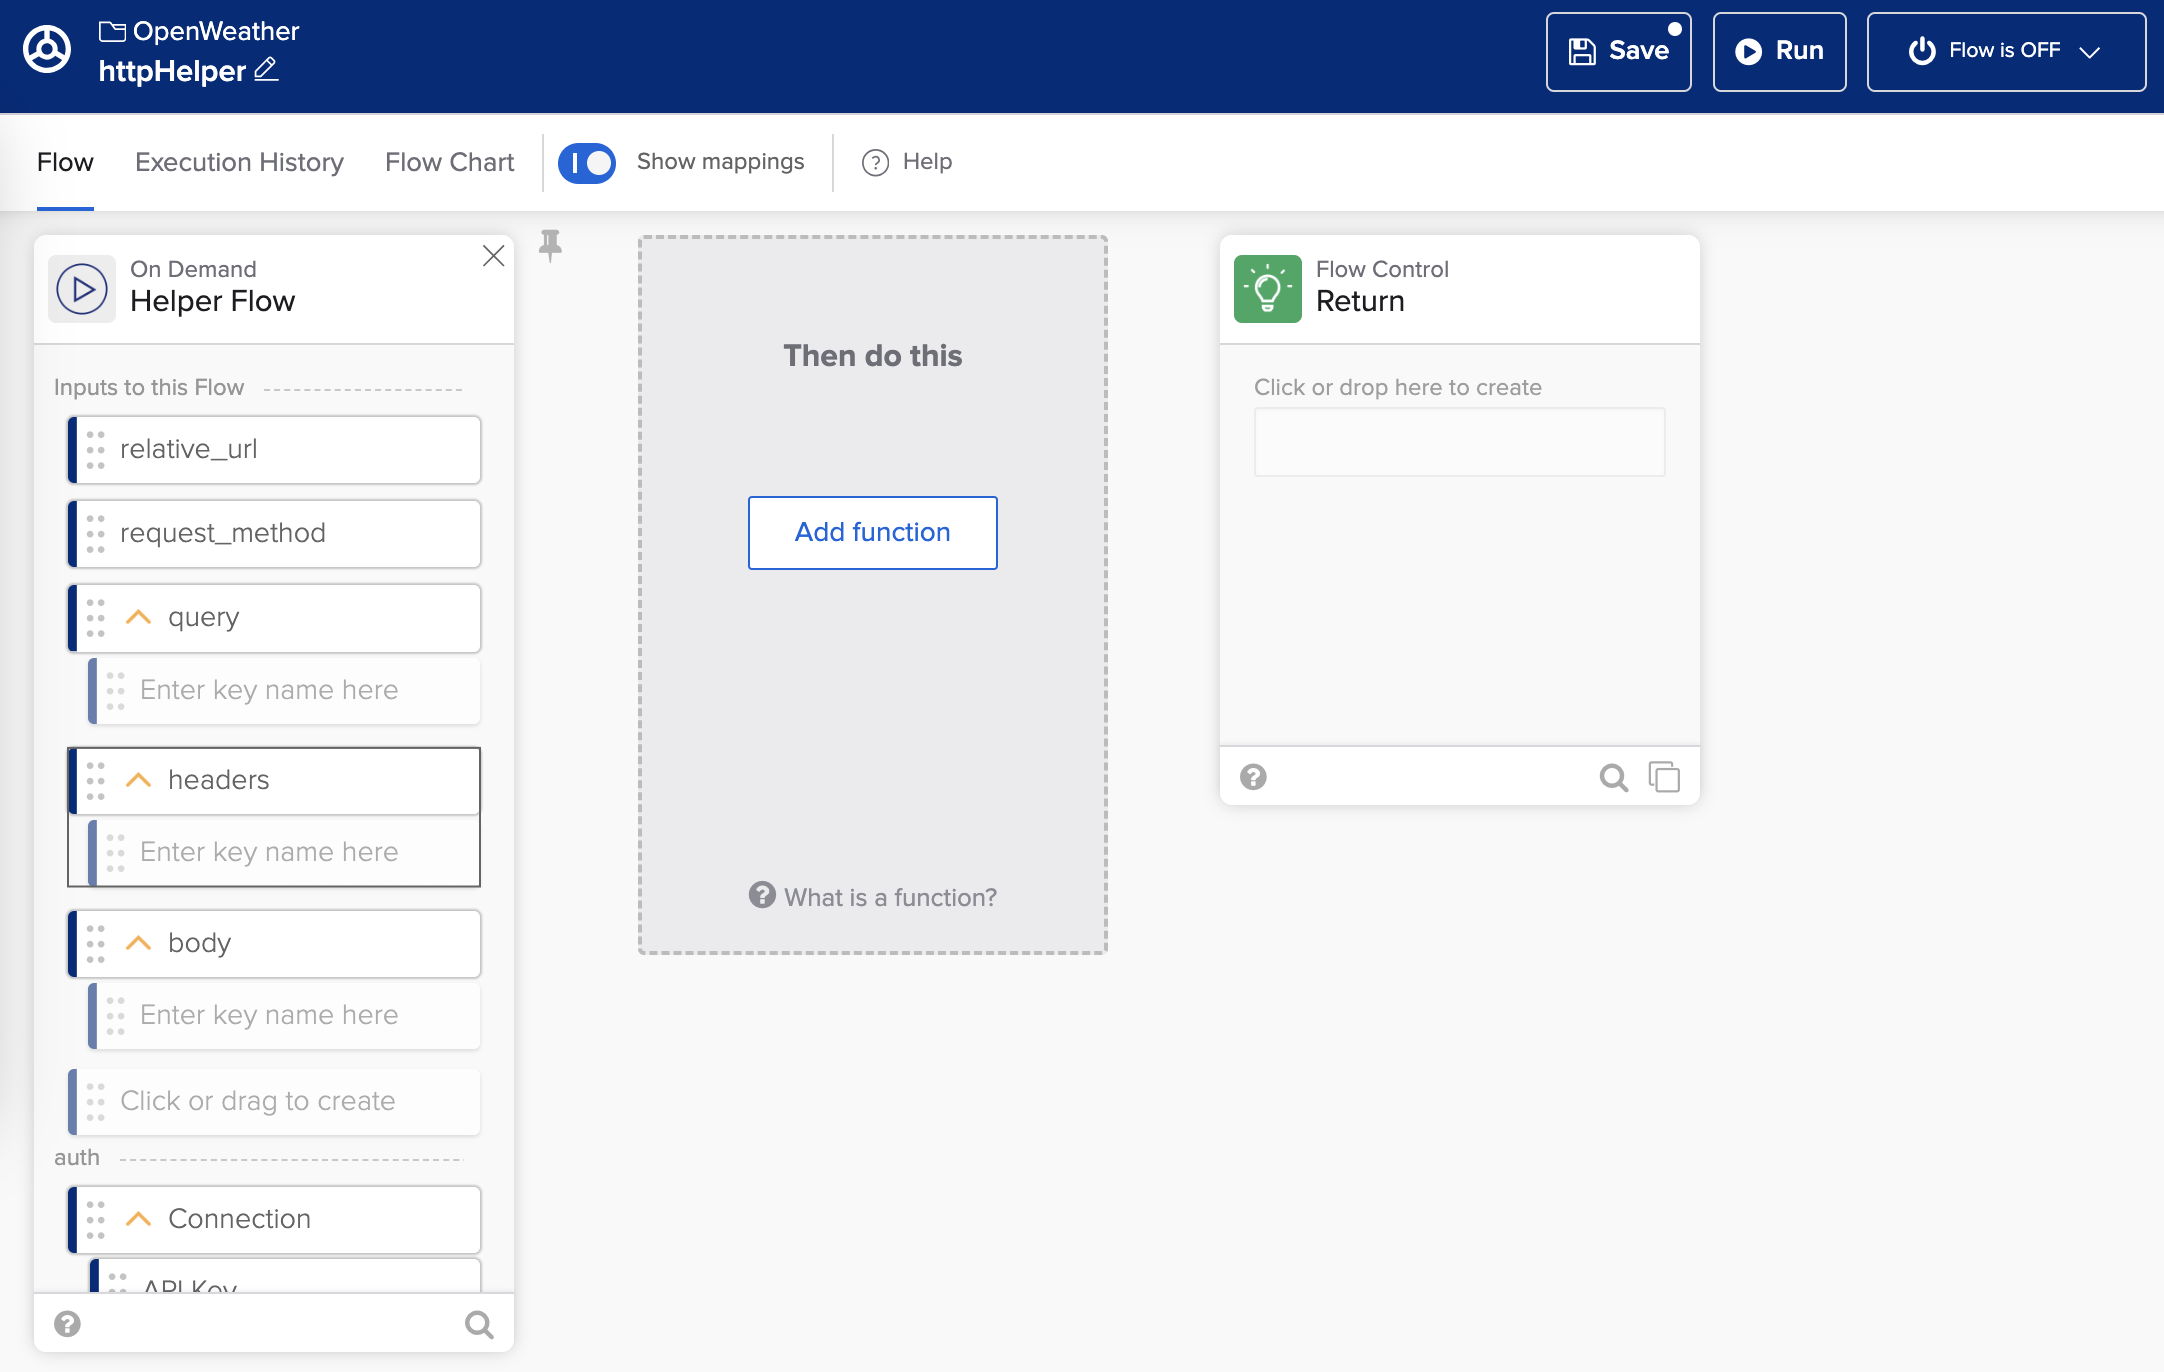
httpHelper flow.
Set up the API URL
The connector will support multiple OpenWeather endpoints. The base URL stays the same, and the relative URL will change. You need to combine the two values into a full URL.
- Add the Text – Concatenate card after the Helper Flow card.
- Enter https://api.openweathermap.org in the text 1 field.
- Connect relative_url to the text 2 field.
- Rename the card’s output field.
- To edit the card, click ⚙️ > Edit card.
- To rename the output field, click on its ✏️ icon and set the name to full_url.
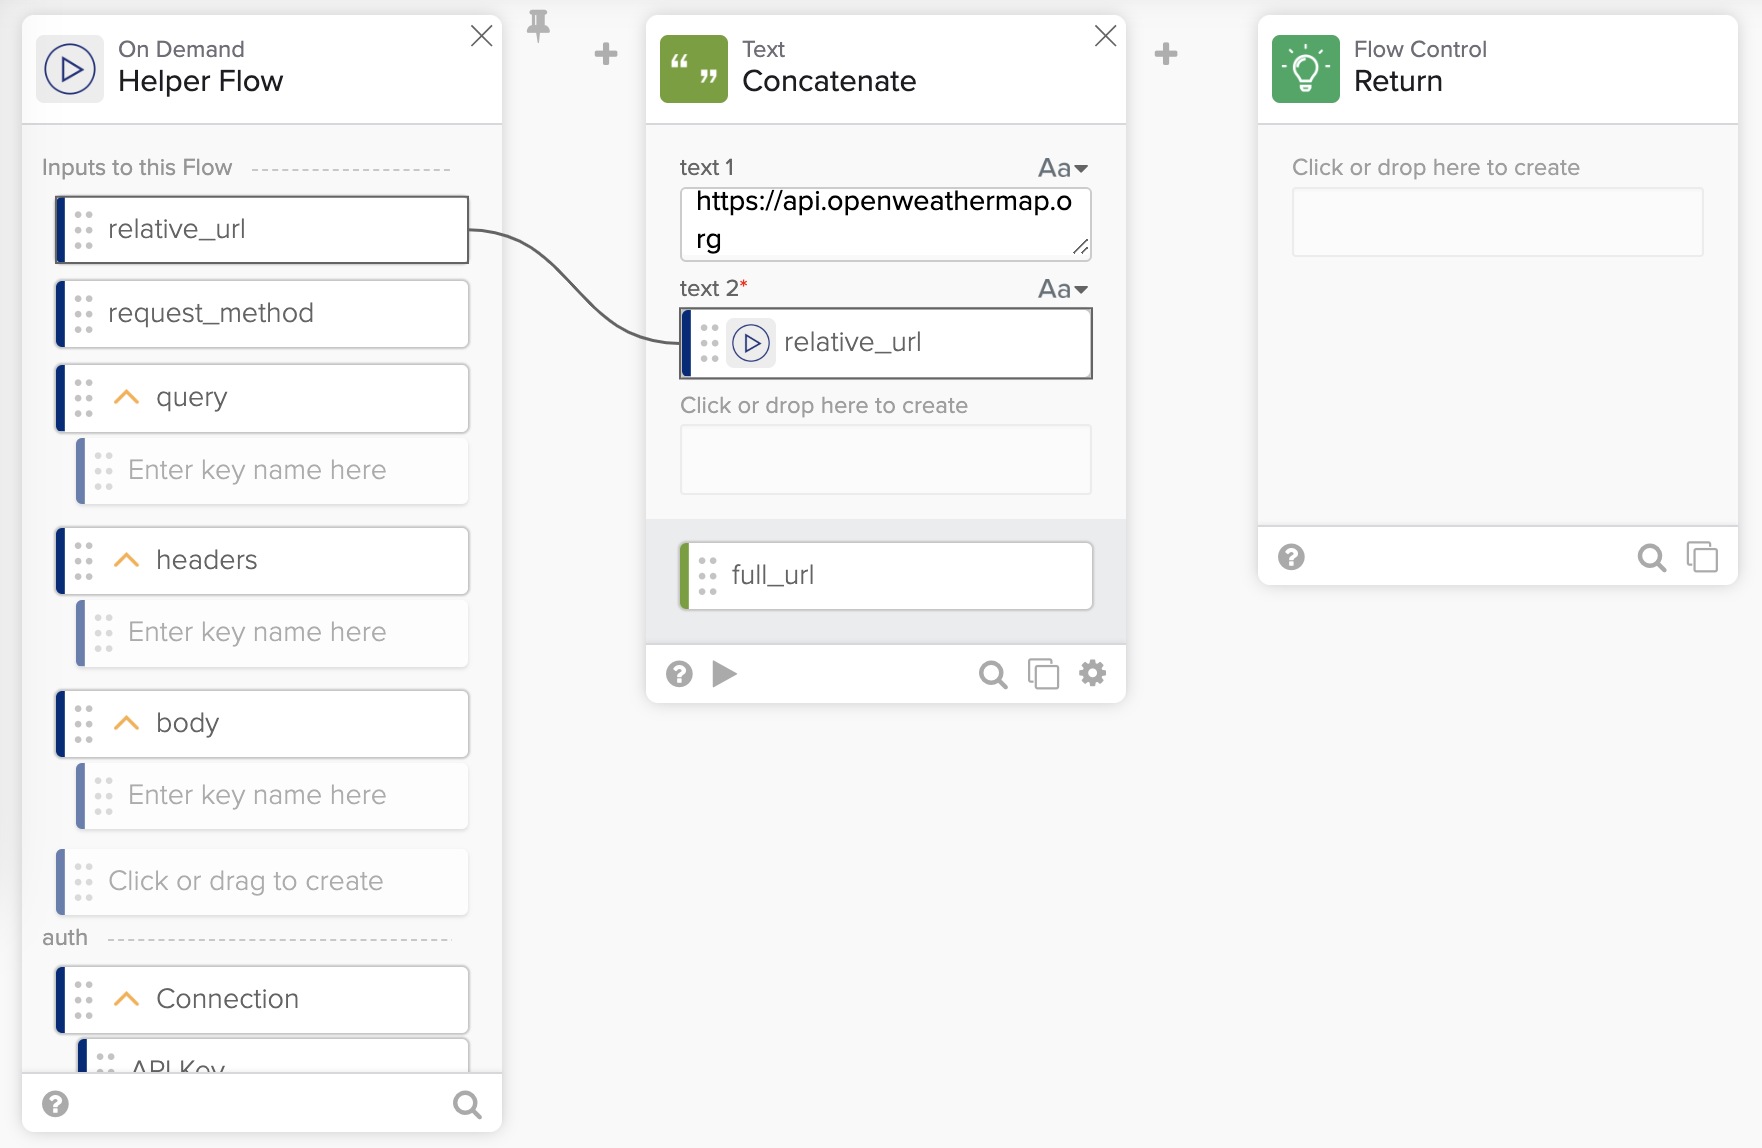
Setting service URL.
To test the card:
- At the bottom of the card, click ▶️.
- Enter /data/2.5/weather relative URL for text 2.
- Click Test to see the full URL: https://api.openweathermap.org/data/2.5/weather.
Set up the API query
As you did in the previous step, you must combine the user’s query information with the API key information.
- Add the Object – Merge card after the Text – Concatenate card.
- Connect:
- query to object 1 field.
- Connection to object 2 field.
- Rename the output field to merged_query.
The flow looks like this:
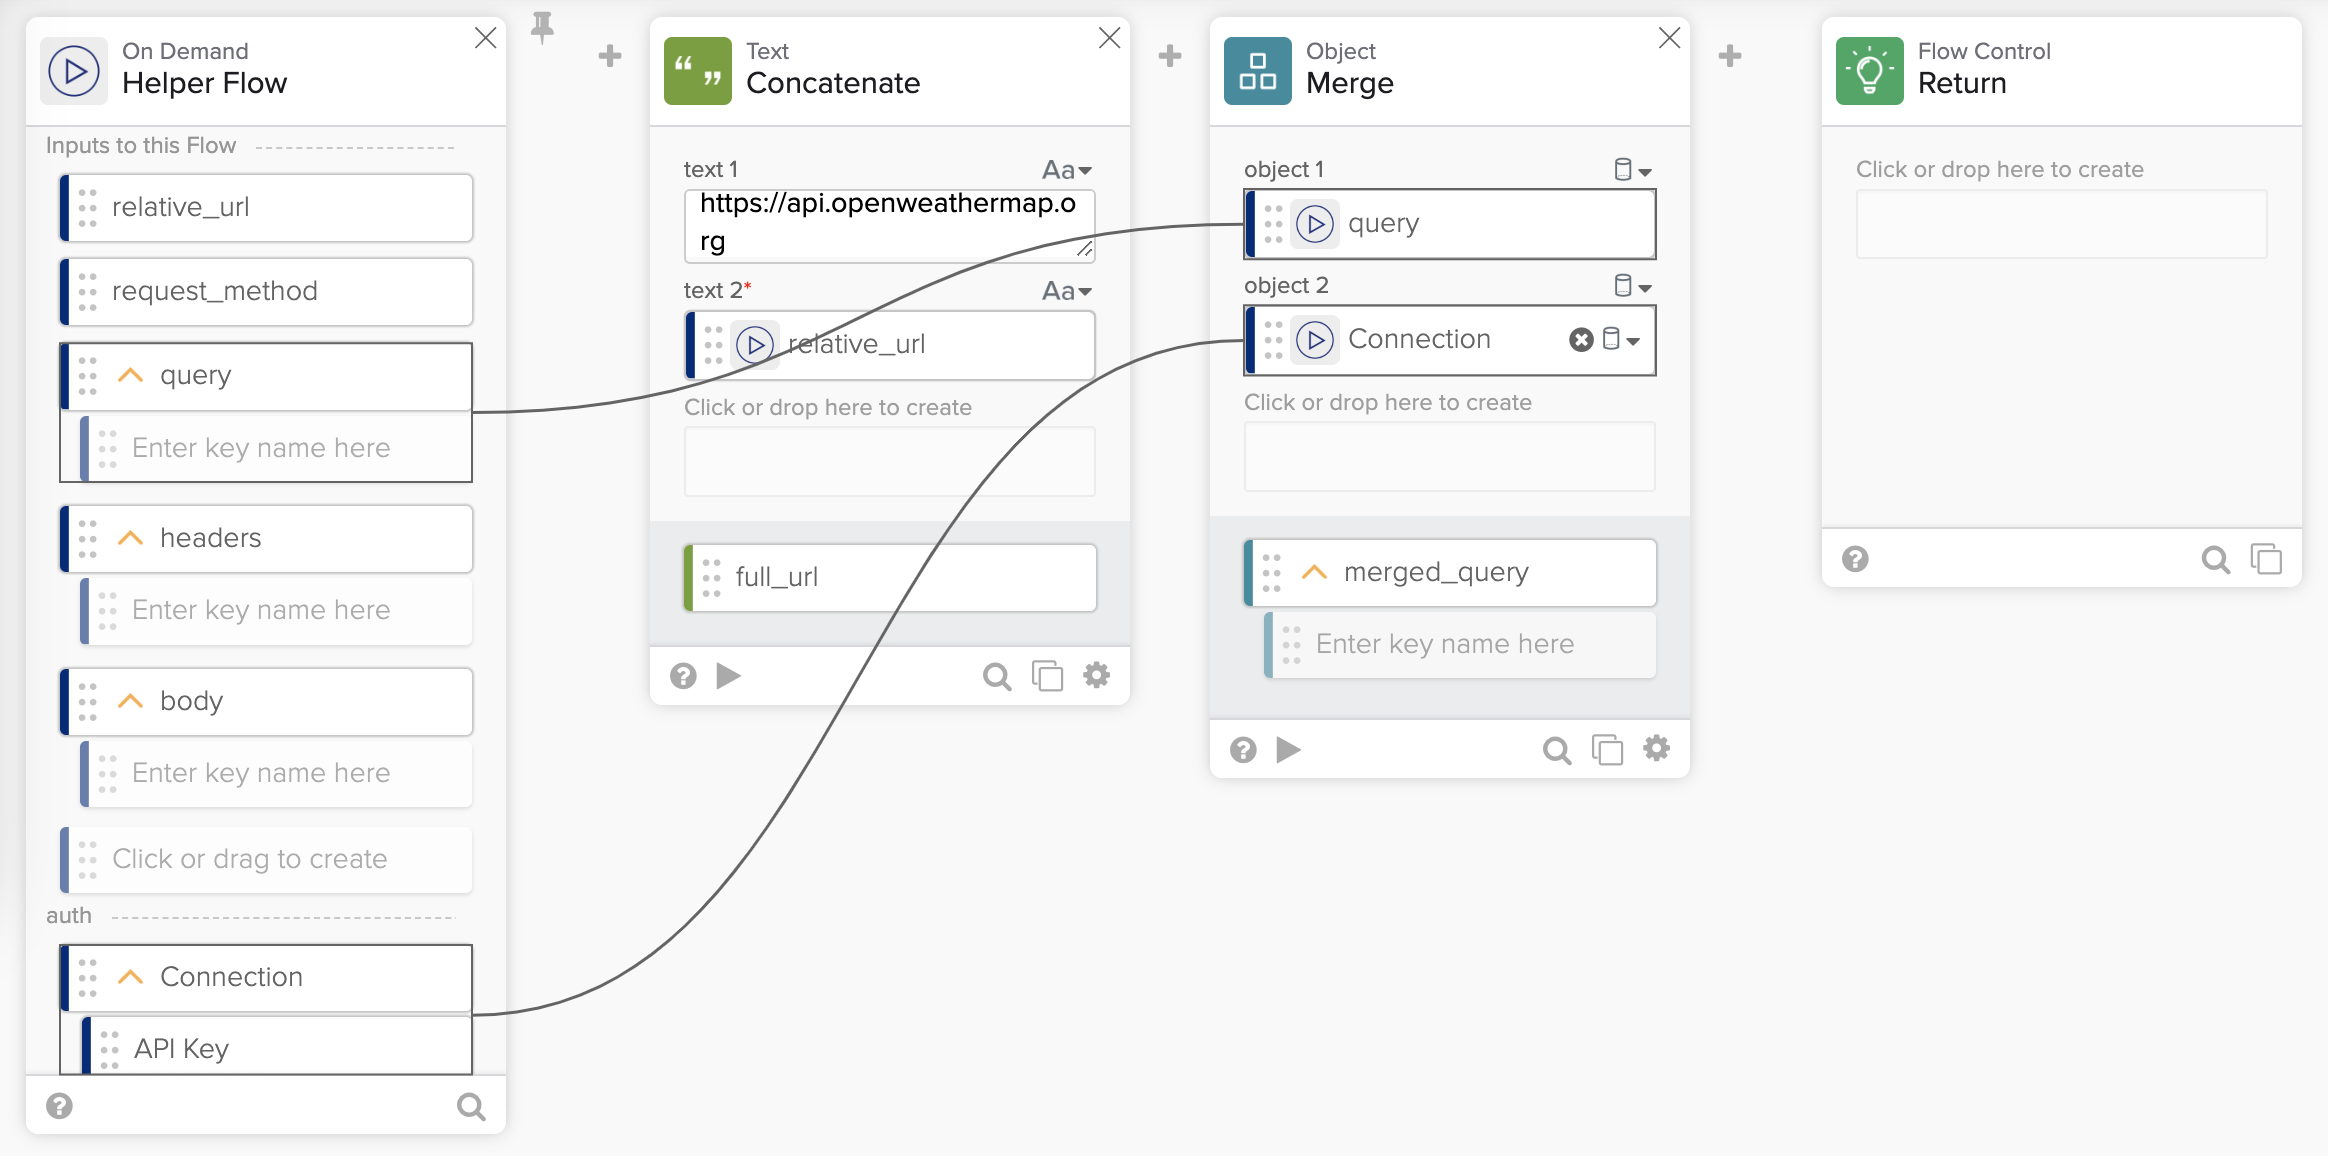
Setting up service query.
Make an API call
You are ready to add a step to make the API call to OpenWeather.
- Add the HTTP – Raw Request card after the Merge card.
- Create the following connections:
- full_url to the url field on the Raw Request card.
- request_method to the method on the Raw Request card.
- headers from the Helper Flow card to the headers field on the Raw Request card.
- merged_query to the query field.
- body to the body field.
The flow looks like this:
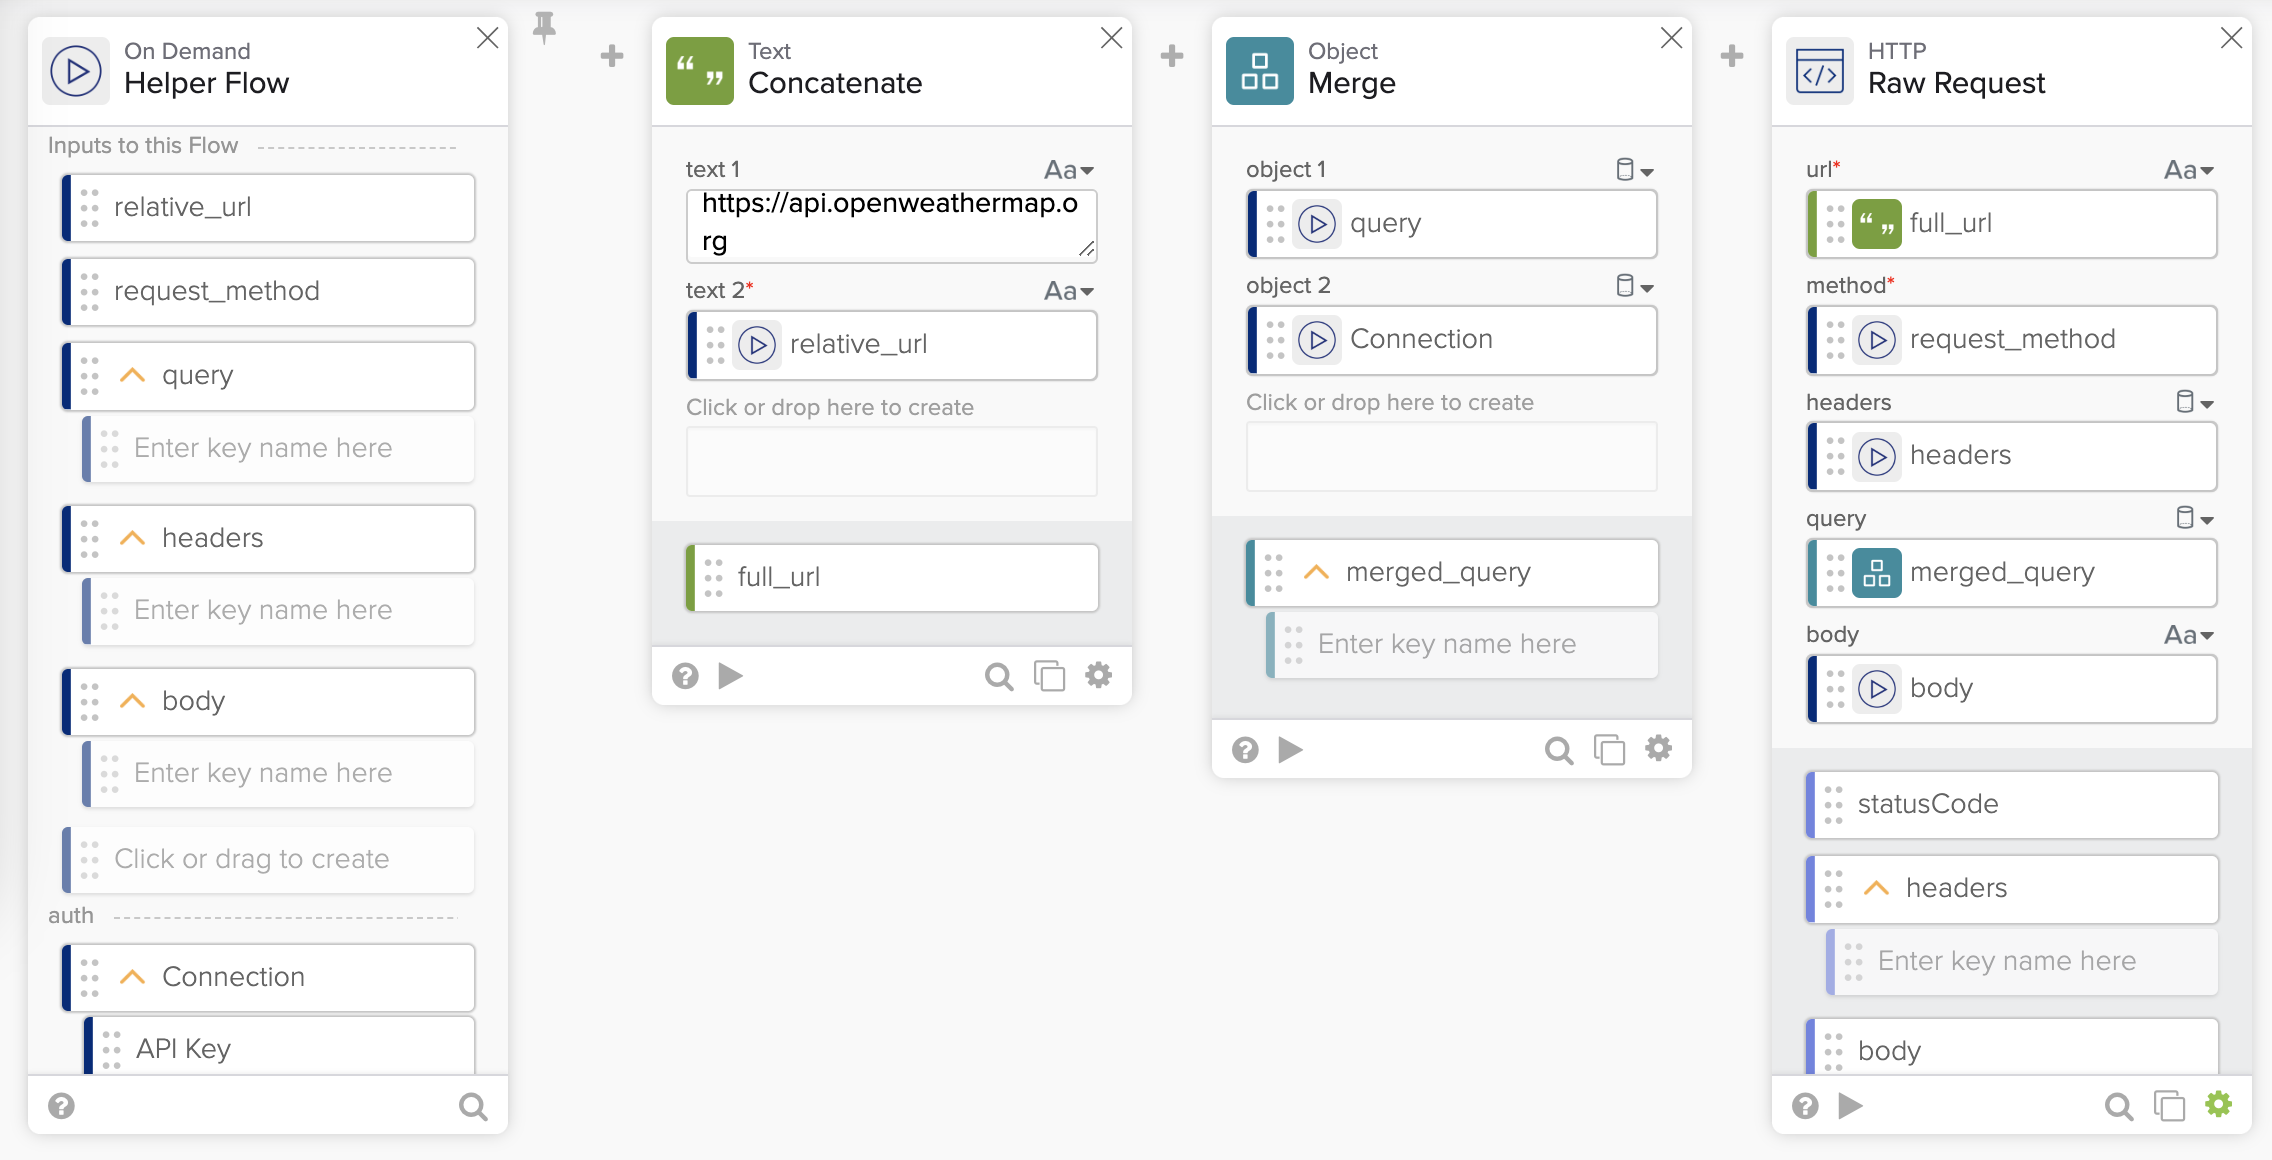
Setting up HTTP request.
You can test the HTTP – Raw Request card if you would like.
- Click ▶️ to test the card.
- For the url field, enter: https://api.openweathermap.org/data/2.5/weather
- Enter GET for the method field.
- For the query field, enter (replace the appid value with your OpenWeather API key):
{
    "q": "Rome, IT",
    "units":"metric",
    "appid": "89b03d9e1df4094dda81b5bc2b01ad5a"
}- Click Test to test the card.
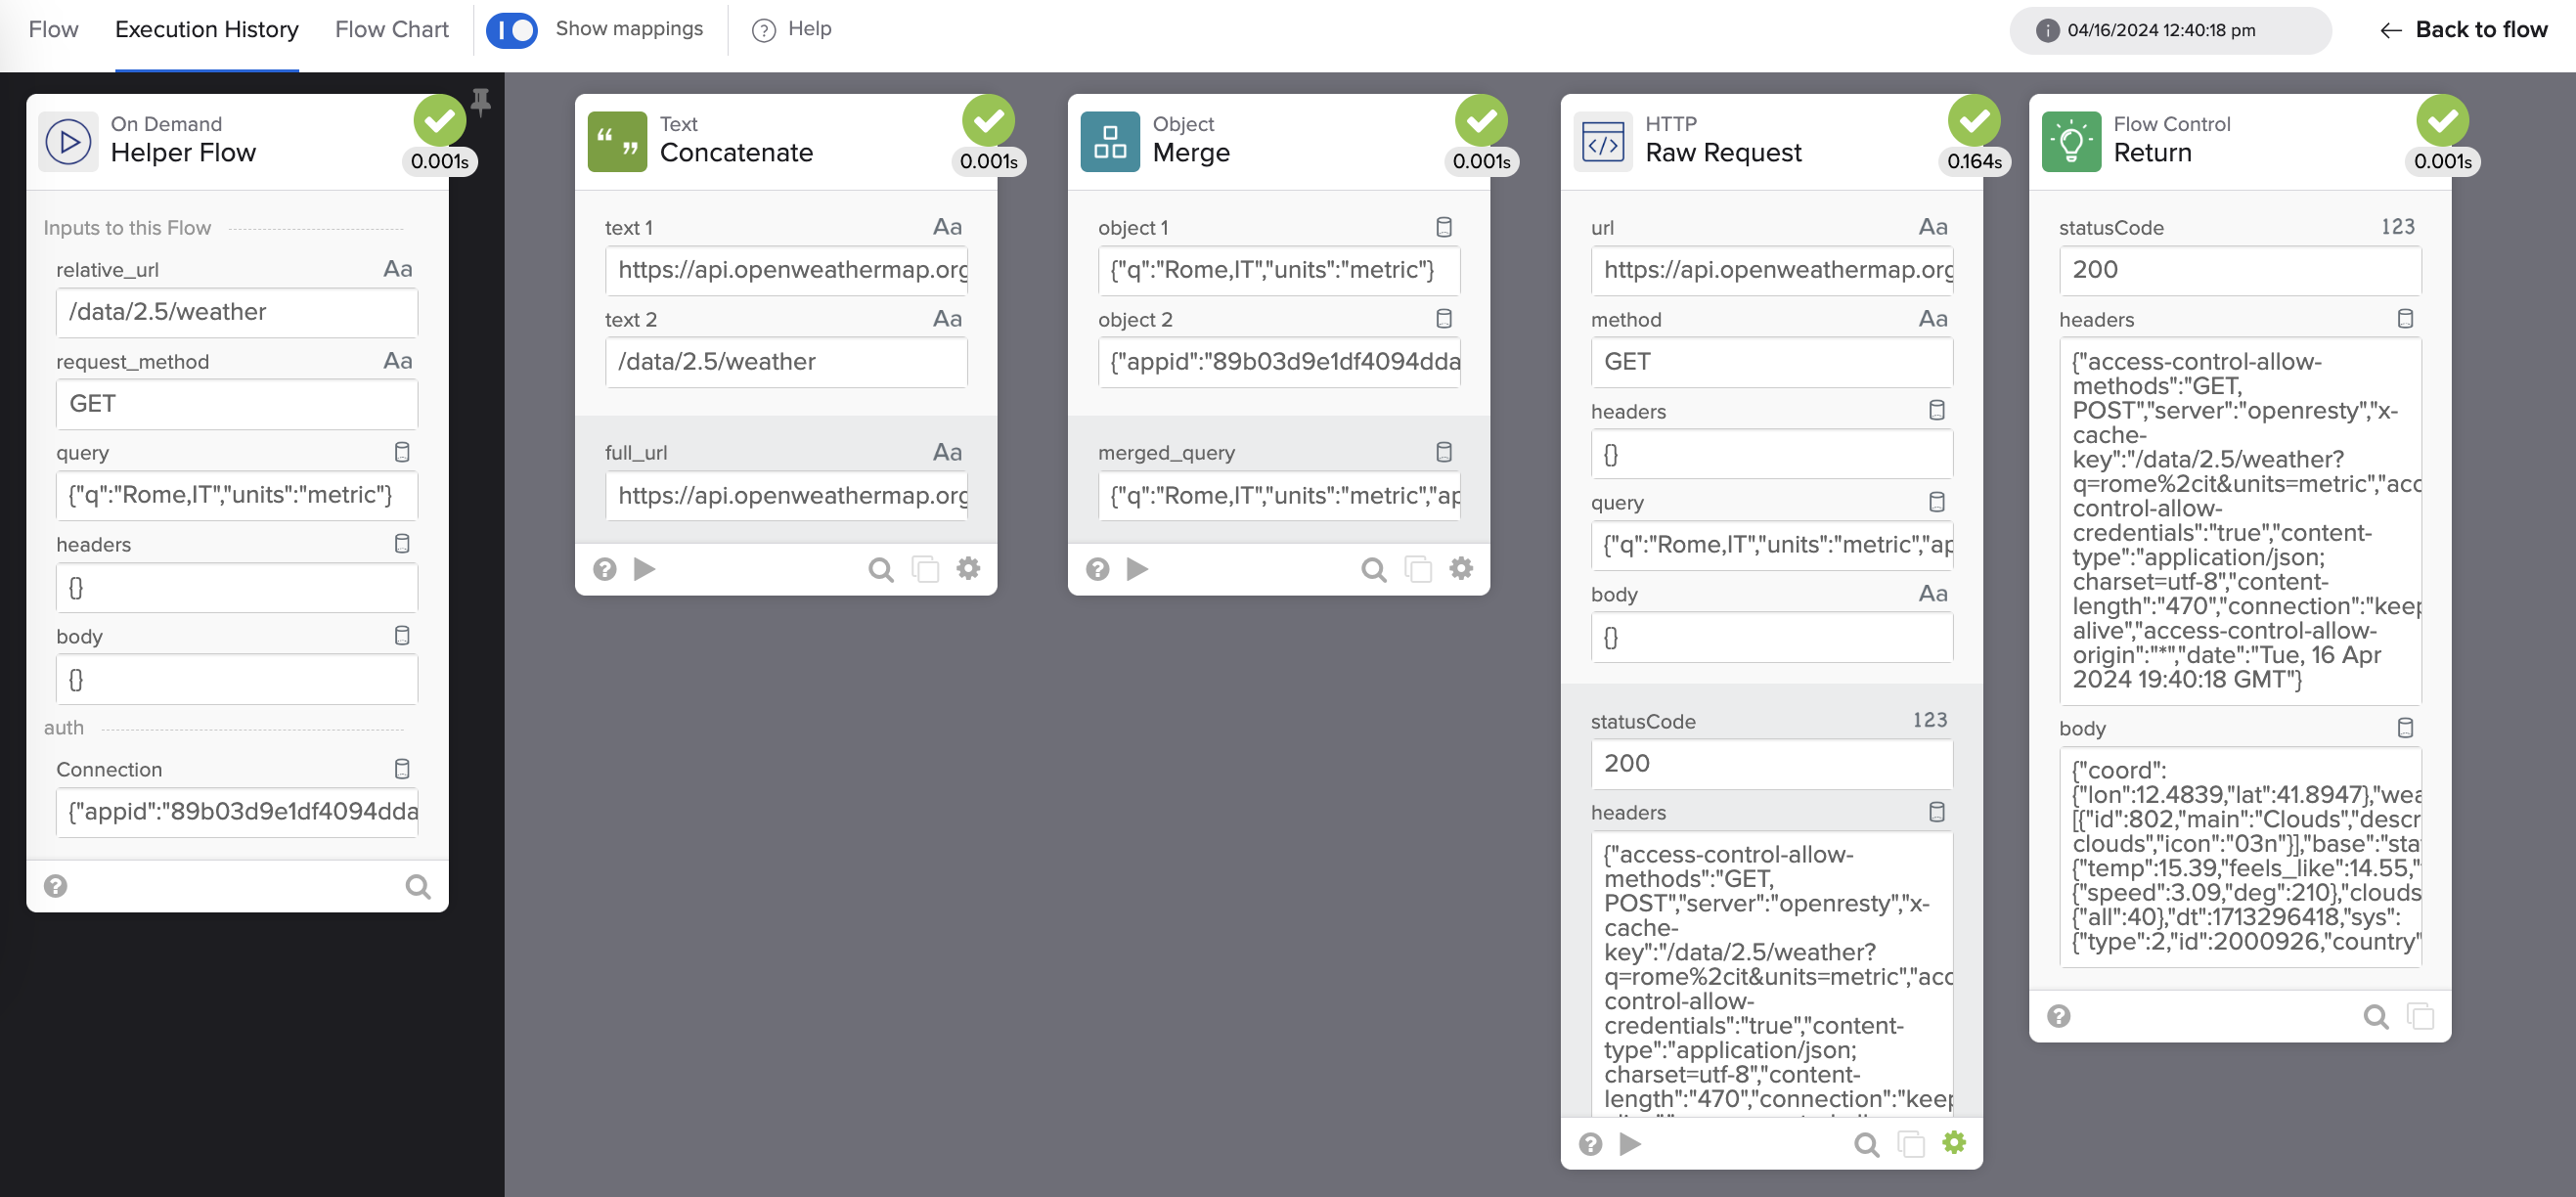
The last step is to set up the flow outputs.
Set up flow outputs
- Connect statusCode, headers, and body fields from the HTTP – Raw Request card to the Flow Control – Return card.
- Change the body field type to Object.
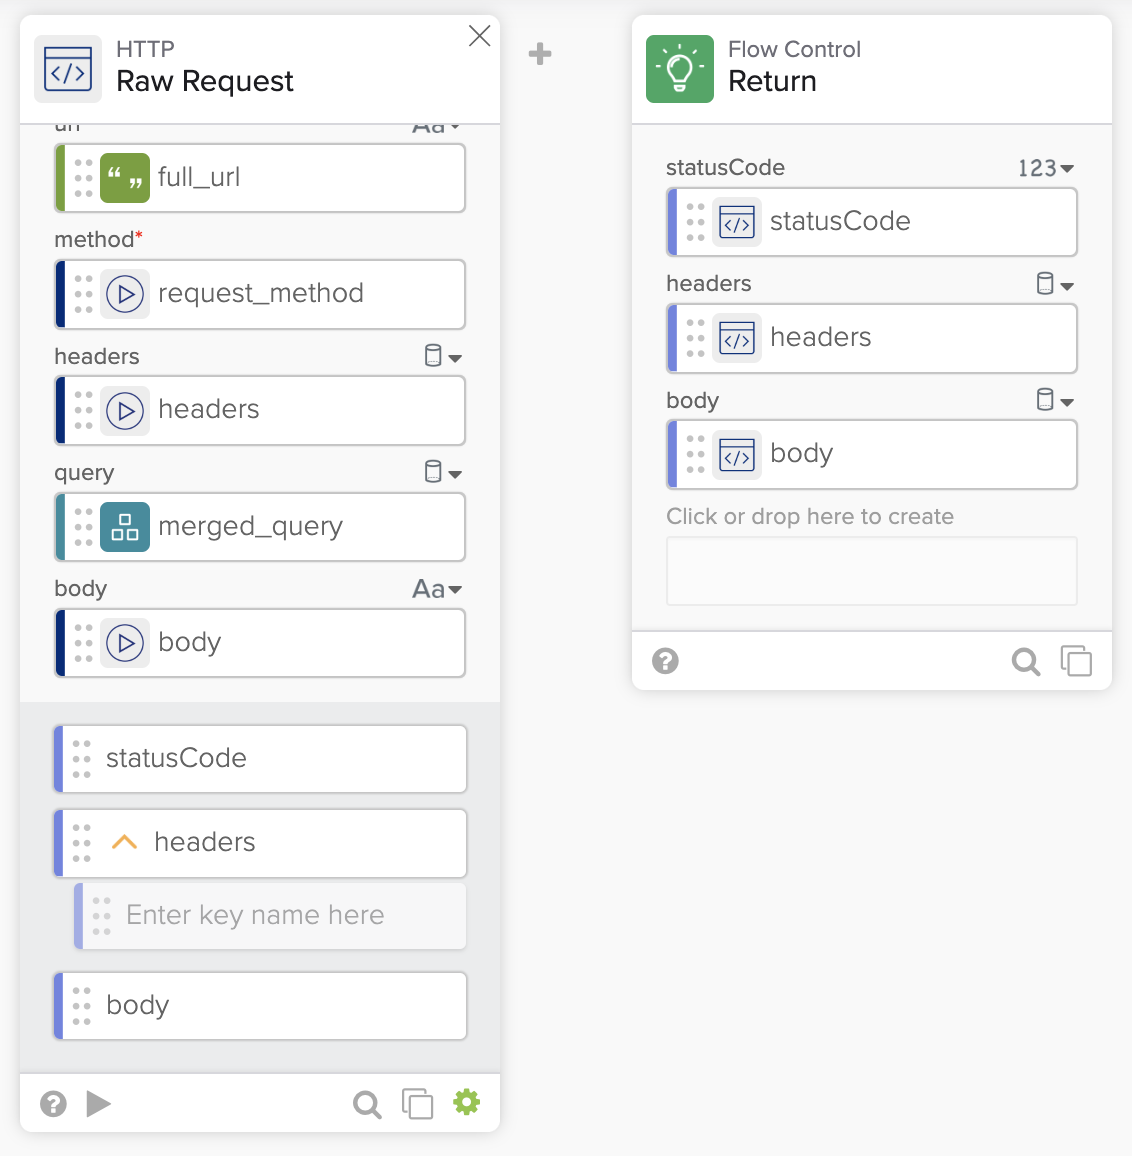
httpHelper output.
Test the httpHelper flow
You created a flow with several inputs. One of the inputs is an OpenWeather API endpoint (relative_url). The flow calls the API endpoint and returns a response (statusCode, headers, and body).
It’s a good practice to test the flow.
- To test the flow, click the Run button.
- Select New connection from the Test Connection list.
- Enter OpenWeather connection for the Name.
- Enter OpenWeather API connection for the Description.
- Enter your OpenWeather API key for the API Key.
- Click Create.
You created a connection to OpenWeather API.
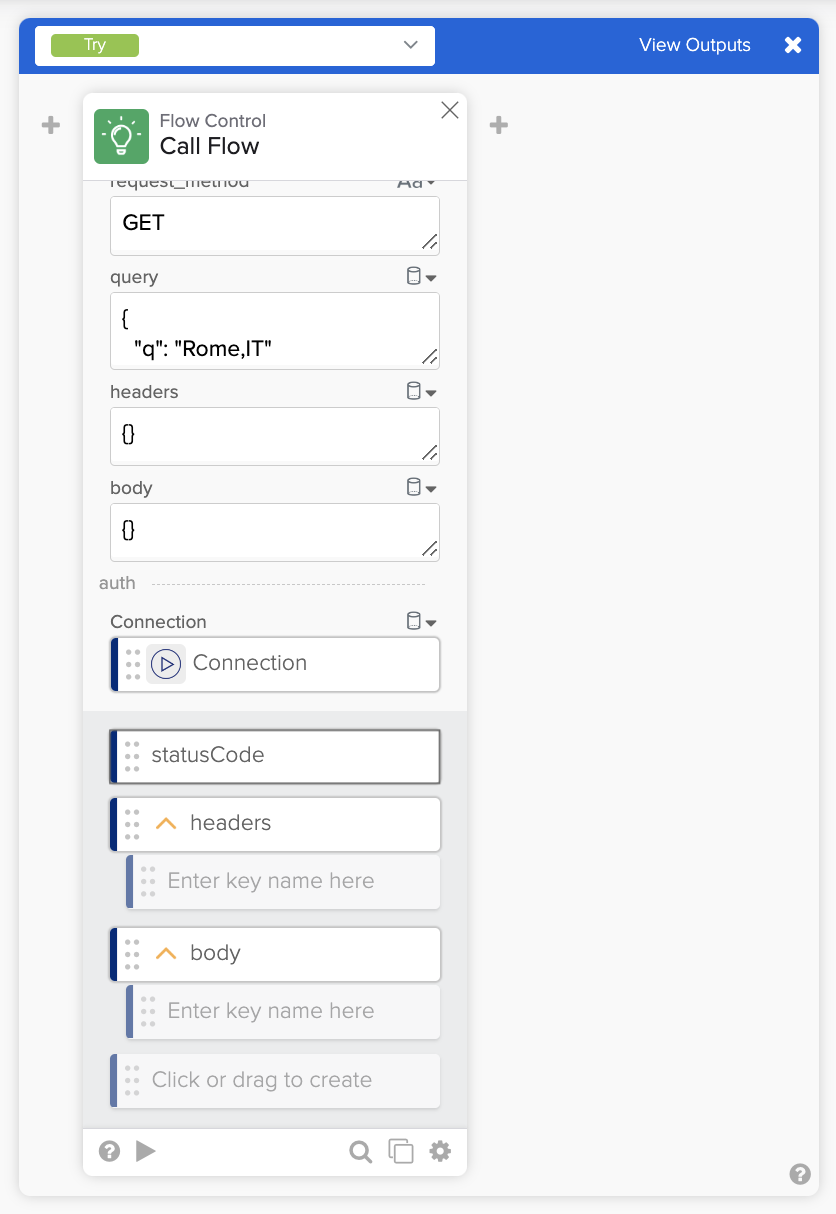
Next, provide the rest of the information for the flow input:
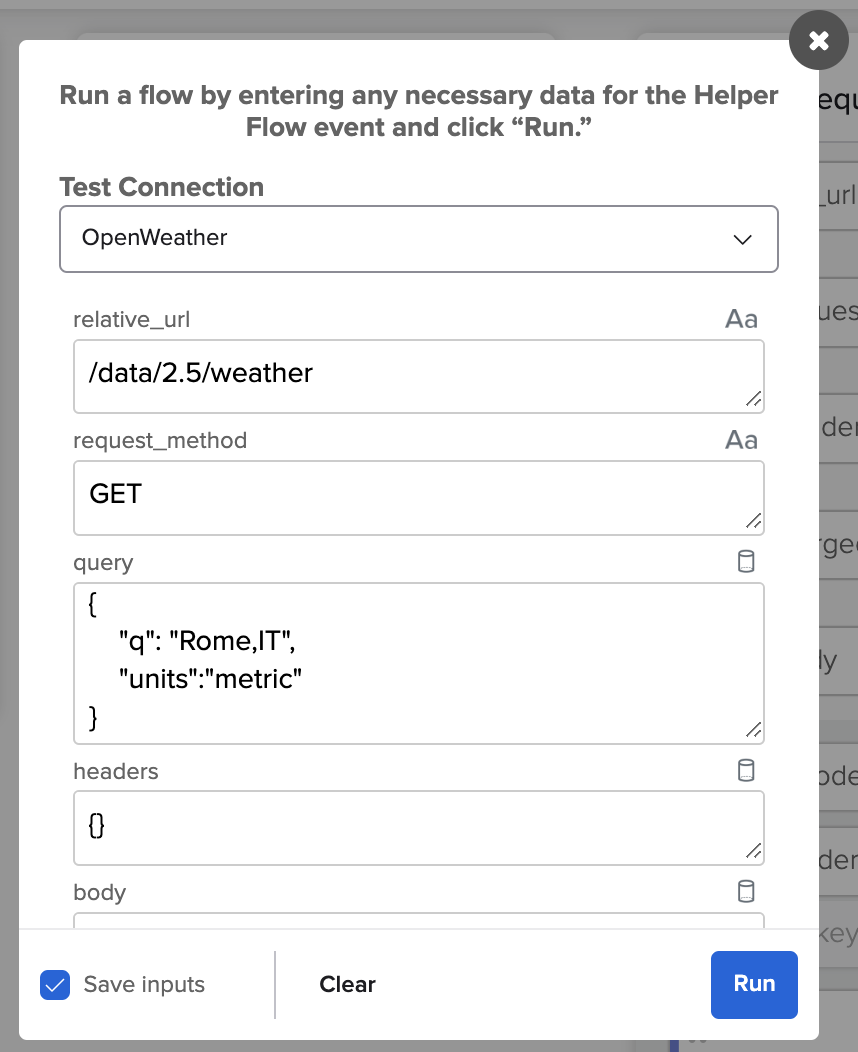
Input for the httpHelper flow.
- Enter /data/2.5/weather for relative_url.
- Enter GET for request_method.
- For the query, enter with your OpenWeather API key:
{
    "q": "Rome,IT",
    "units":"metric"
}- Leave headers and body fields blank.
- Click Run to run the flow.
Testing the httpHelper flow.
If you’d like, you can create a fake connection that will result in an error. The fake connection will help see how the connector works when authentication fails.
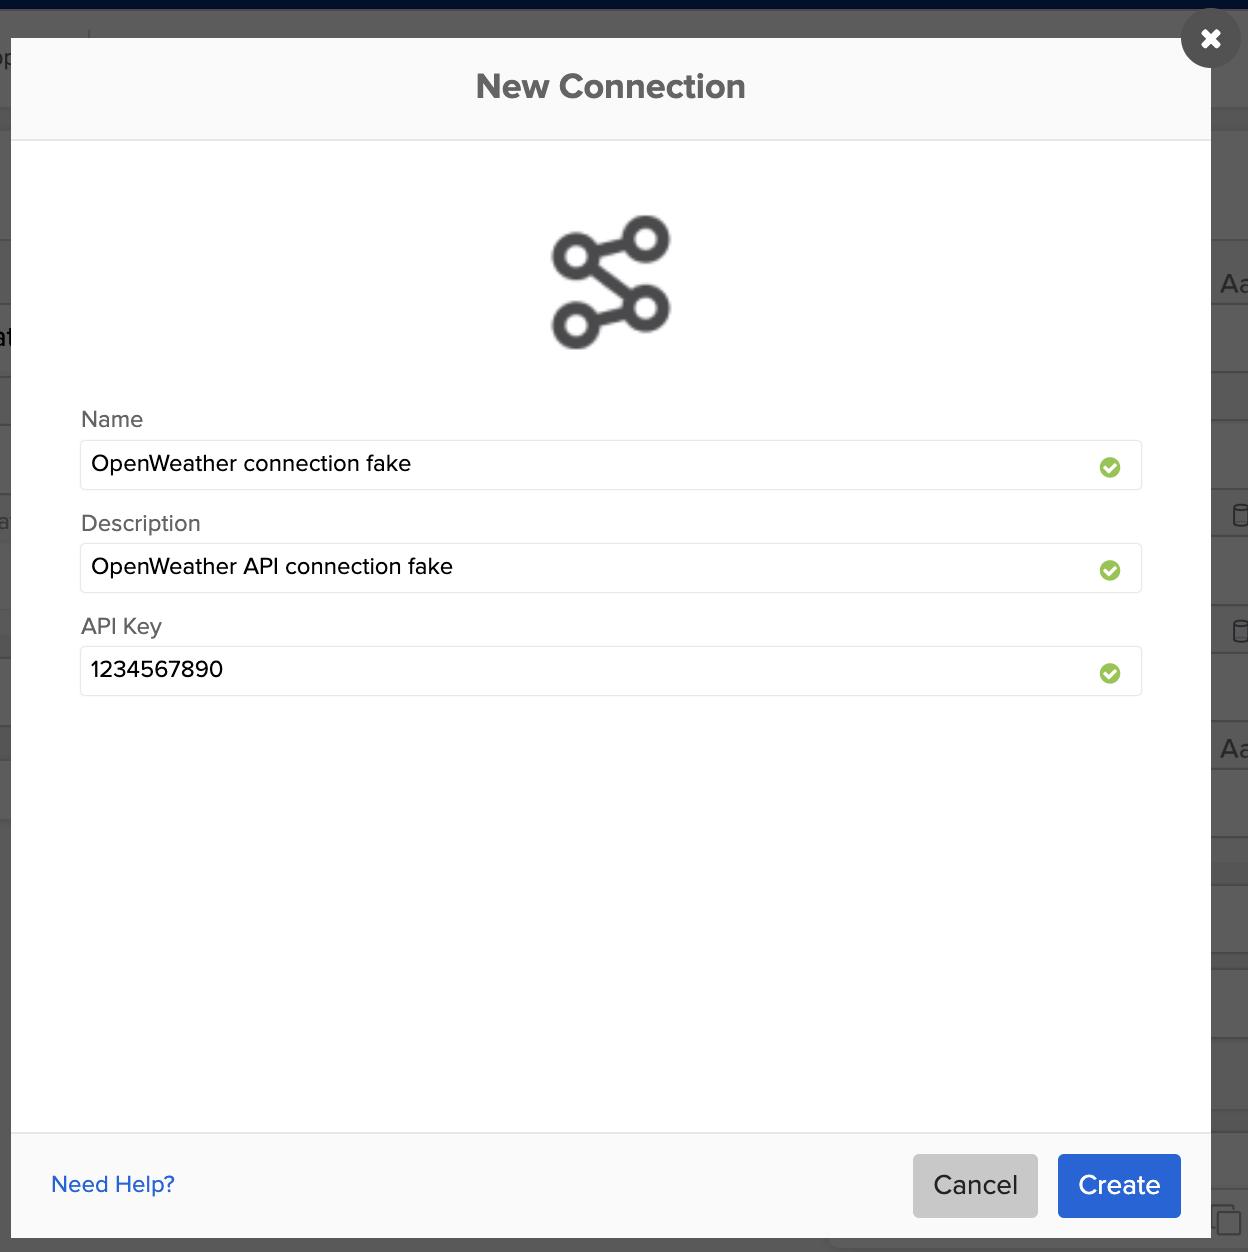
Fake connection.
You built and tested the httpHelper flow. Other connector flows will call the httpHelper flow.
The following section will teach you to create another system flow. This flow will check authentication to the service is working.
Create a flow to check for a valid connection
You will create a flow named _authPing. An _authPing flow is a system flow used by the platform to call an API and check for valid authorization.
This action acts as a validation check and runs when you first authenticate the connector, add new connectors, or open flows.
Create a flow
- Return to the connector project view.
- Click + New Flow from the Flows page.
- Click Add event, and select the Authping event.
- To save the flow, click Unnamed in the upper left corner.
- Enter _authping for the the Name.
- Enter Connection health check. for the description.
- Check the Save all data that passes through the Flow? option.
- Click Save.
New authping flow.
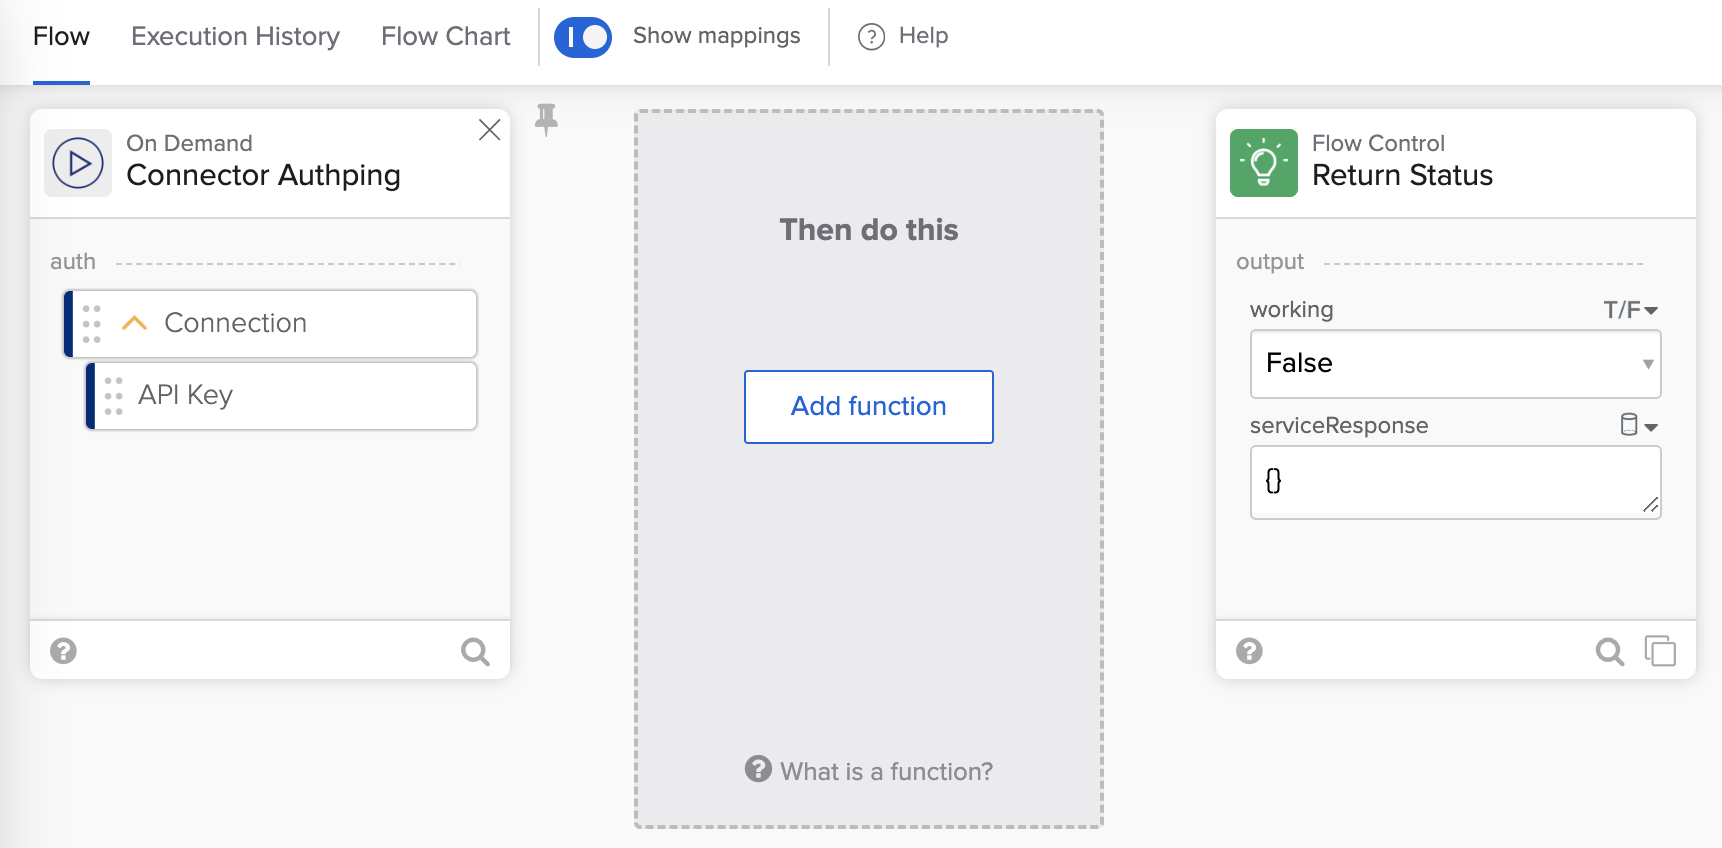
Add connection health check cards
- Click Add function, and select Error Handling – If Error card.
- In the Try block (automatically selected), click ➕, then function (calculator icon), and select the Flow Control – Call Flow card.
- On the Call Flow card, click Choose Flow.
- Select the httpHelper flow, and click Choose.
The flow looks like this:
authping flow with the Call Flow card.
This flow calls the httpHelper flow to check the connection to the service is working. You must use an API endpoint that requires authentication.
Note: The Okta Workflows team recommends a request with the smallest response size. For example, some APIs have a /me endpoint to get information about the logged-in user.
The OpenWeather doesn’t provide /me endpoint. You will use a regular request to check the connection’s health.
Finish configuring the Call Flow card:
- Enter /data/2.5/weather for the relative_url.
- Enter GET for the request_method.
- For query, enter:
{
  "q": "Rome,IT"
}- Leave the headers and body fields blank. You also don’t need units in the query since this is only a ping request.
- Connect the Connection field from the first card to the Connection field on the Call Flow card.
The flow looks like this:

authping flow with the Call Flow card set up.
To create outputs on the Call Flow card:
- Click inside the Click or drag to create area and create the following output fields:
- statusCode (type Number).
- headers (Object).
- body (Object).
Call Flow with outputs.
Next, you will set up a message when the connection is working and a message when the connection is not working.
To set up a message when for working connection:
- Click the ➕ after the Call Flow card inside the If Error card and select the Flow Control – Assign card.
- Add a message field and set it to The connection is successful value in the Control – Assign card.
Create outputs for the If Error card:
- Click View Outputs in the If Error card (upper right corner). The card opens a section where you define the card’s outputs.
- Click inside the field box and create two outputs:
- statusCode.
- message.
- Create the following connections:
- statusCode from the Call Flow card to the statusCode‘s first sub-field.
- message from the Assign card to the message‘s first sub-field.
The card looks like this:
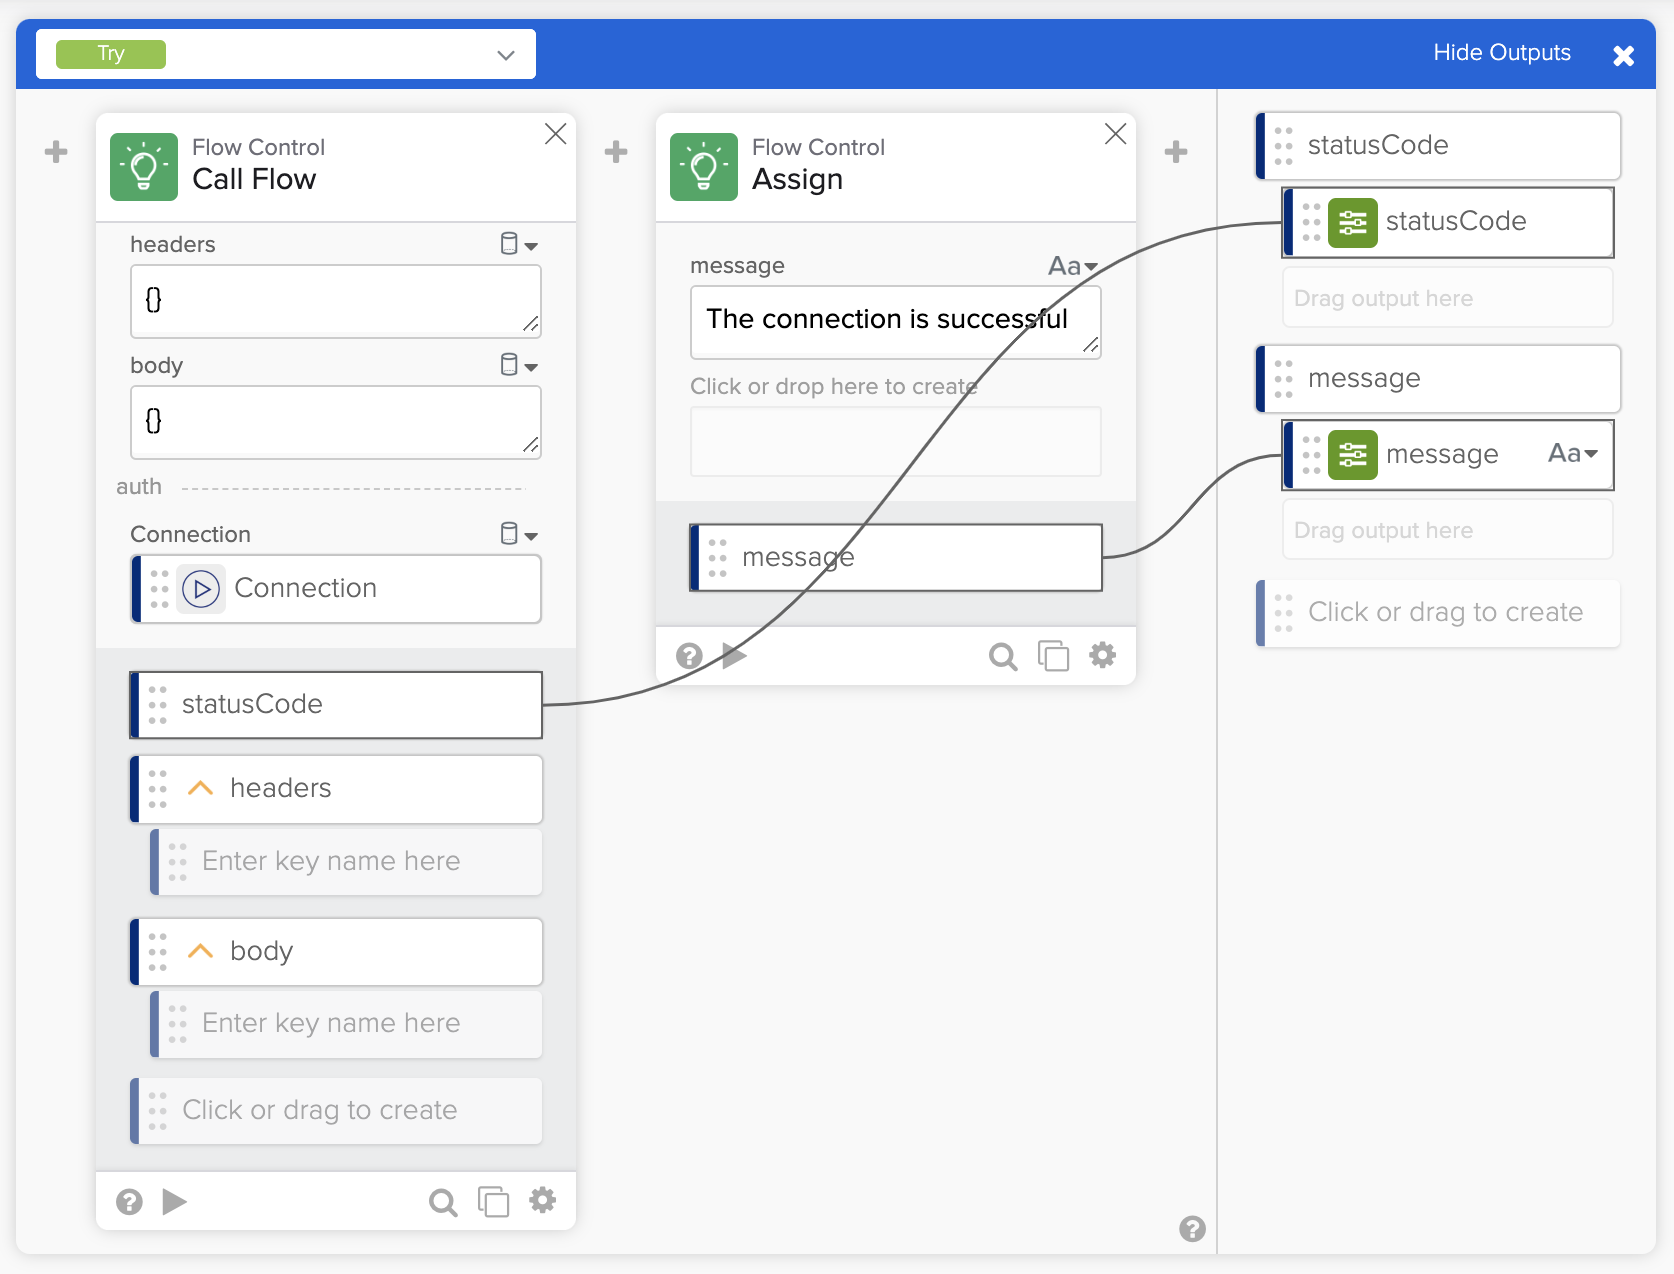
Set up a message when the connection is working.
To set up a message when the connection is not working:
- Using the list where it says Try, switch to the If Error block on the If Error card.
- Add two fields to the Error object:
- statusCode (type Text).
- description (Text).
- Click ➕ to the right of the Error object inside the If Error block and add the Text – Concatenate card.
- Create the following connections:
- description from the Error object to the text 1 field.
- Enter : (colon) in the text 2 field.
- Click to create a third field and connect message from Error to it.
Next, you will connect the message to the If Error card output.
- Click View Outputs on the If Error card.
- Create the following connections:
- statusCode from Error to the statusCode‘s second sub-field.
- output from Concatenate to the message‘s second sub-field.
The card looks like this:
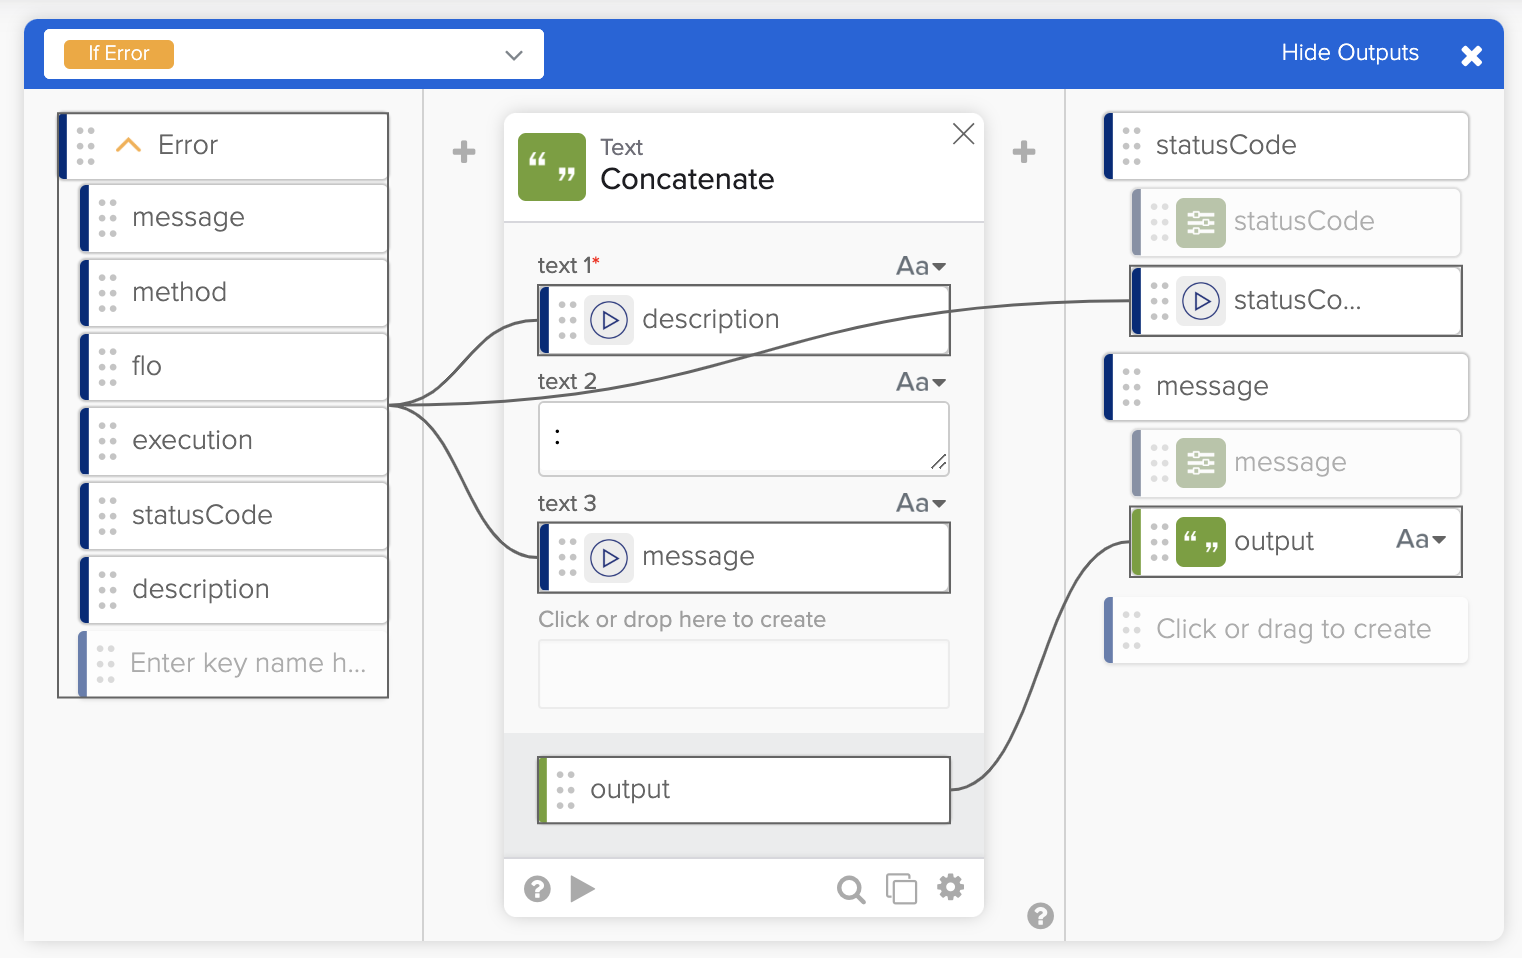
Set up a message when the connection is not working.
Set up flow outputs
The Flow Control – Return Status card has two fields: working and serviceResponse. You will use the information available in this flow to set these fields.
- Click ➕ after the If Error card and add the True/False – Compare card.
- Connect statusCode from If Error card output to value a field.
- Enter 200 for the value b field.
- Rename the result output field to working.
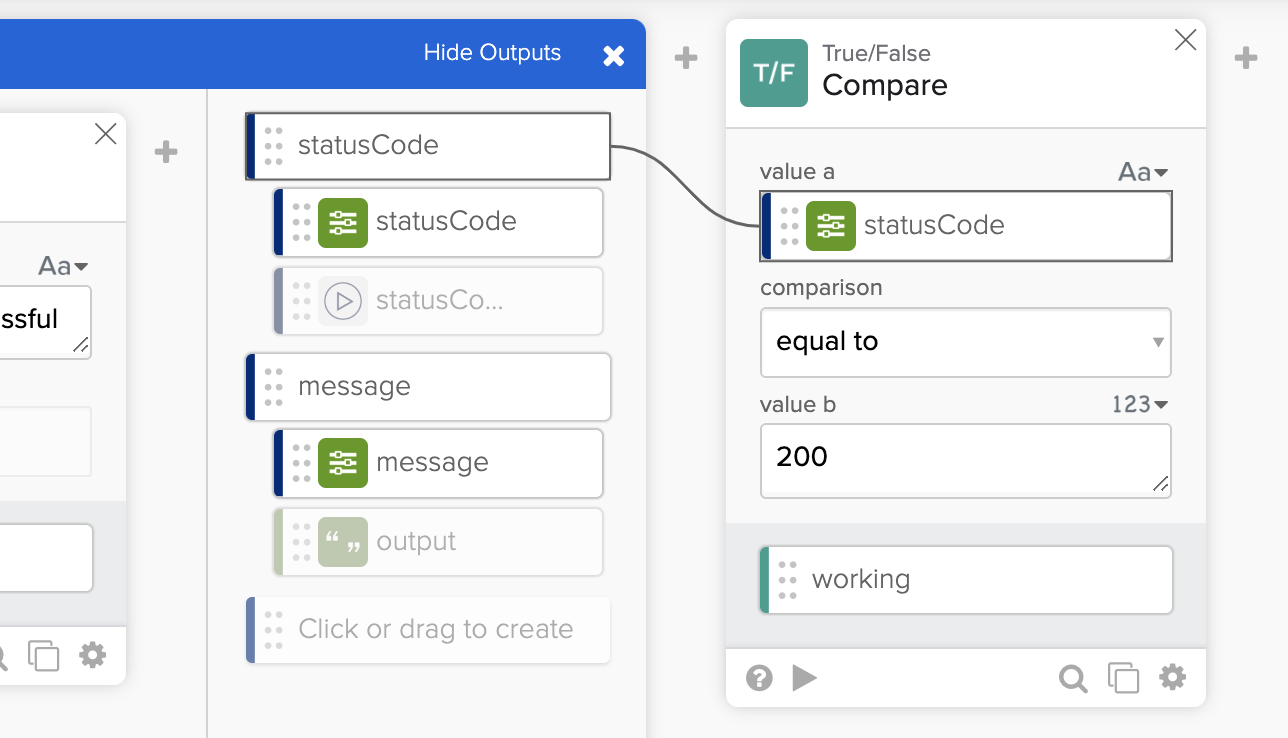
Setting up connection status code.
If the call to the API is successful (200), you know the connection is working.
- Click ➕ after the True/False – Compare card and add the Object – Construct card.
- Create two fields on the Construct card:
- statusCode (type Text).
- body (Text).
- Create the following connections:
- statusCode from If Error card output to the statusCode field on the Construct card.
- message from If Error card output to to body field on the Construct card.
- Rename the output field on the Construct card to serviceResponse.
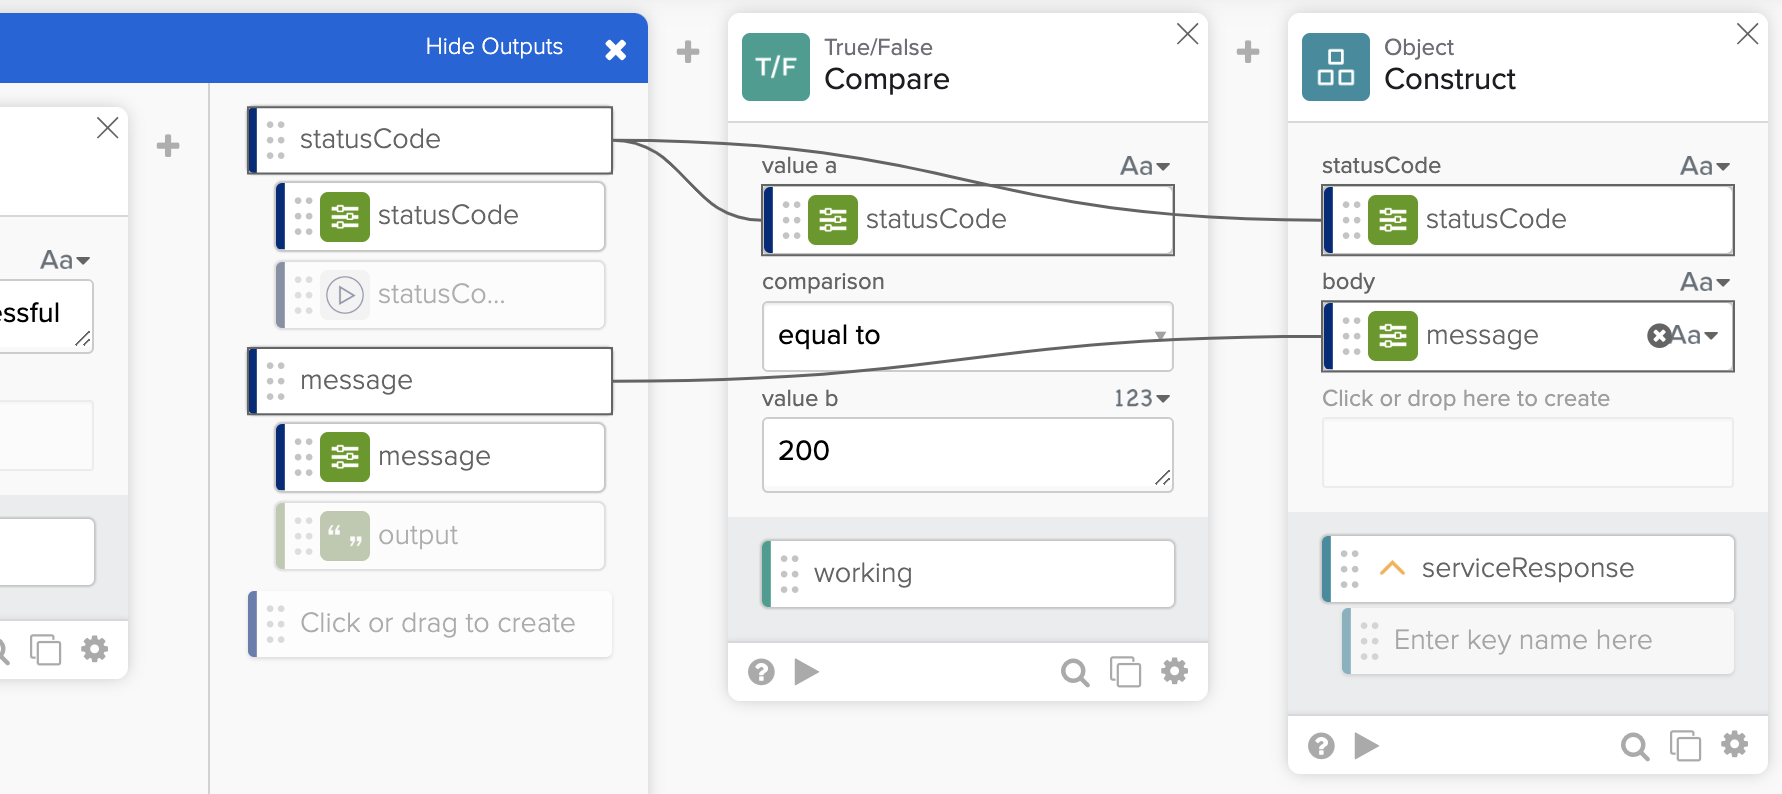
Setting up connection status response.
To set up flow outputs:
- Connect the working from the Compare card to the working field on the Return Status card.
- Connect serviceResponse from the Construct card to the serviceResponse field on the Return Status card.
The complete flow:
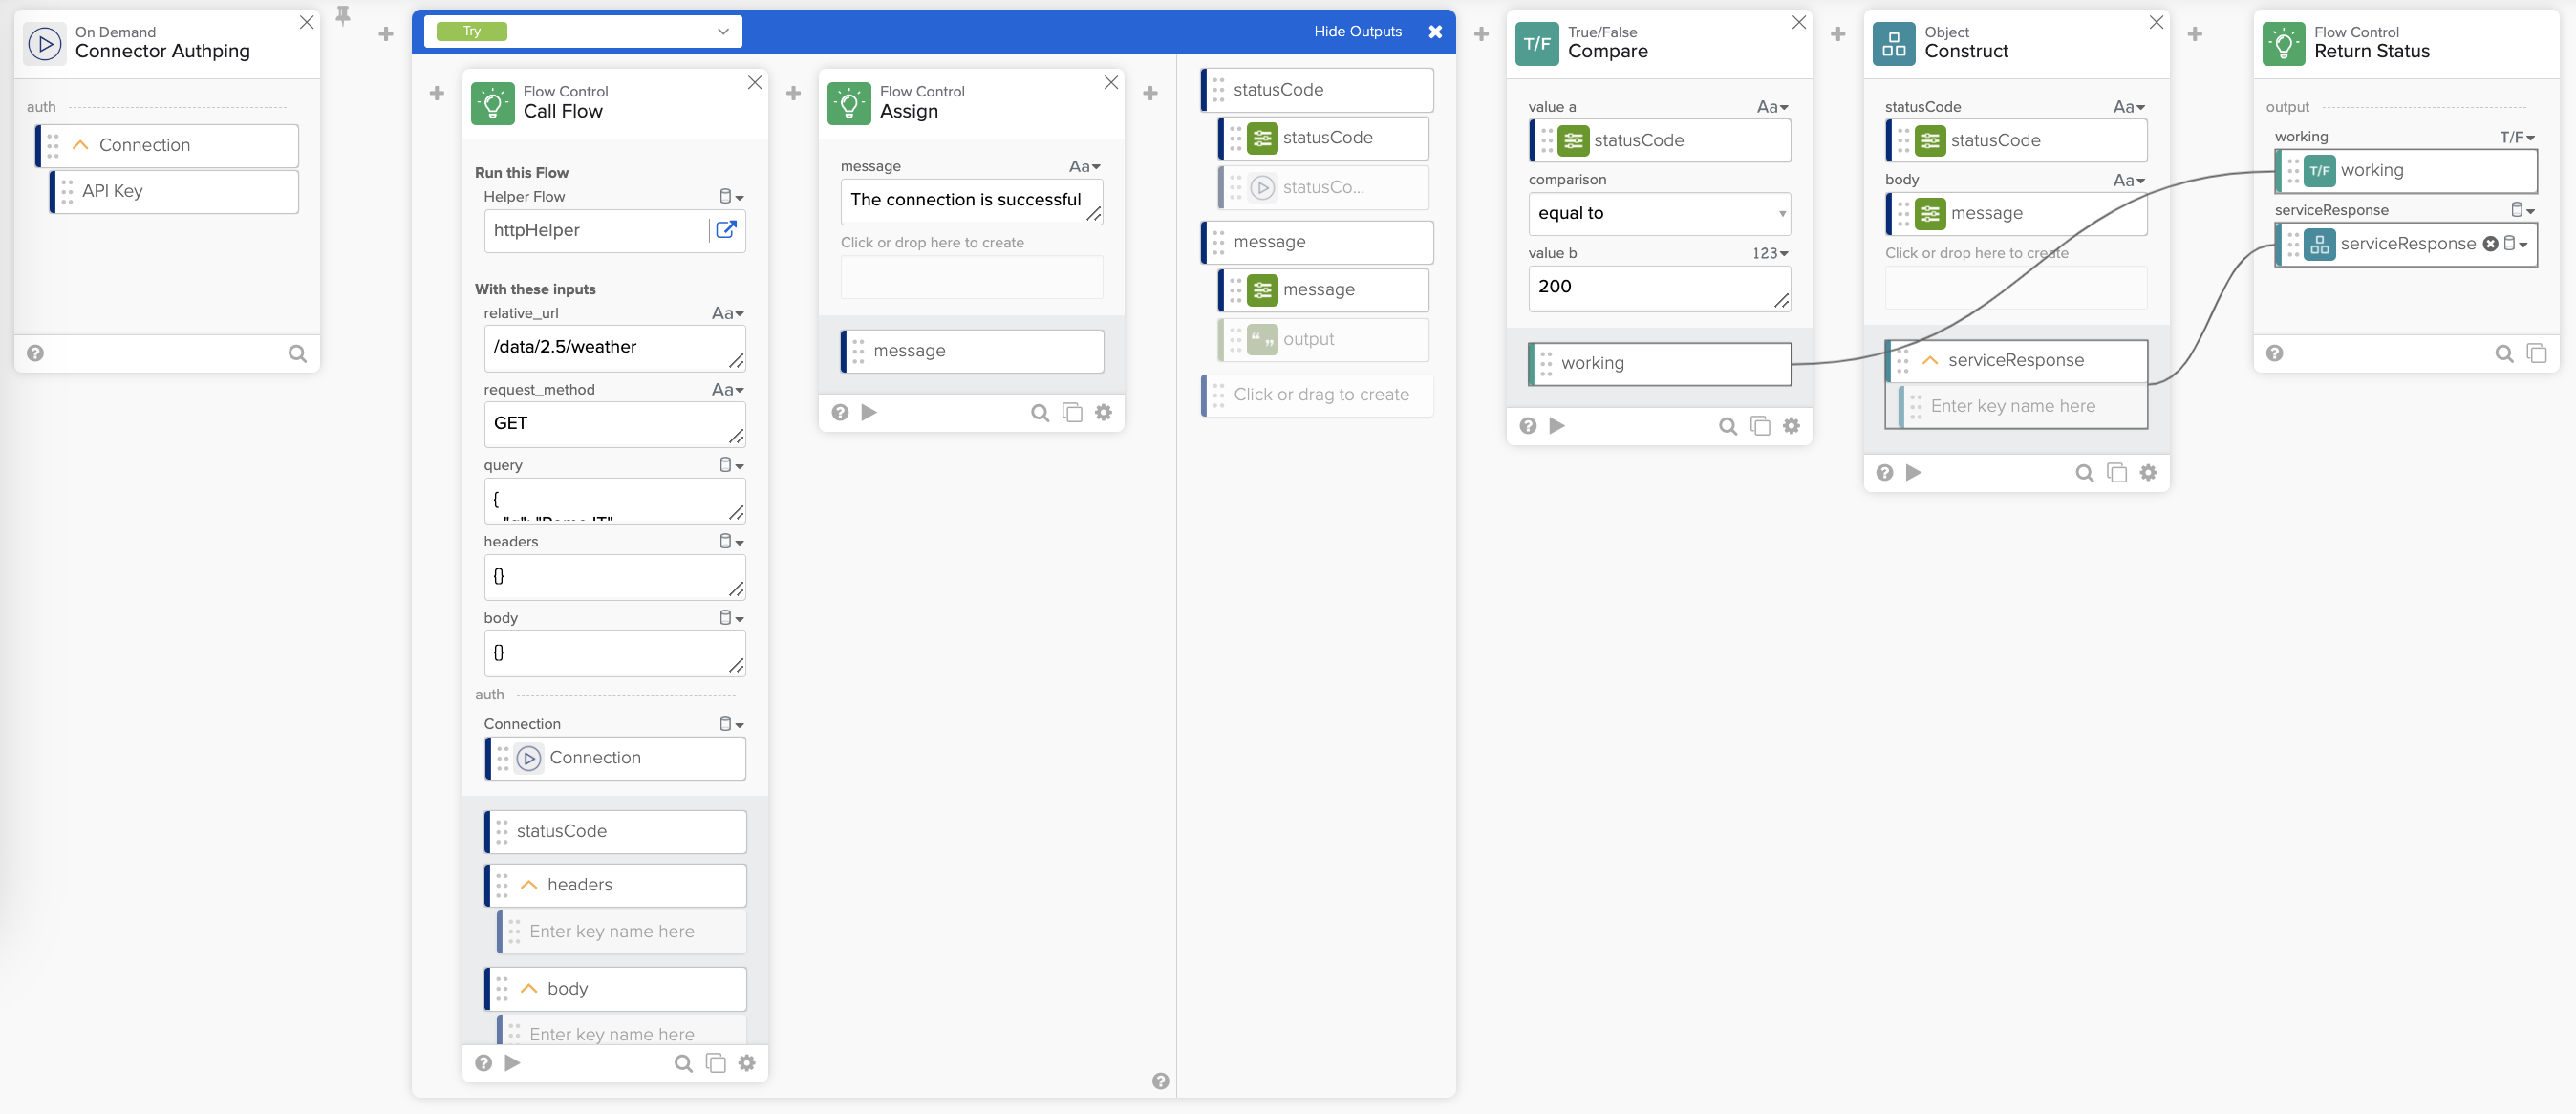
The complete authping flow.
Test the flow
- Save the flow.
- Click Run.
- Select a working connection and click Run.
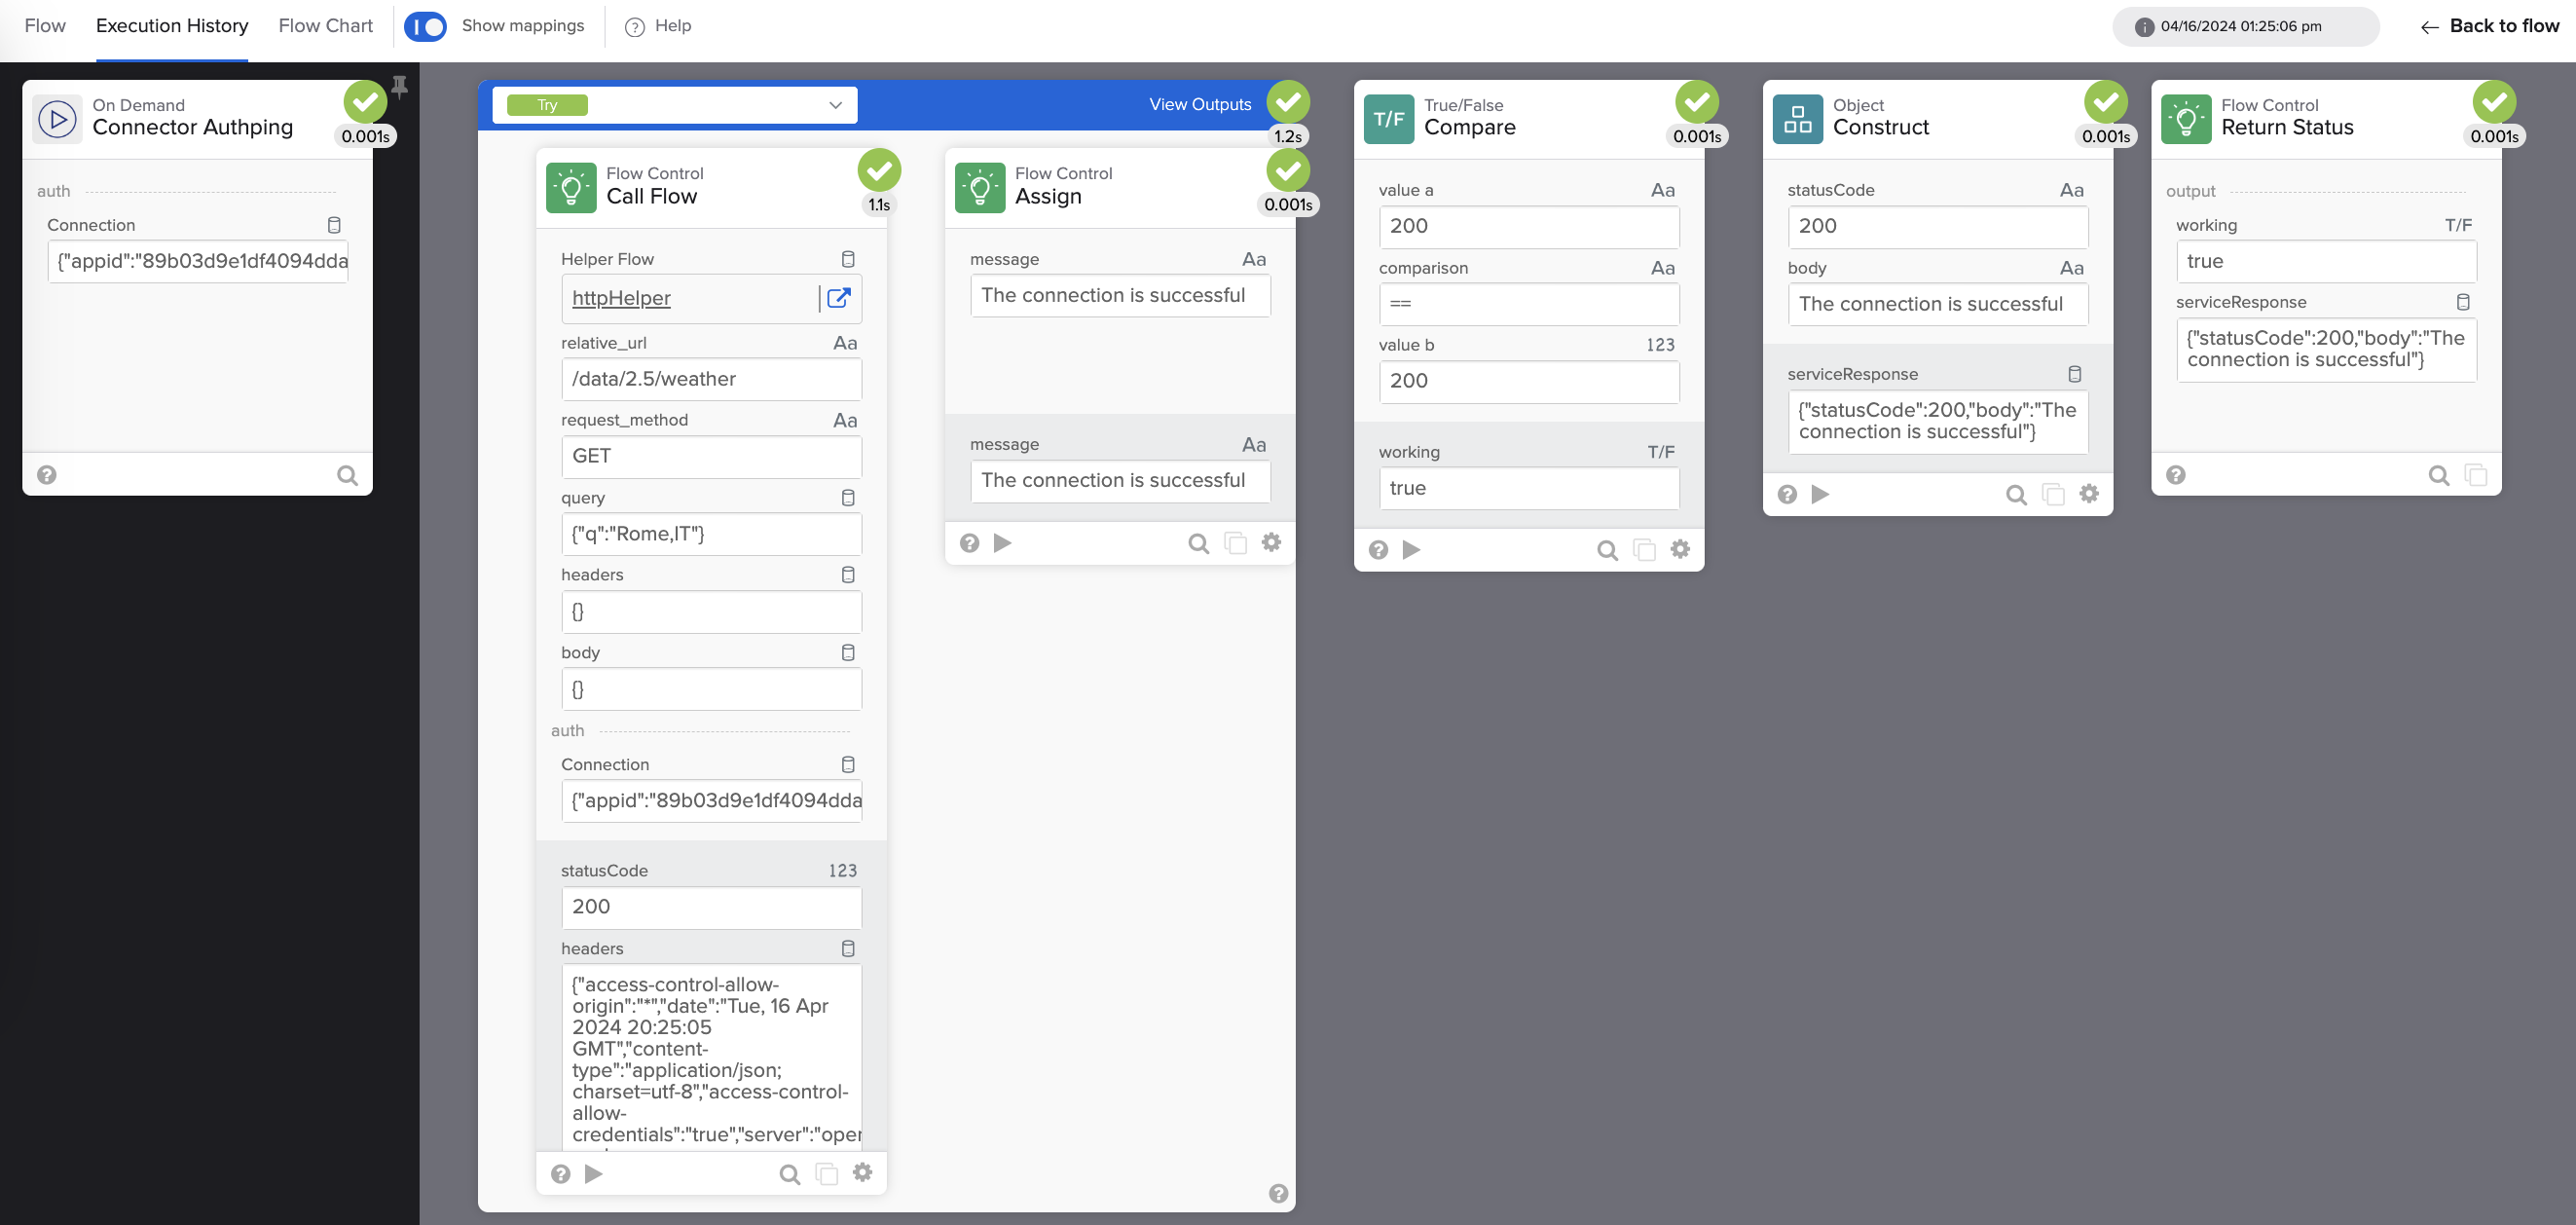
Testing the authping flow.
Select a non-working connection you created and rerun the flow.
In this section, you created the second system flow named _authping. The first system flow is httpHelper.
In the following sections, you will create action flows that perform the API calls with the help of the system flows.
Create an action for current weather
In this section, you will create a connector action for OpenWeather’s current weather endpoint.
Create a flow
- Go back to the connector’s project view.
- Click + New Flow to create a new flow.
- Click Unnamed in the upper left corner to name the flow.`
- Enter Current for the Flow name.
- Enter This action returns current weather data for a city. for the Description.
- Check the Save all data that passes through the Flow? option
- Click Save to save the flow.
Configure the flow as an action
An action flow makes a service API call.
To set up this flow as an action flow:
- Click Add event and then Action event type.
The flow looks like this:
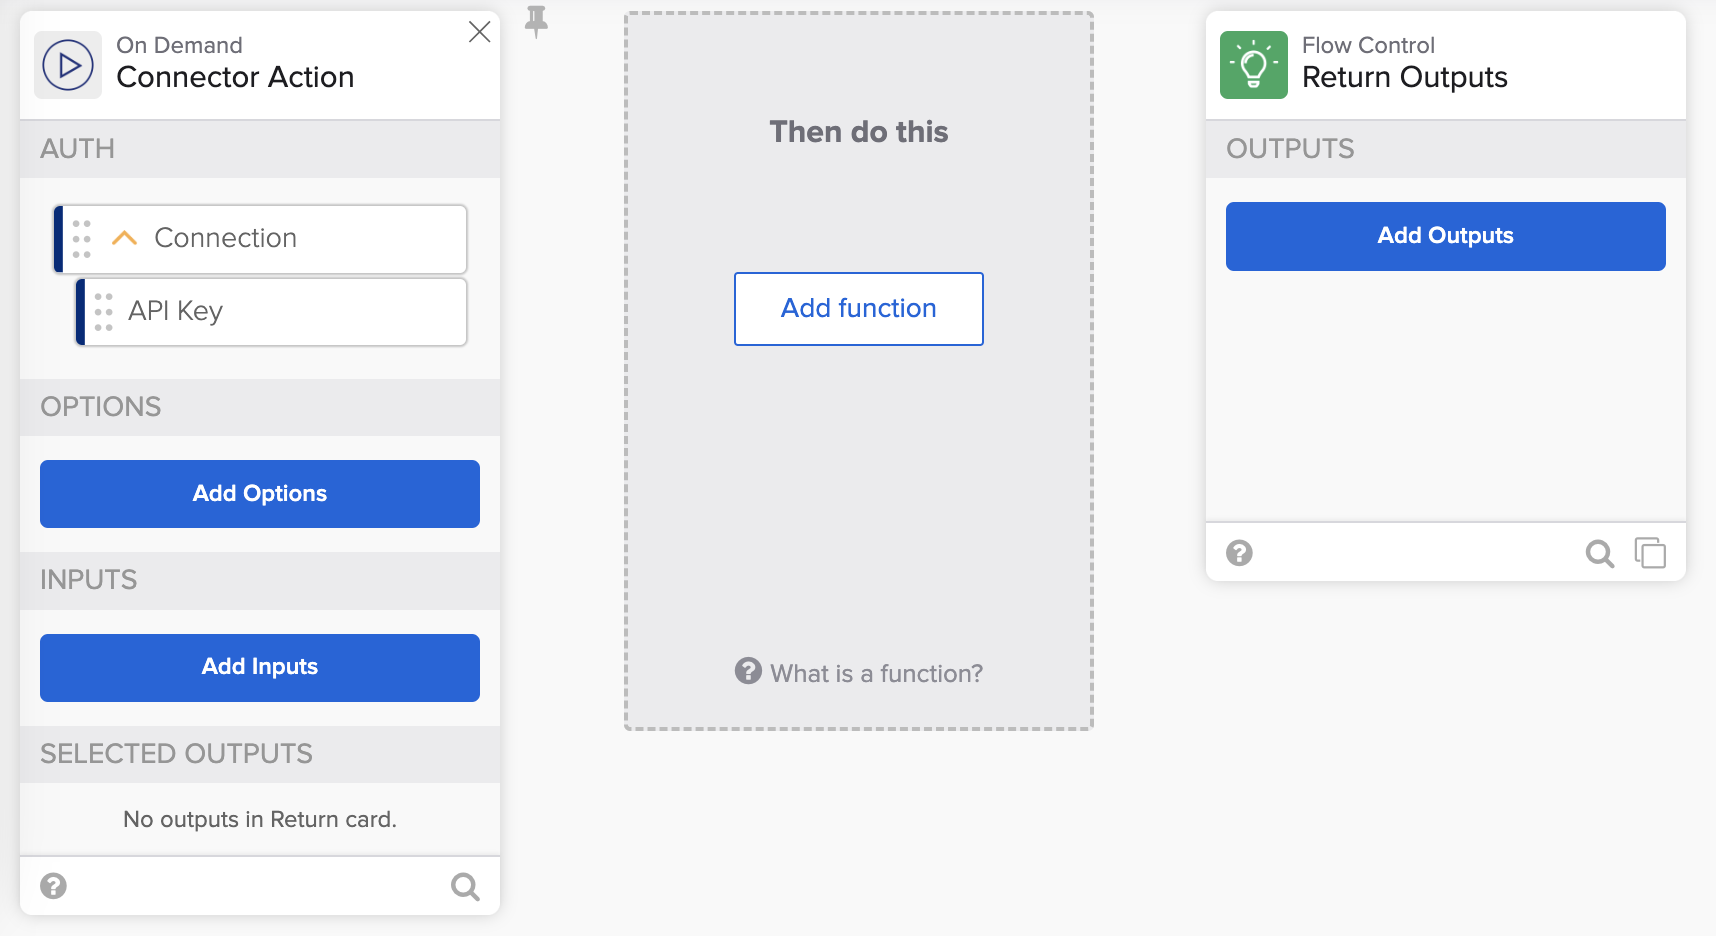
New action flow.
Set up action inputs
Action inputs are any inputs you need to make an API call to the underlying service.
You will use OpenWeather’s API request by city name and country for this action. This means the connector needs three inputs: city, country and units.
To set up the inputs:
- Click Add Inputs on the Connector Action card.
- Open the Add group list and select Add Static Group.
- Create the input for the city:
- Label: City.
- Field Type: Text Field.
- Data Type: Text.
- Required: yes.
- Add the input for the country:
- Label: Country.
- Field Type: Text Field.
- Data Type: Text.
- Required: no.
- Add the input for the units:
- Label: Units.
- Field Type: Dropdown.
- Data Type: Text.
- Required: no.
- Add three options for units:
- Option: Celcius, Value: metric.
- Option: Fahrenheit, Value: imperial.
- Option: Kelvin, Value: standard.
You can see a preview of the card on the right-hand side.
This is how the setup looks:
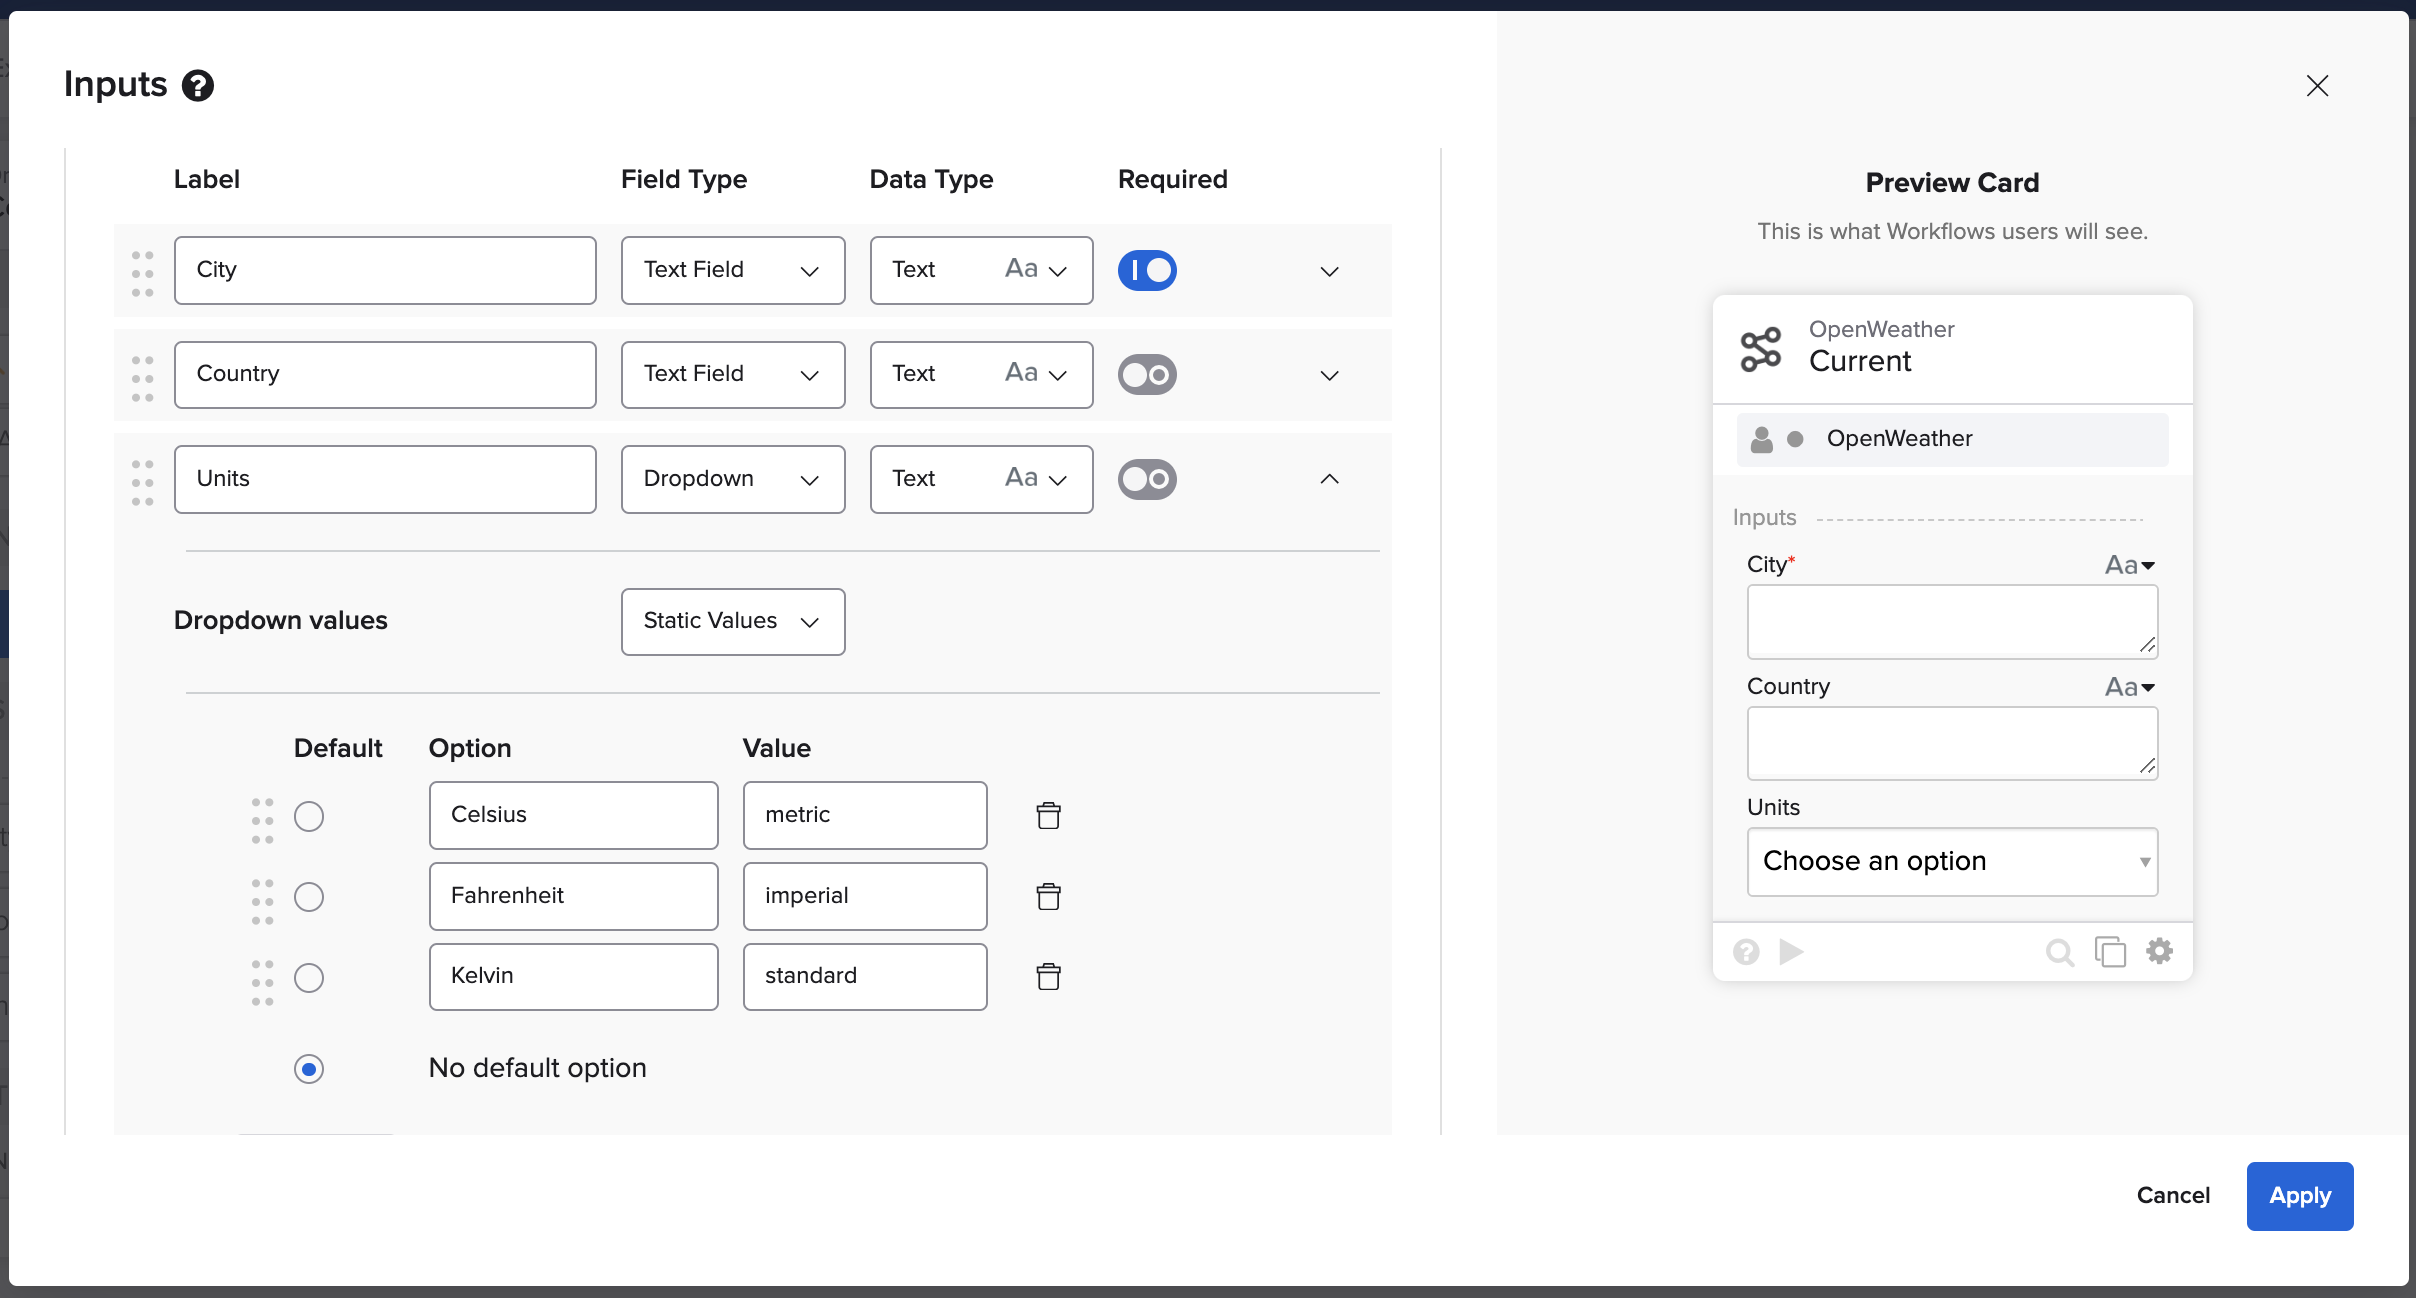
Setting up action inputs.
- Click Apply to save the inputs.
This is how the flow looks:
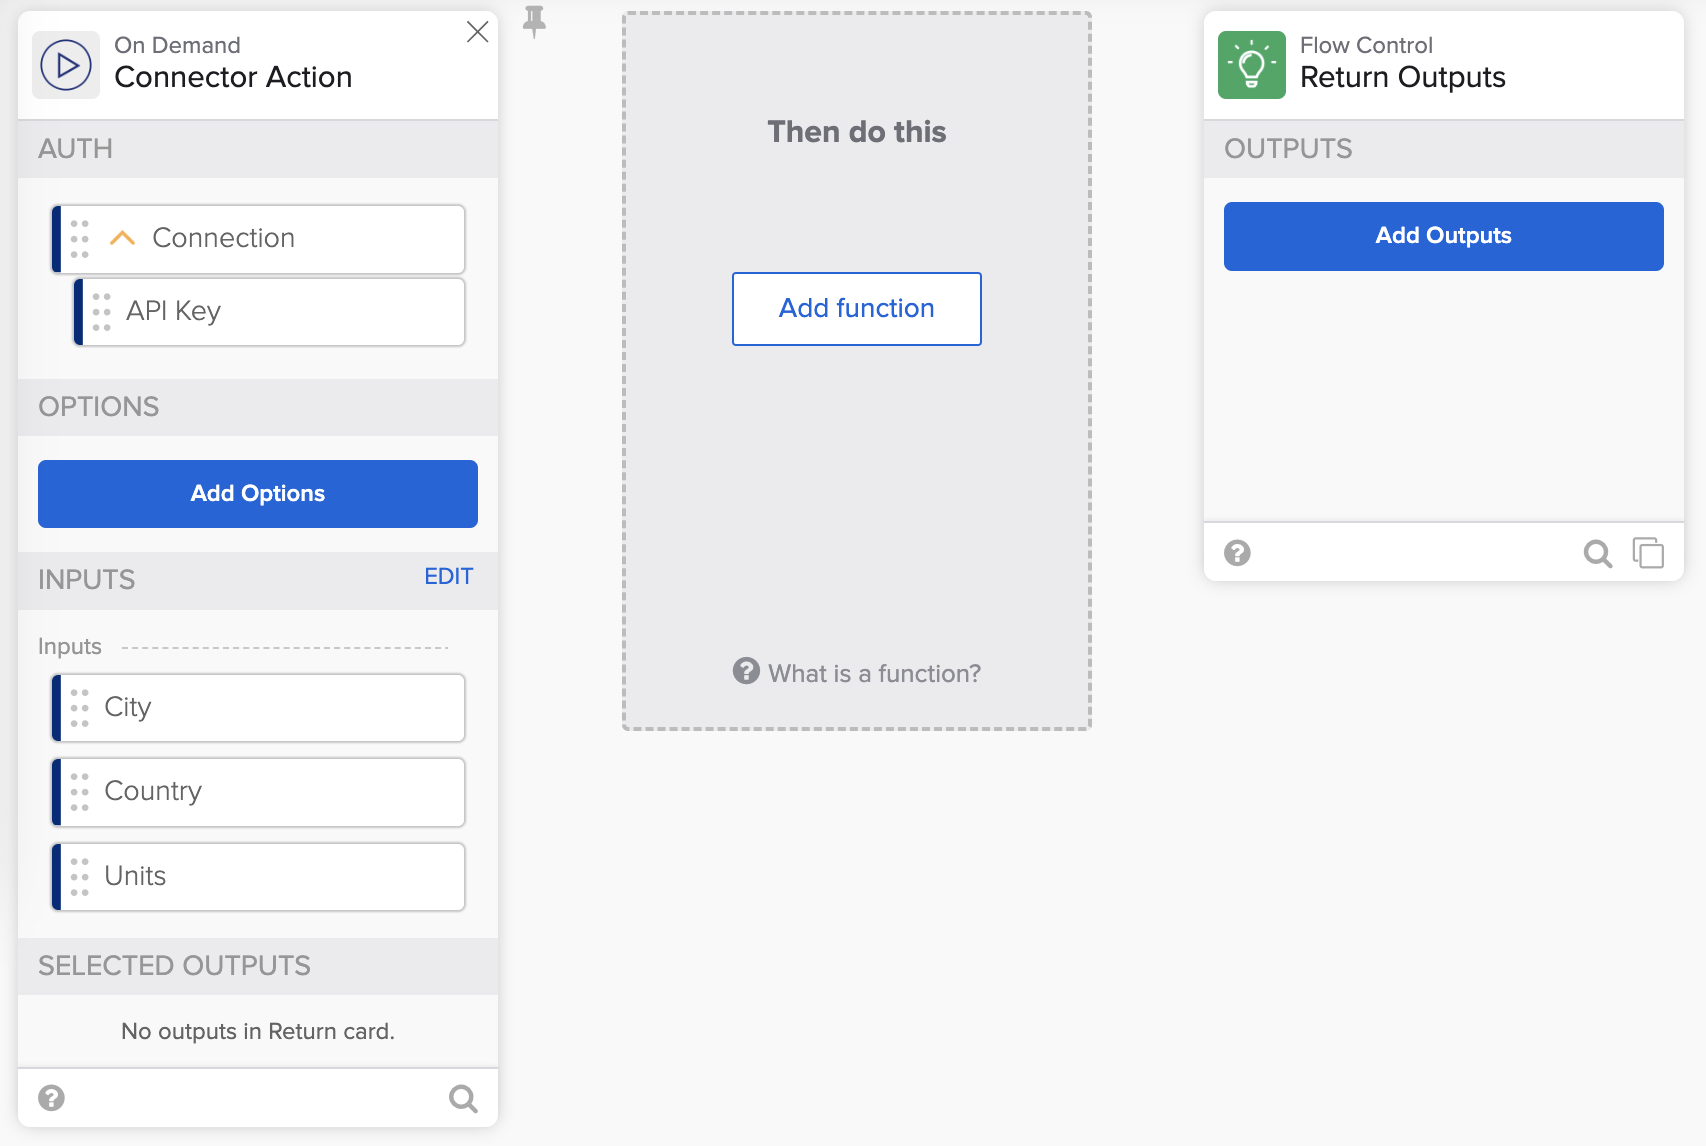
Action flow with inputs.
Format inputs for the API call
You need to format the inputs in a format that the OpenWeather API requires. This is how an API call looks:
https://api.openweathermap.org/data/2.5/weather?q={city name},{country code},units={units}&appid={API key}You need to format the inputs as:
q={city name},{country code}&units={units}For example:
q=Rome,IT&units=metricYou will use several cards to create this query.
First, set up the query for the q parameter:
- Add the Text – Concatenate card after the Connector Action card.
- Create the following connections:
- City to text 1 on the Concatenate card.
- Enter , (comma) for text 2 field on the Concatenate card.
- Country to the third field on the Concatenate card.
- Add the Object – Construct card after the Concatenate card.
- Create a filed and name the field q.
- Connect output from Concatenate card the to the q field.
- Rename the output field to query1.
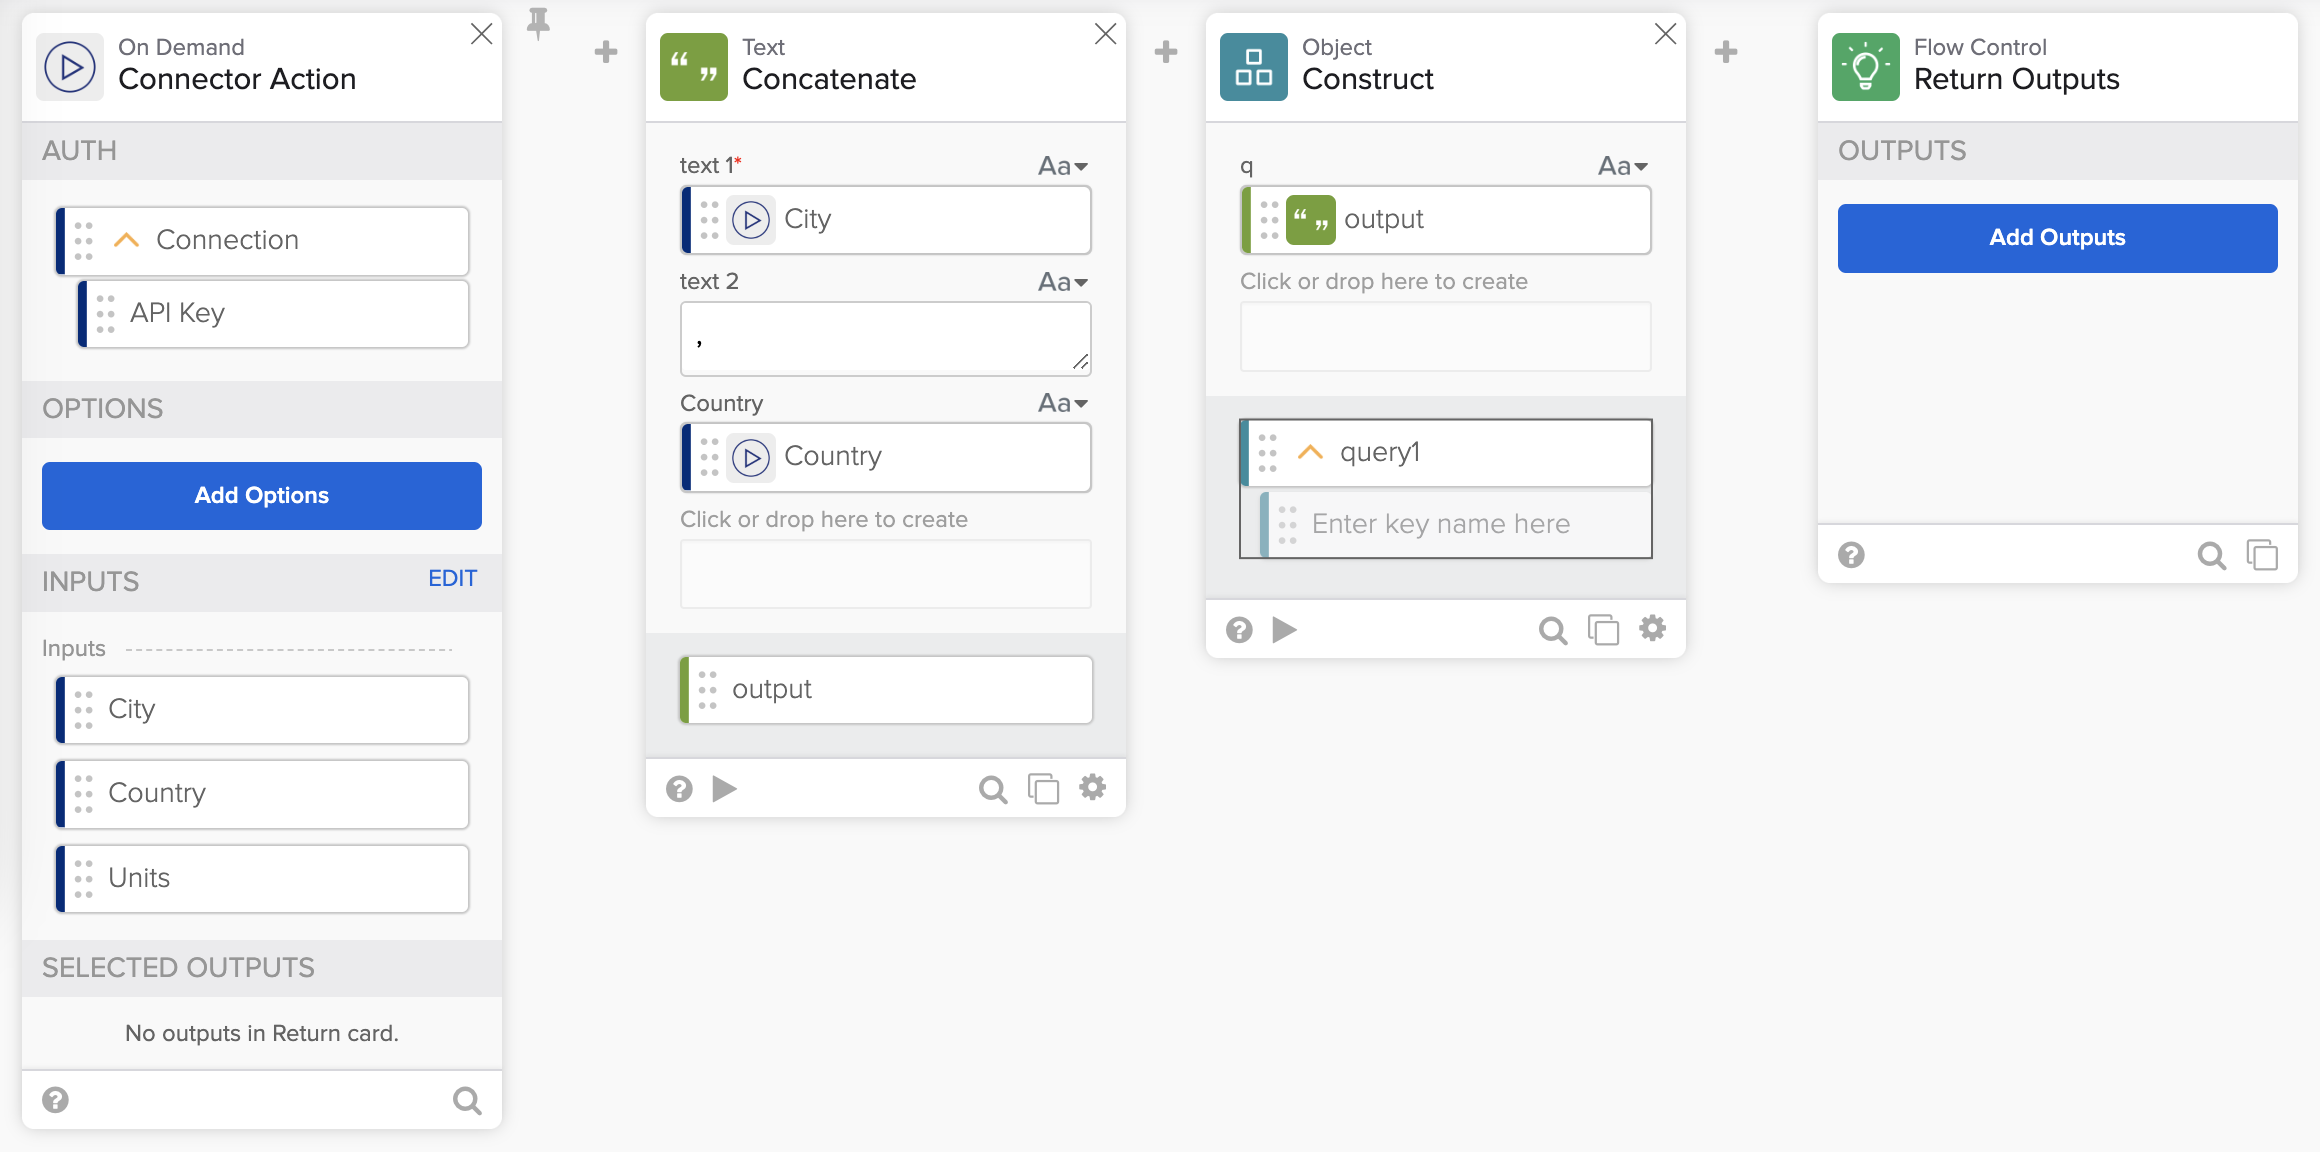
Set up query for the q parameter.
Next, you will setup the query for the units parameter:
- Add the Object – Construct card.
- Create a field and name it units.
- Connect Units from the first card to the units on the Construct card.
- Rename the Construct card output to query2.
Next, you will merge the two queries.
- Add the Object – Merge card.
- Connect query1 to the object 1 field and query2 to the object 2 field.
- Rename the card’s output to full_query.
This is how the flow looks:
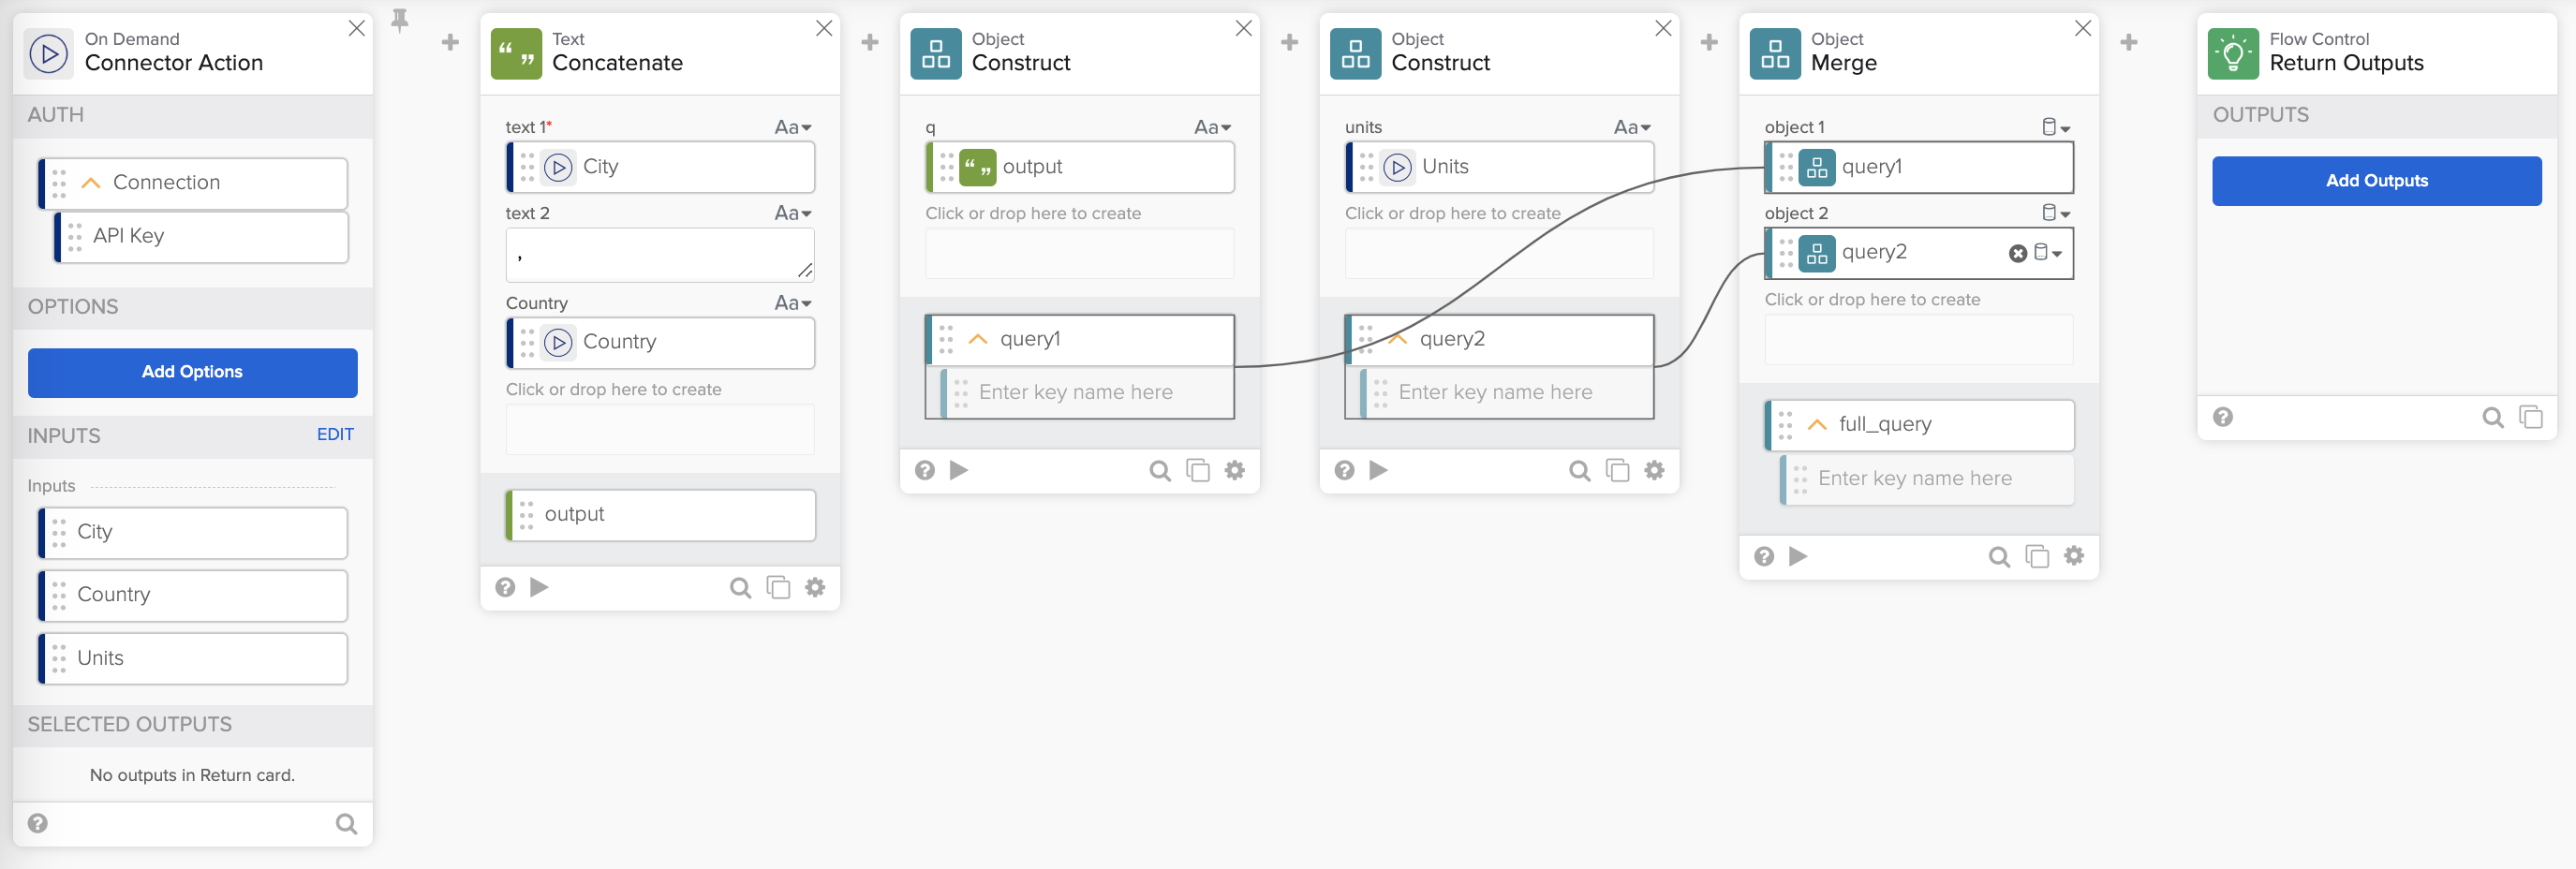
Set up query for q and units parameters.
Call the OpenWeather API
In this step, you will make a call to OpenWeather API.
- Add the Flow Control – Call Flow card.
- Click Choose Flow, select the httpHelper flow and click Choose.
- Enter /data/2.5/weather for the relative_url field.
- Enter GET for the request_method.
- Connect full_query to the query field on the Call Flow card.
- Connect the Connection field from the first card to the Connection field on the Call Flow card.
- Create three outputs for the Call Flow card:
- statusCode (type Number).
- headers (type Object).
- body (type Object).
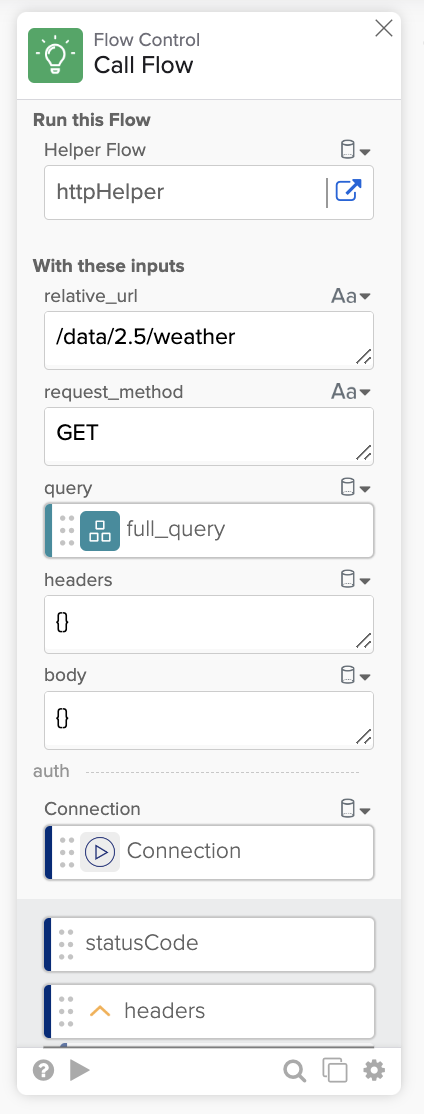
The Call Flow card.
Create flow outputs
Create the following outputs on the Flow Control – Return Outputs card:
- Click Add Outputs.
- Open Add group and select Add Static Group.
- Create three outputs:
- Status Code (type Number).
- Headers (Object).
- Delete the empty key entry.
- Body (Object).
- Delete the empty key entry.
- Click Apply to save the outputs.
- Connect data from the Call Flow card to the Return Outputs card:
- statusCode to the Status Code field.
- headers to the Headers field.
- body to the Body field.
The end of the flow looks like this:
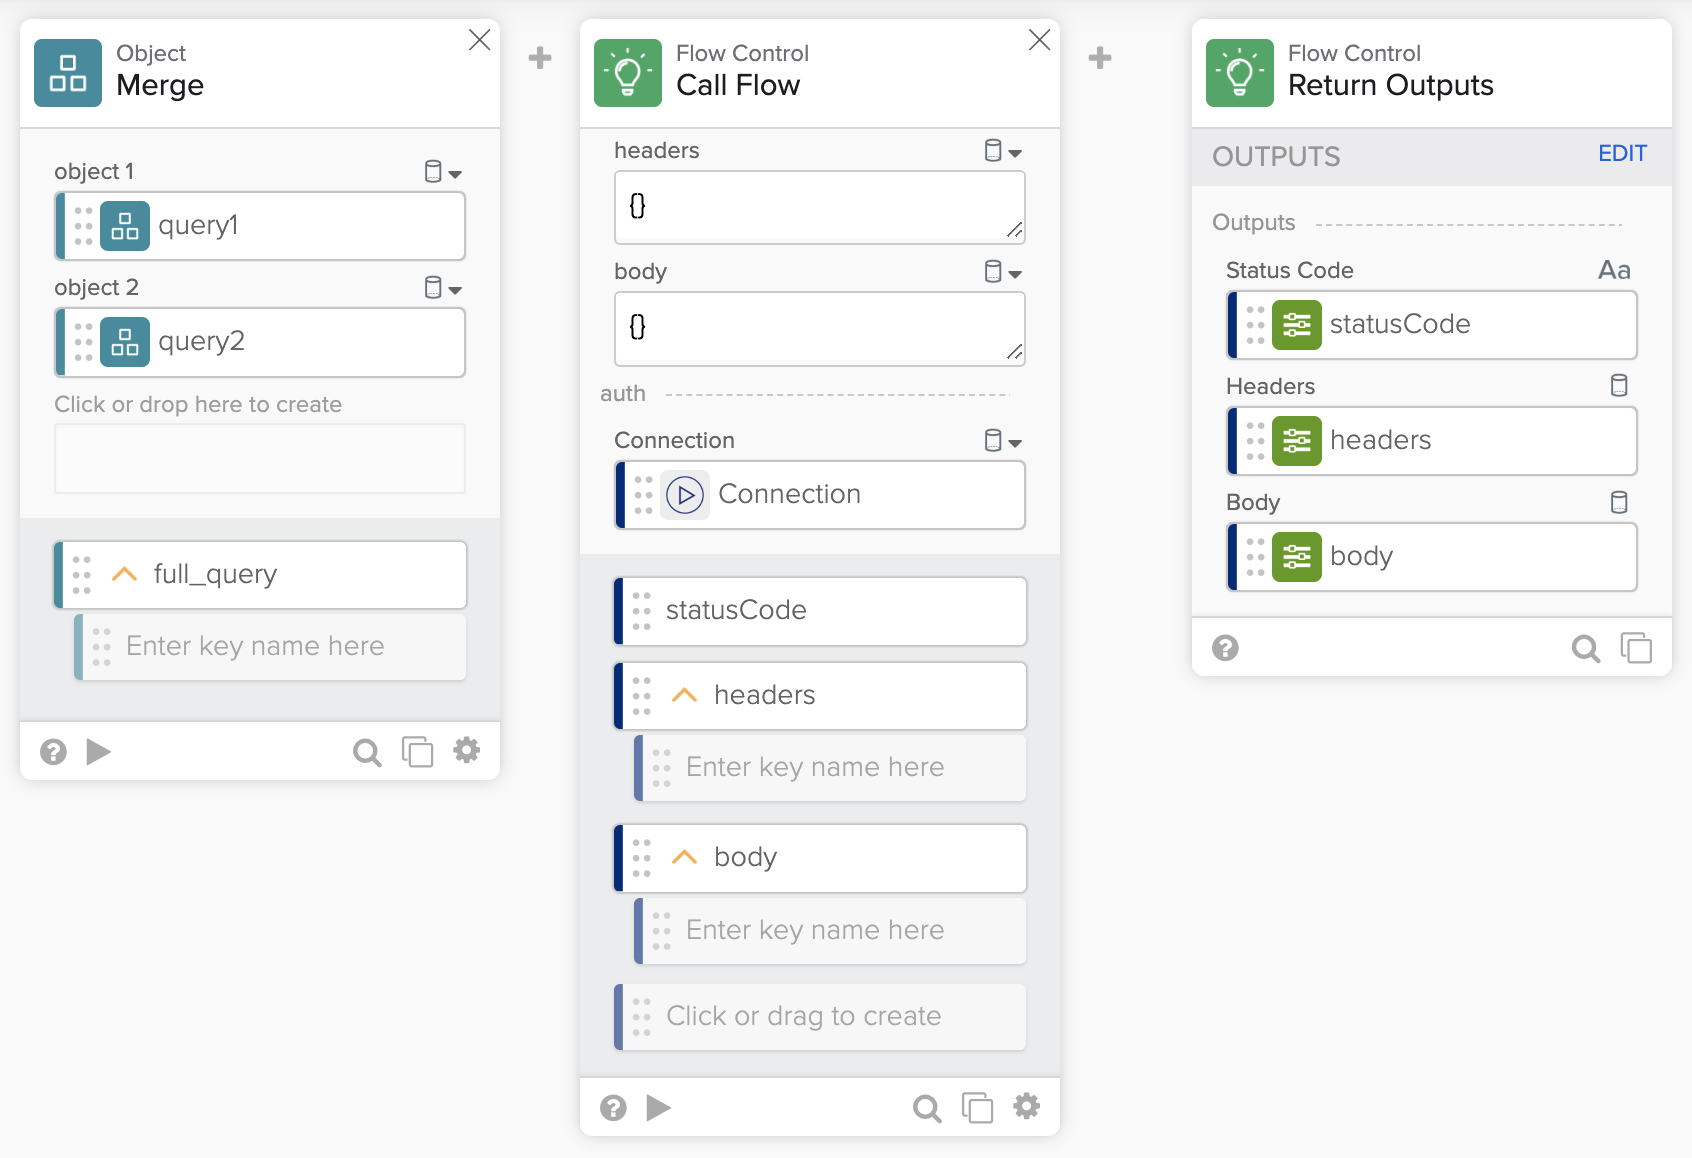
Current action flow with outputs.
Test the flow
- Save the flow and click Run to test the flow.
- Enter a city and country and click Run.
You are ready to deploy and try the connector action.
Deploy the connector
Turn flows on
Flows need to be on before deploying.
- Return to the Flows page.
- Turn the three flows on.
Update connector settings
In this section you will enter additional information in settings.
- Return to the main project view.
- Open to the Overview page.
- Click Edit in the Settings section.
- Update the connector name to Weather.
- Find and upload a weather icon to use for the connector.
- This tutorial uses an icon from Weather icons created by iconixar – Flaticon.
- Change the Accent Color if you want.
- Enter User Documentation URL and Support Contact Email information.
- Click Save to save all changes.

Connector settings.
Deploy the connector
To deploy the connector:
- Switch to the Deployment tab.
- Click Create test version.
- Select the three vertical dots under Actions for a test version you created and select Deploy Version.
You will see the connector deployed in the Private deployment section after about 20-30 seconds.
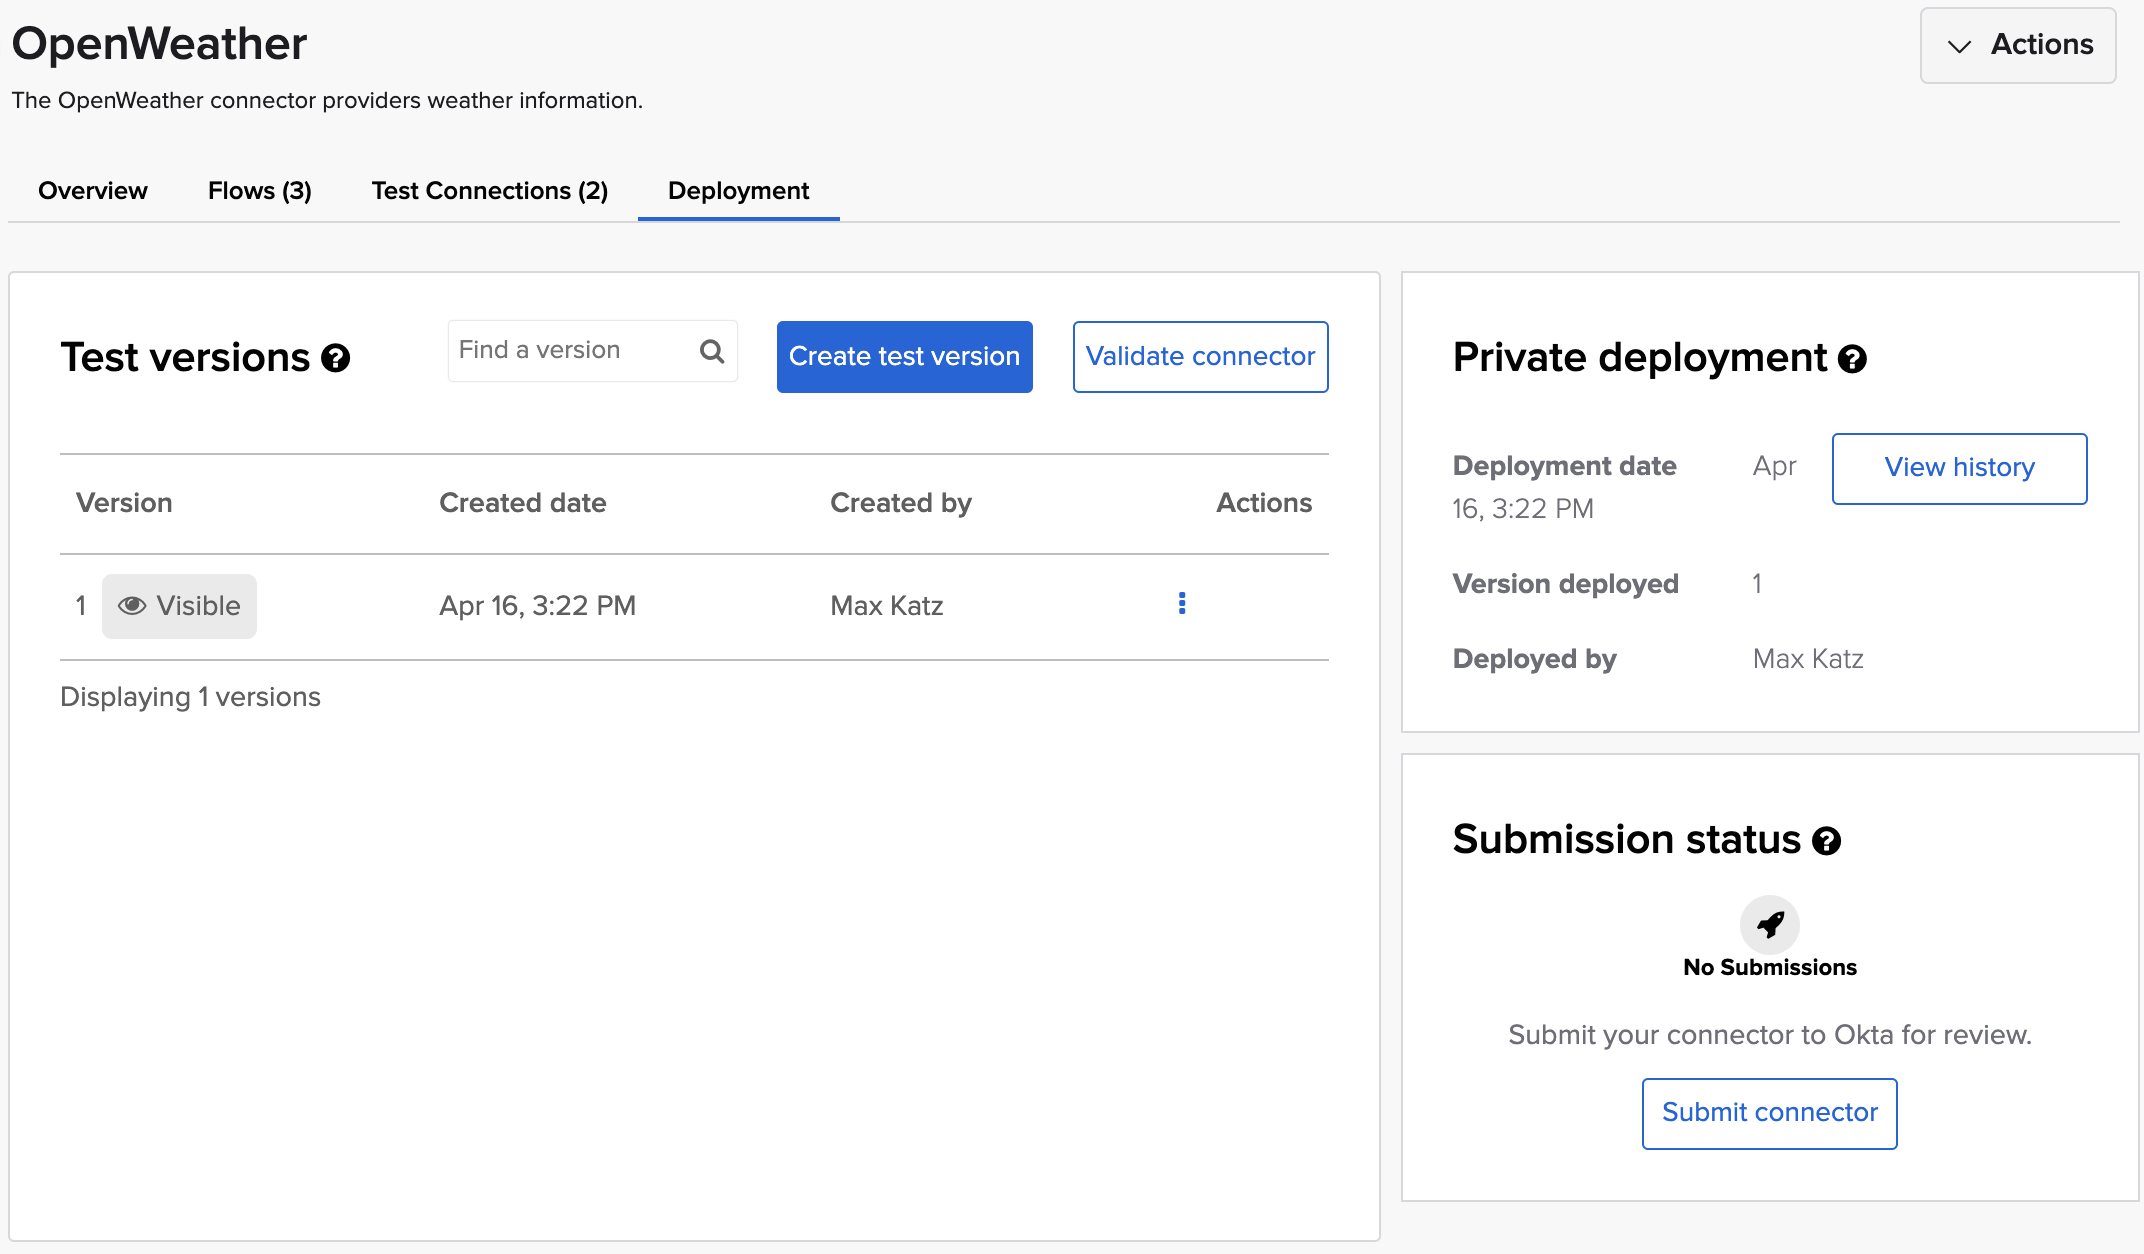
Connector deployment.
You are ready to use the connector in a flow.
Using the connector in a flow
In this step you will the connector action in a flow.
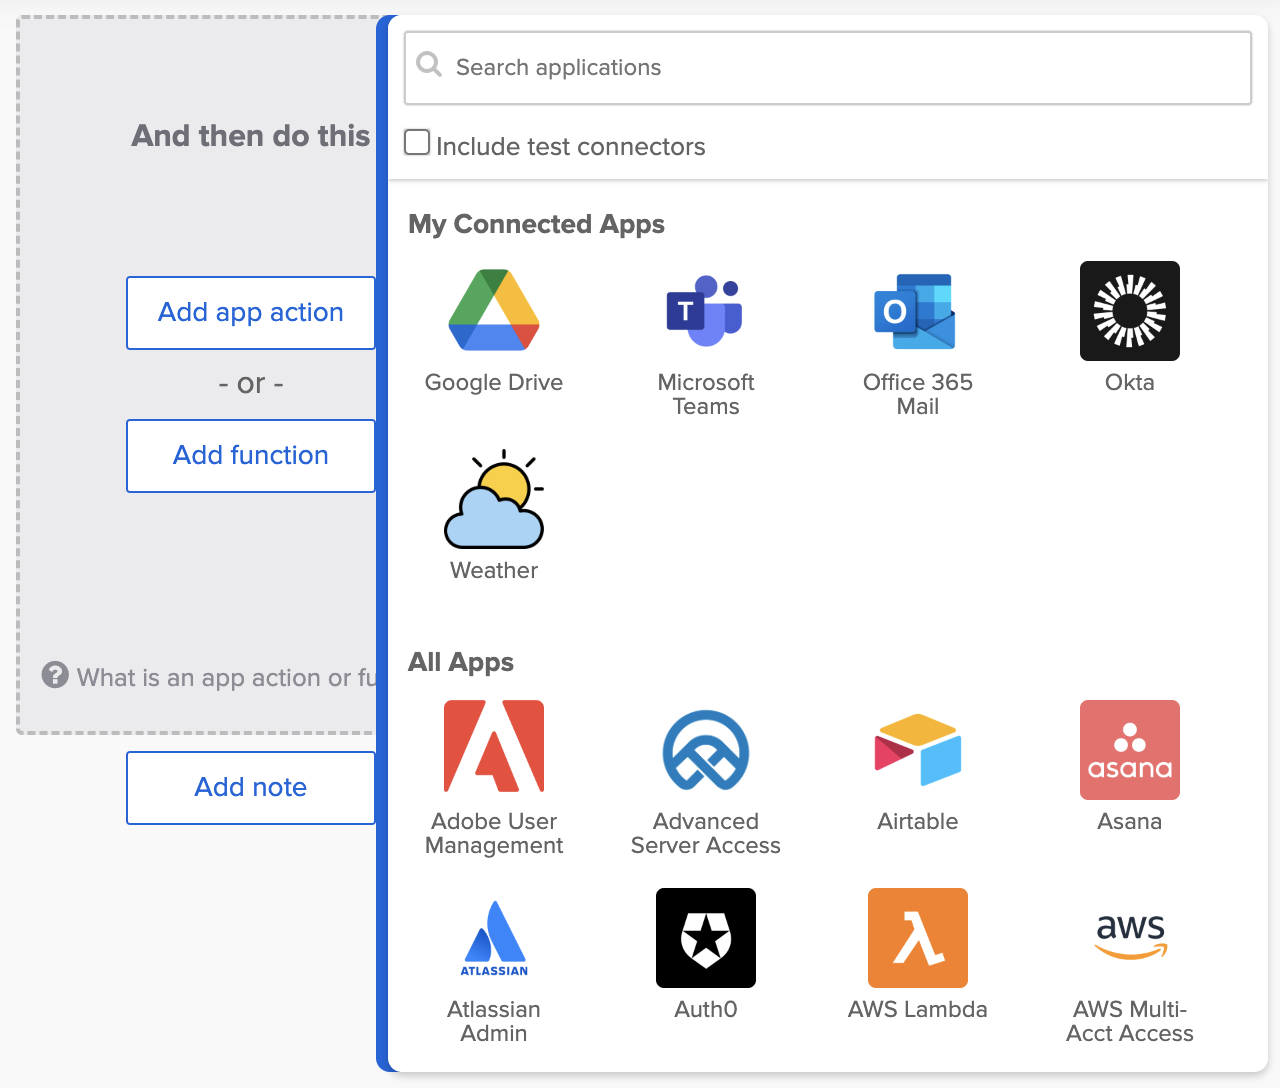
Add the Weather connector.
Add the card
- Create a new flow in Workflows.
- Click Add app action and select the Weather connector. You can also search for it.
- Select the Current action.
Create a connection
Since this is your first time using the connector, you need to create a connection to the API.
- Click + New Connection.
- Keep the connector name.
- Enter OpenWeather connection for the Description field.
- Enter your OpenWeather API key for the API Key field. You can find the API key on the API keys page.
- Click Create to create the connection.
Test
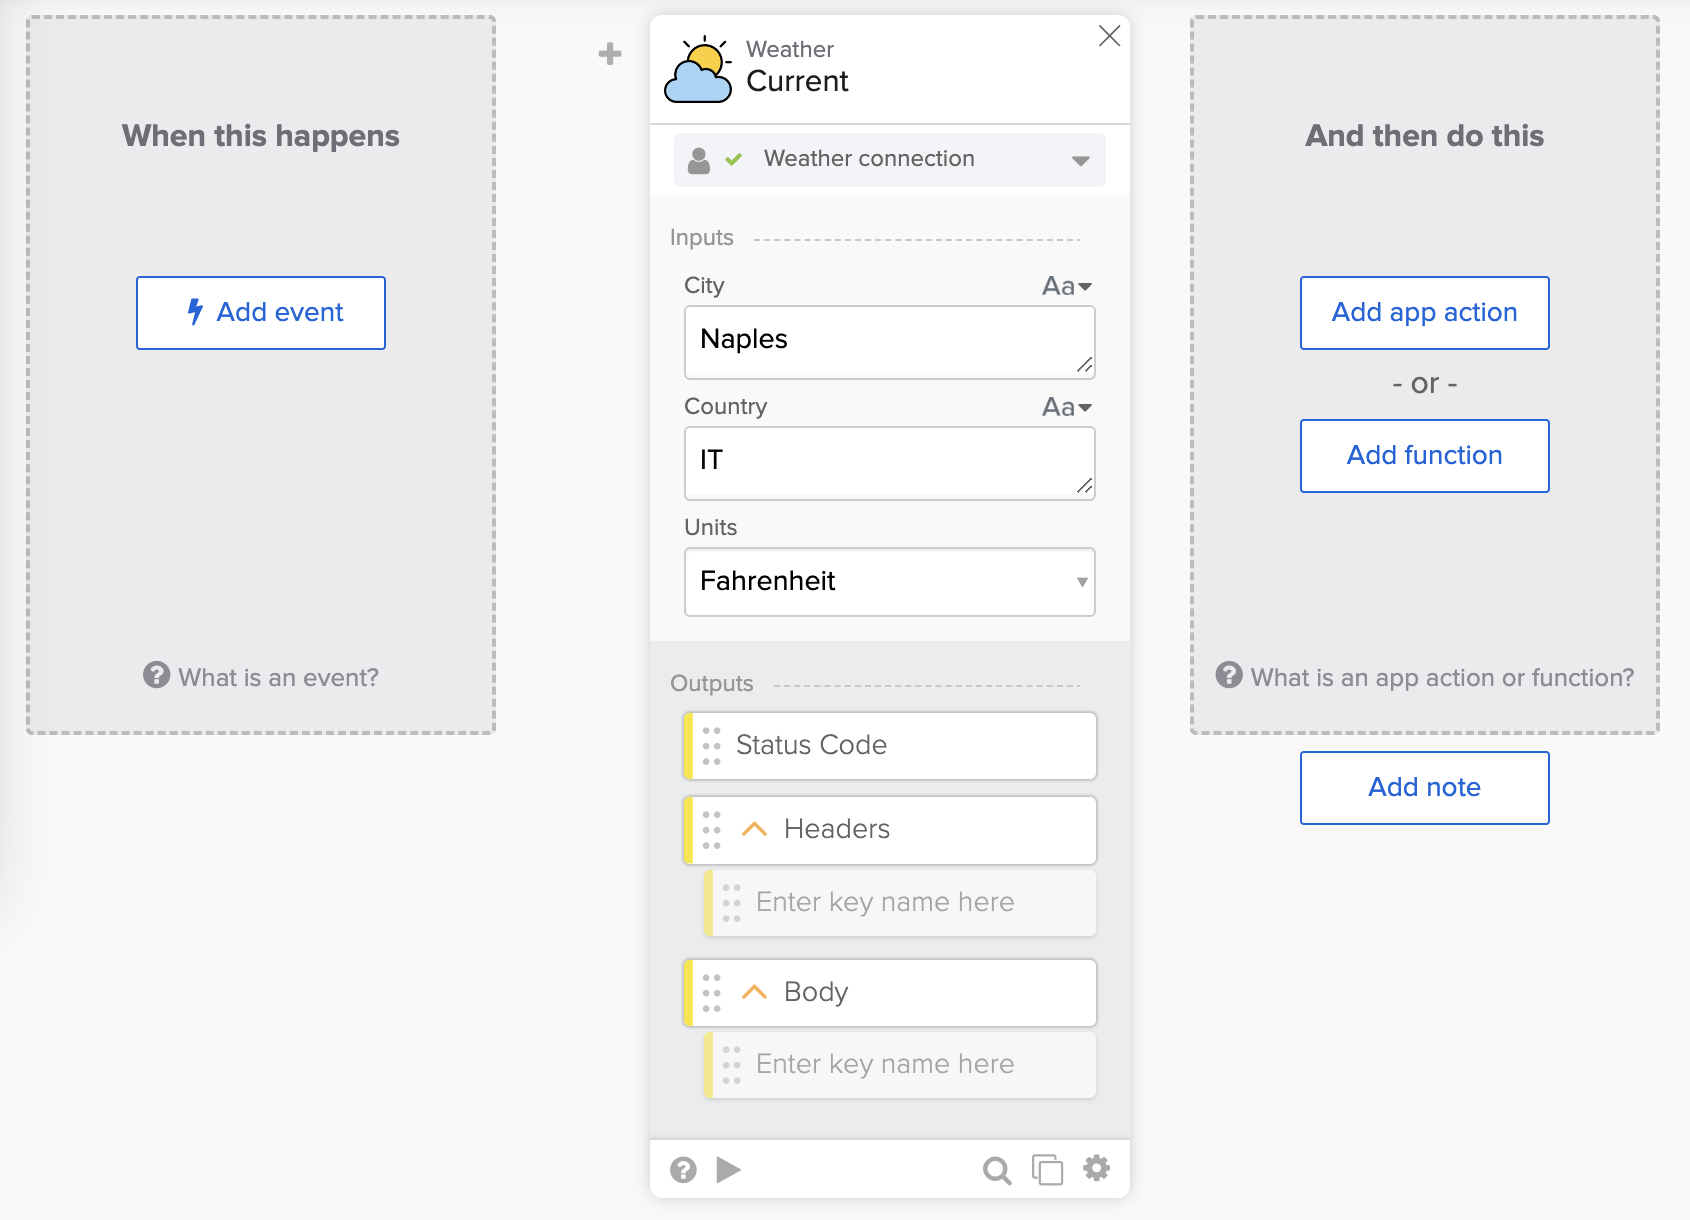
The Weather – Current card.
- Enter a City, Country and choose Units on the Weather – Current card.
- Click Run to test the flow. You can also test the card.
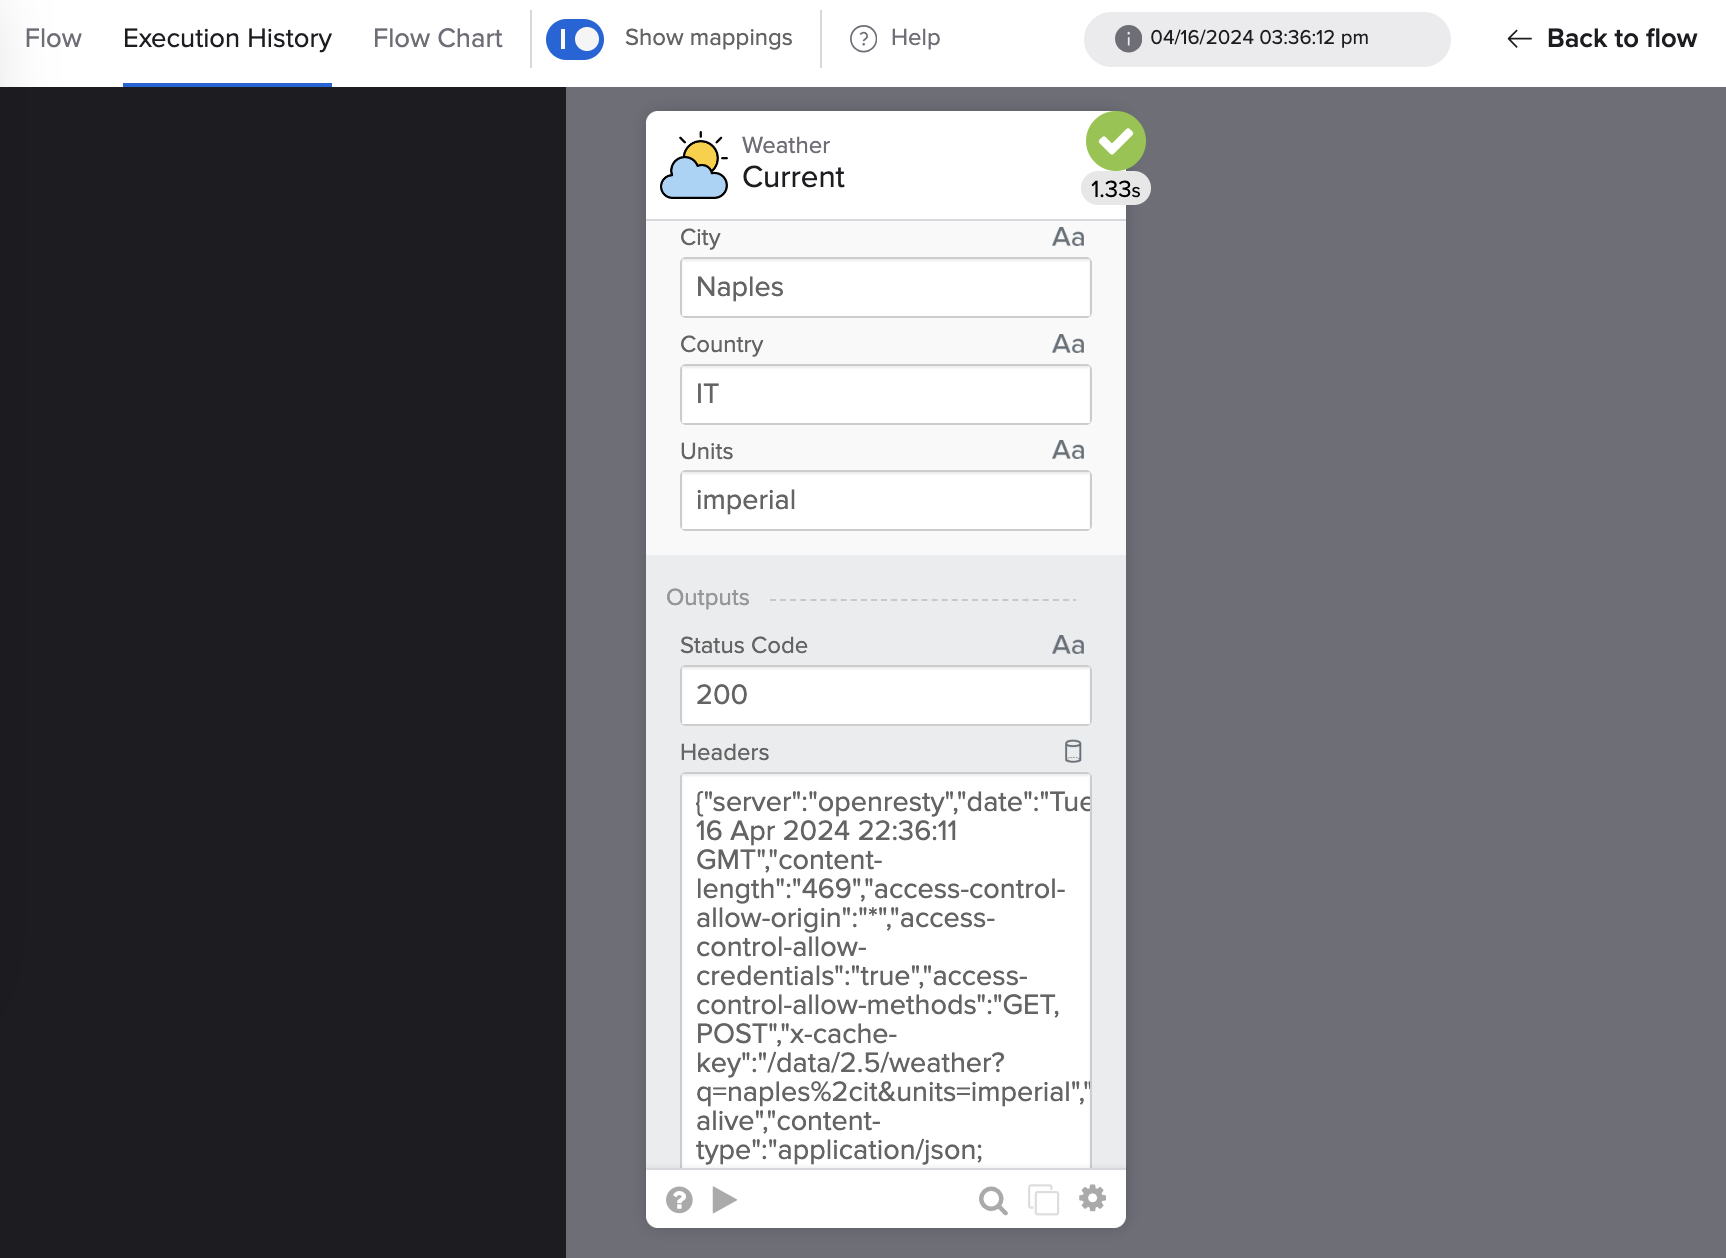
Testing a flow with the Weather – Current card.
Congratulations! You built a connector with one action and used it in a flow. You will add two more actions to the connector in the following two sections.
Create an action for a 5-day forecast
In this section, you will create a connection action for the 5-day weather forecast. You will duplicate the existing Current action and make a small update to the new flow.
Duplicate the flow
- Go to the Flows page in the connector project view.
- Duplicate the Current action.
- In list view, click the ⚙️ > Duplicate.
- In the cards view, click Duplicate in the bottom right corner of the card.
- Open the new flow and rename it to Forecast.
- Enter This action returns a 5-day weather forecast for a city. for the Description.
- Click Save.
Update the API endpoint
- Update the relative_URL field from /data/2.5/weather to /data/2.5/forecast in the Flow Control – Call Flow card.
- Save the flow.
Test the flow
Test the flow if you want.
Create an action for Custom API Action
In this section, you will create an action for the custom API action.
A custom API action allows the call of any endpoint on the service, even if a pre-built action is unavailable. A custom API action will enable you to specify the API endpoint, request method (GET, POST, etc.), and request parameters (query, headers, and body).
The Understanding Okta Workflows Connectors article has information about a custom API action.
Create a flow
From the Flows tab:
- Click + New Flow to create a new flow.
- Click Unnamed in the upper left corner to name the flow.`
- Enter Custom API Action for the Flow name.
- Enter Make an authenticated HTTP request to the OpenWeather API. for the Description.
- Check the Save all data that passes through the Flow? option
- Click Save to save the flow.
Set up action inputs
- Click Add event and choose the Action event.
A custom API action needs to support the request types that the underlying API supports.
- Click Add Options in the OPTIONS section.
- Click Add field.
- Enter Request Type for the Label field.
- Change Field Type to Dropdown.
Enter values for the request type:
- Enter GET for Option and GET for Value in the first row.
- Enter the rest of request types:
- POST
- PUT
- PATCH
- DELETE
- Check GET as the default option.
- Click Apply to save the request type list.
Note: The OpenWeather API uses the GET request type. Other connectors you build will likely support the more request types.
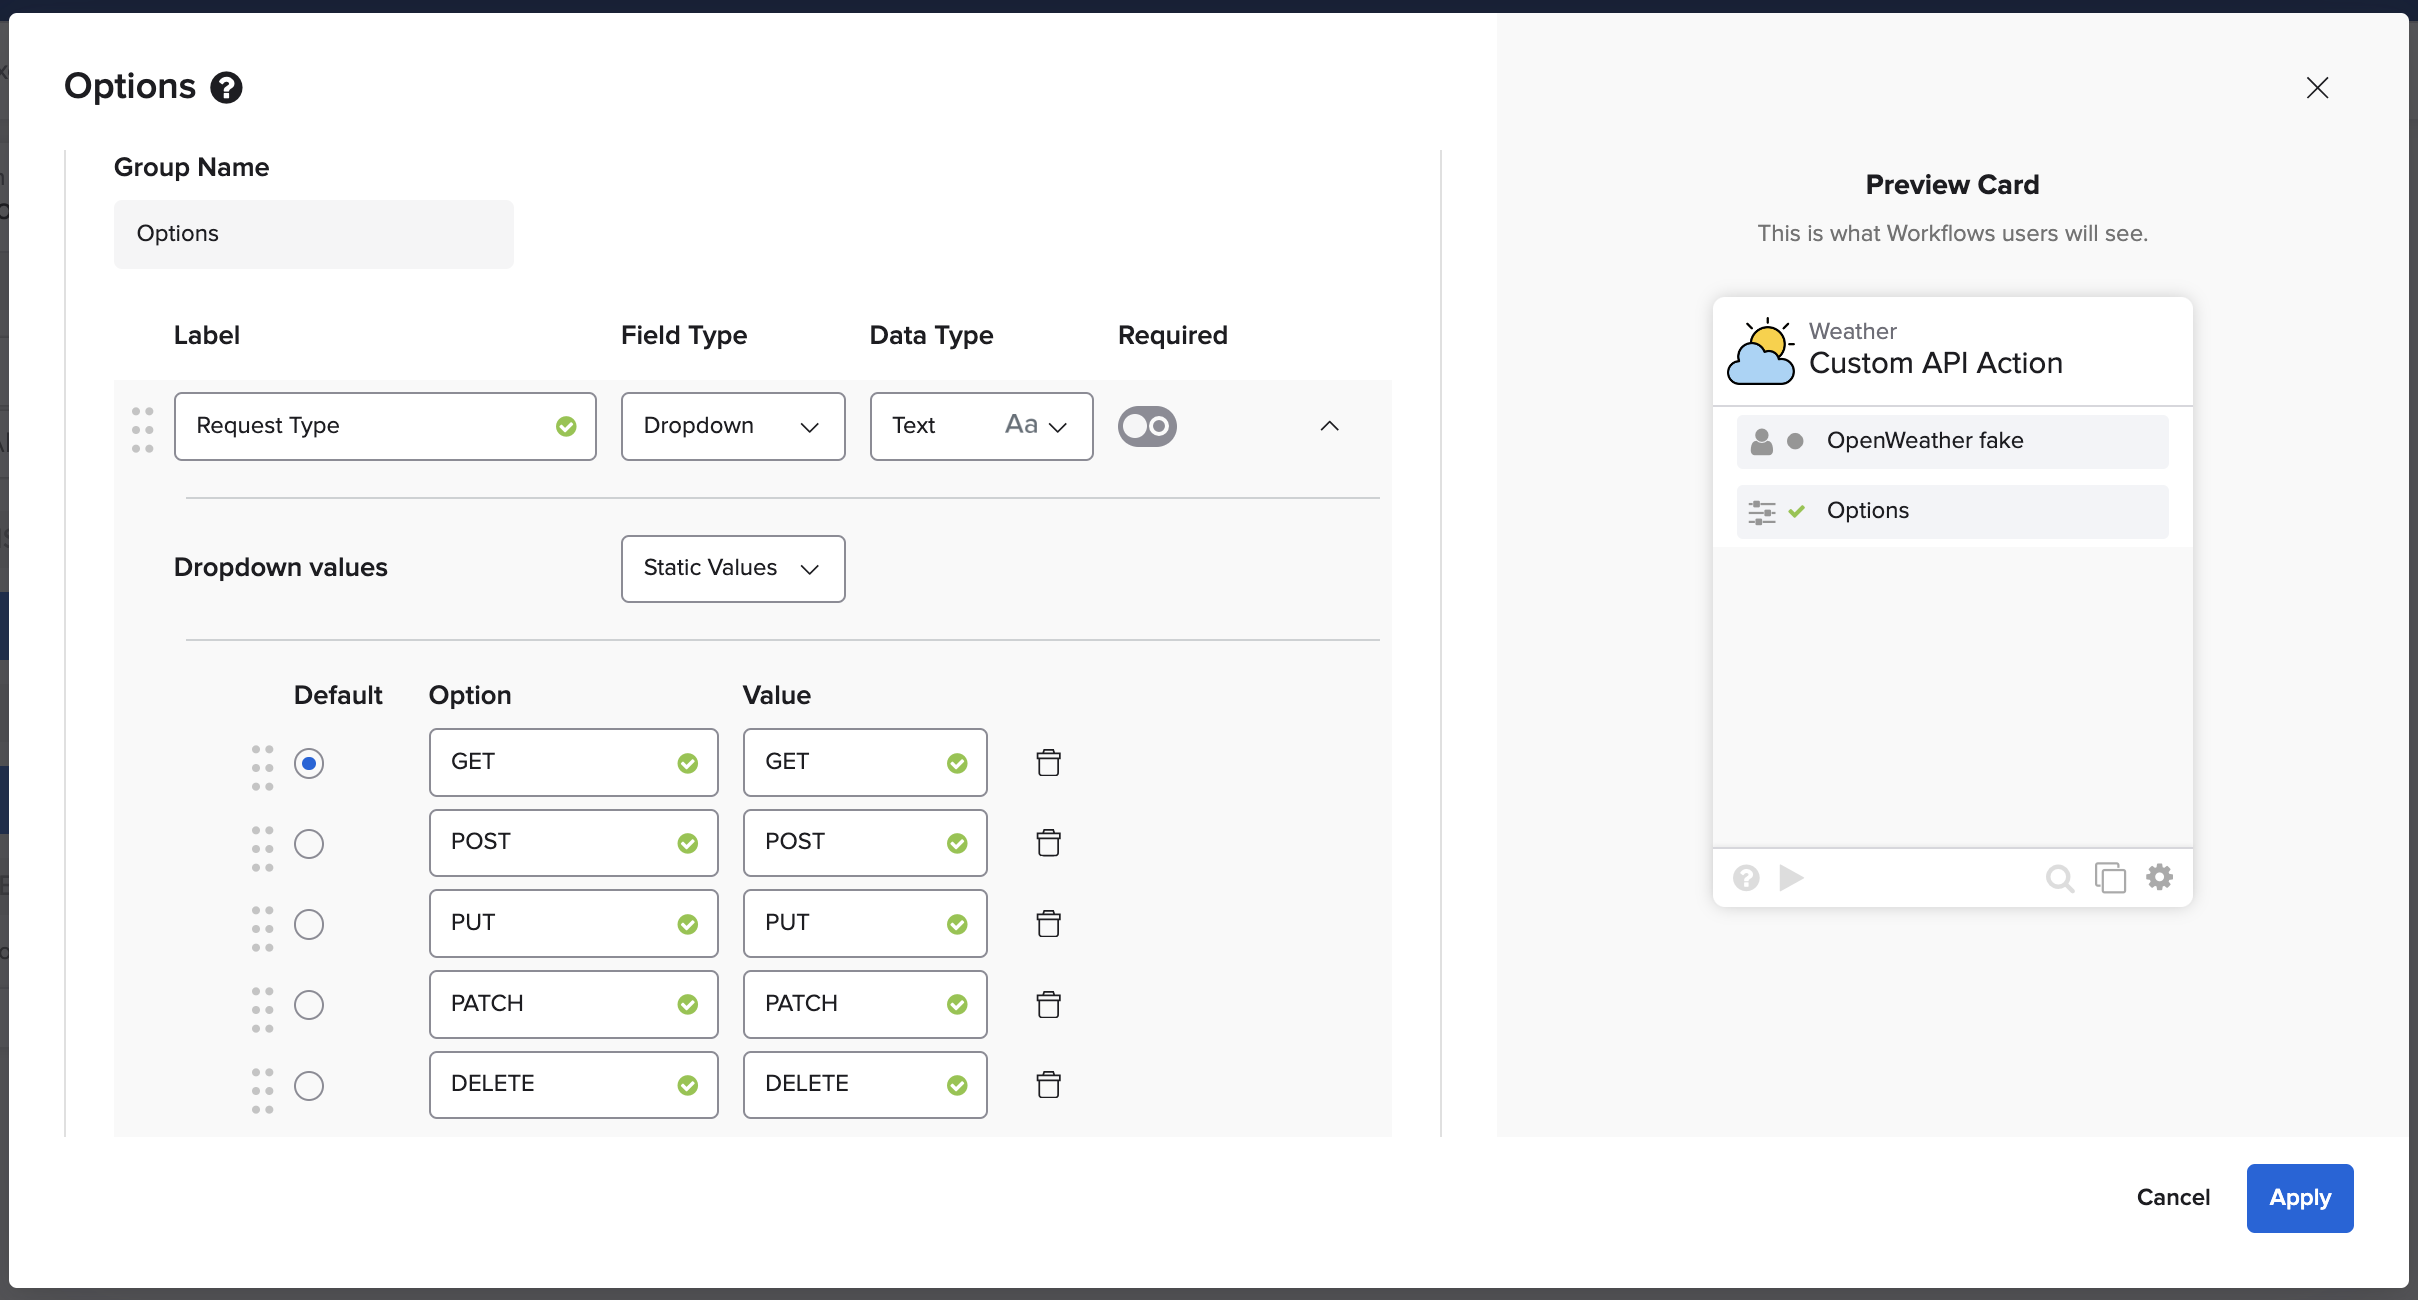
Setting up request type list.
The action needs other inputs: relative URL, headers, query and body fields.
- Click Add Inputs in the INPUTS section.
- Click Add group > Add static group.
- Add the following fields:
- Relative URL (type Text, required field).
- Query (Object).
- Headers (Object).
- Body (Object).
The inputs looks like this:
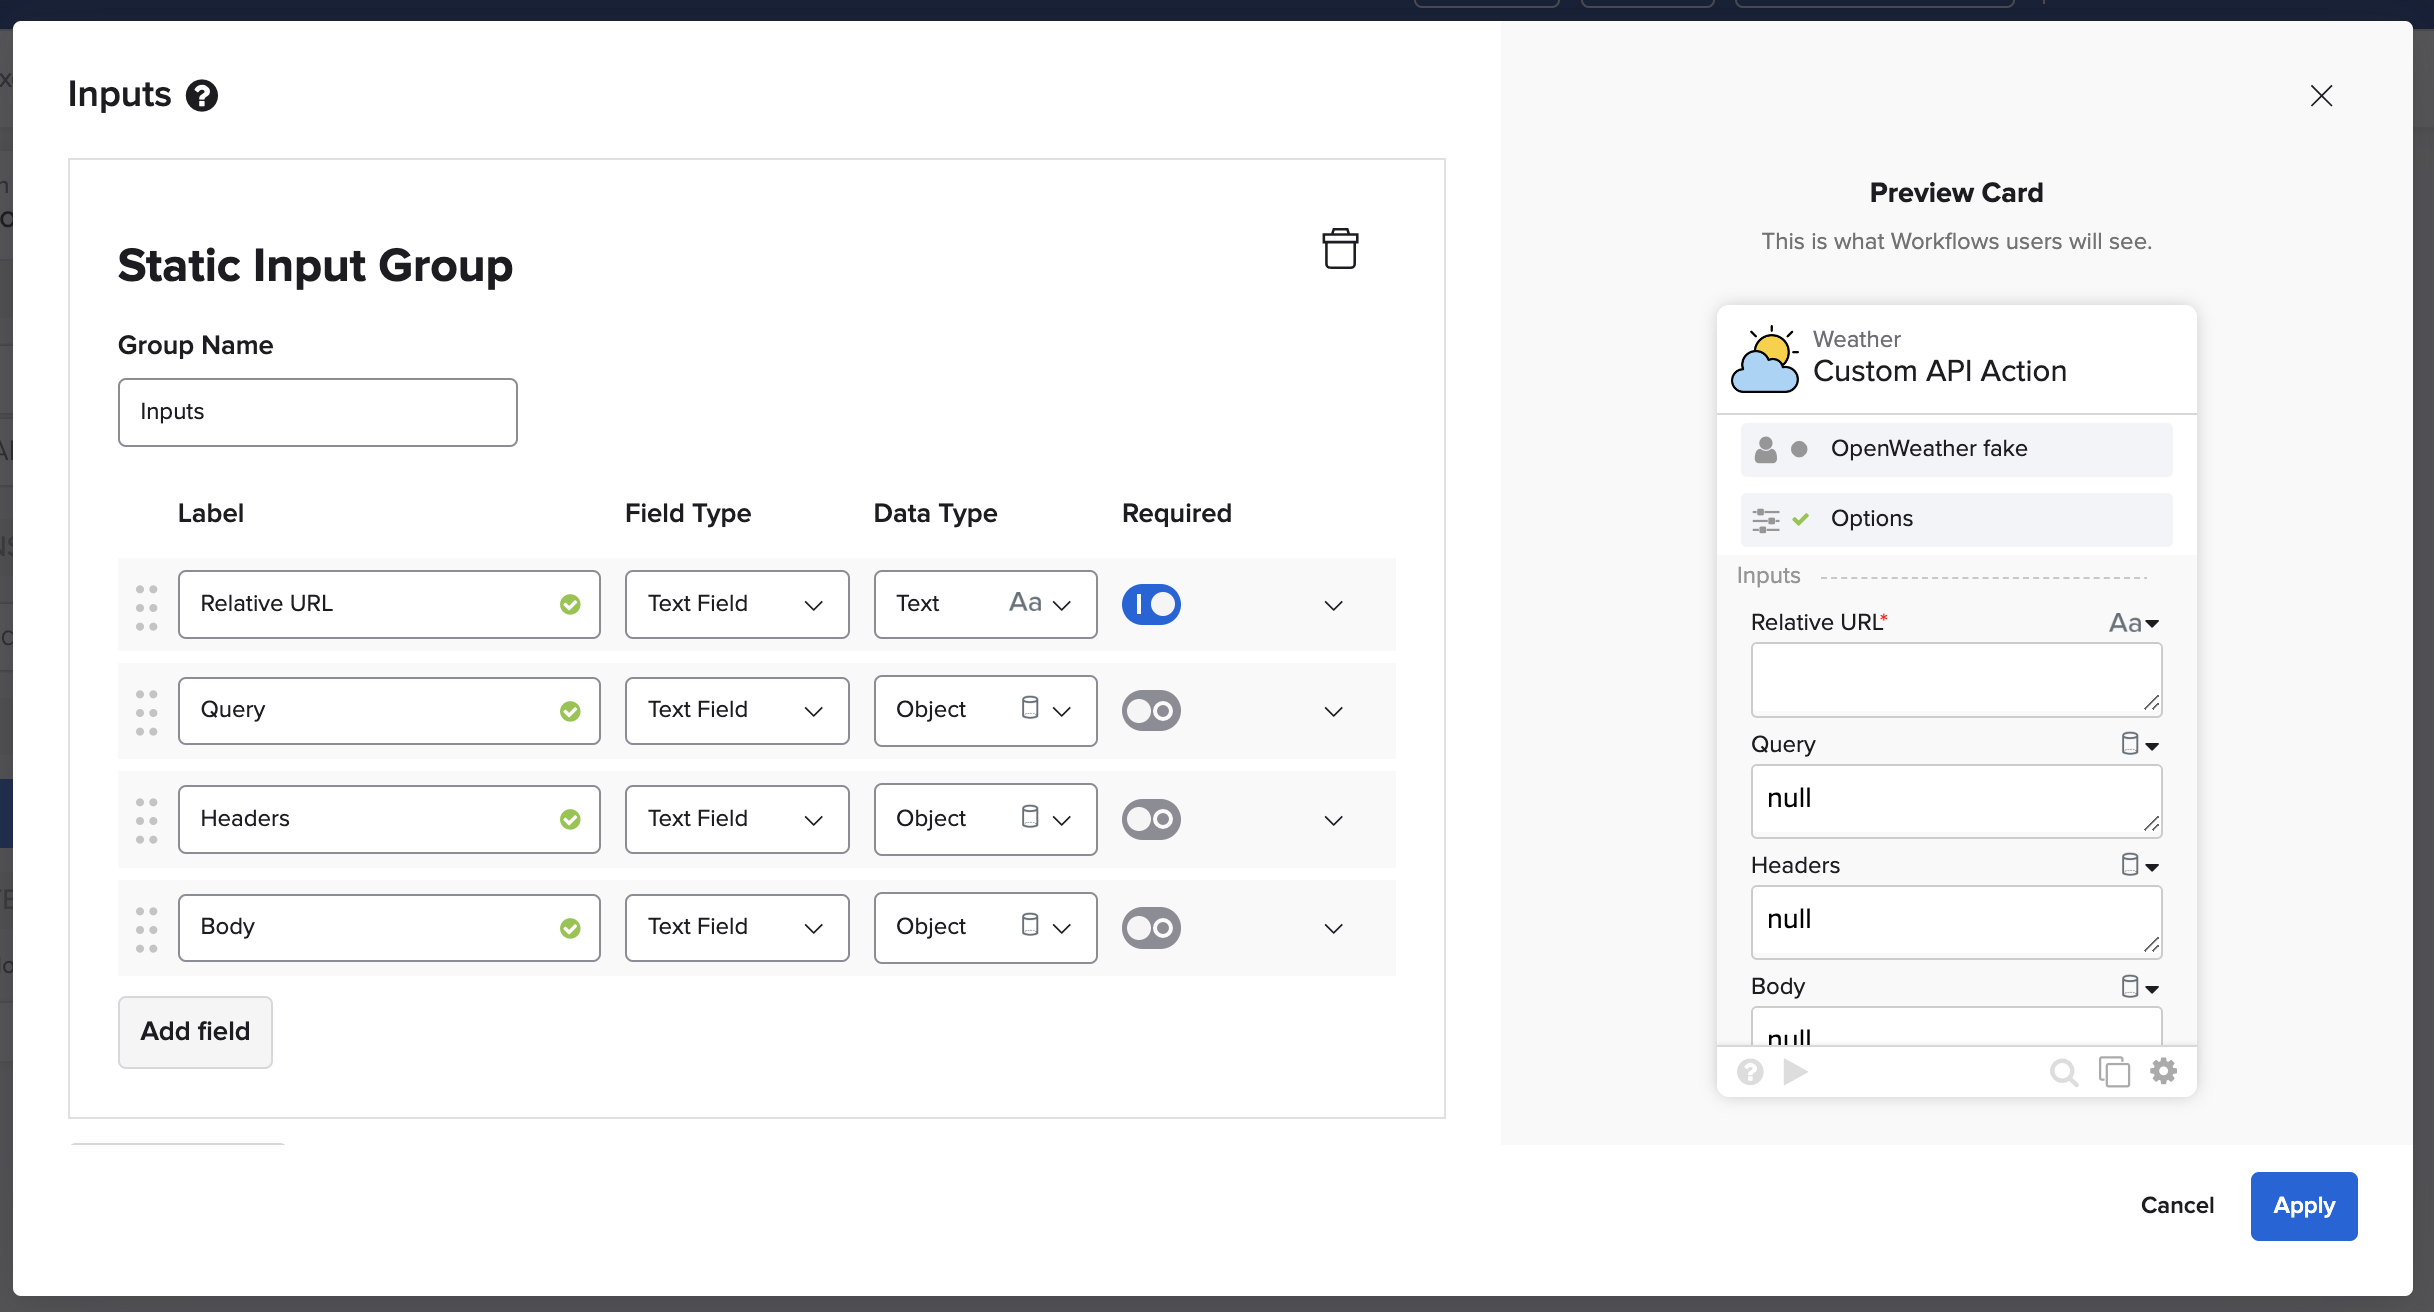
Custom API Action inputs.
- Click Apply to save the changes.
The flow looks like this:

Custom API Action action with inputs.
The flow has all the inputs. In the next section, you will call the API endpoint.
Call the custom API endpoint
- Click Add function.
- Add the Call Flow function.
- Click Choose Flow and select the httpHelper flow.
- Click Choose.
- Create the connections to the Call Flow card in the screenshot below:
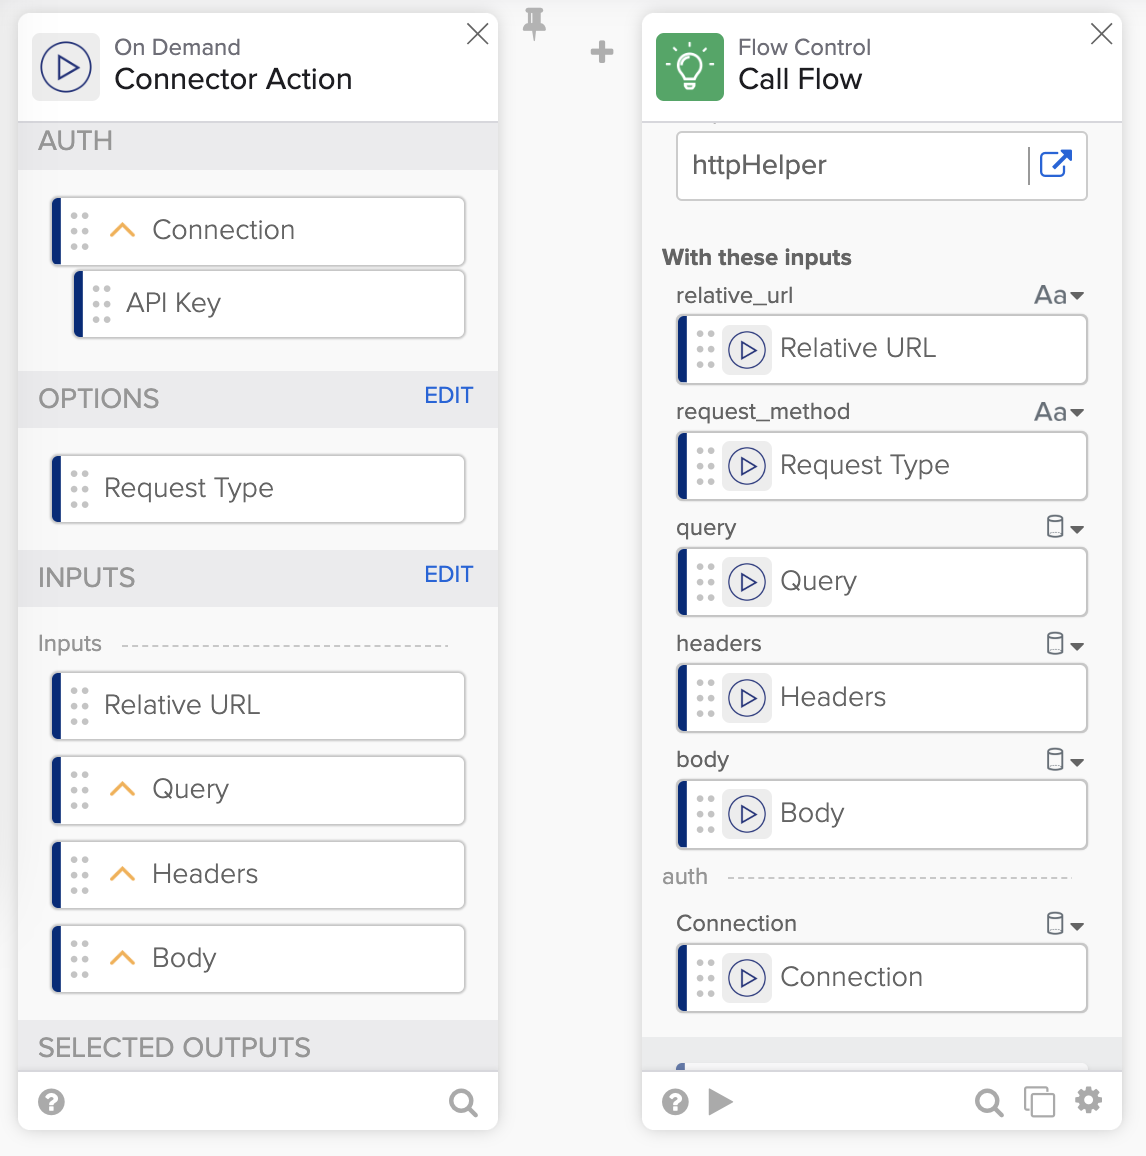
Passing data to the Call Flow card.
Scroll to the Call Flow card output section.
- Create the following three output fields:
- statusCode (type Number).
- headers (Object).
- body (Object).
Create action outputs
- Click Add Outputs on the Return Outputs card.
- Click Add group > Add static group.
- Add three output fields:
- Status Code (type Number).
- Headers (Object).
- Delete the empty key entry.
- Body (Object).
- Delete the empty key entry.
- Click Apply.
- Create the connections to the Return Outputs card in the screenshot below:
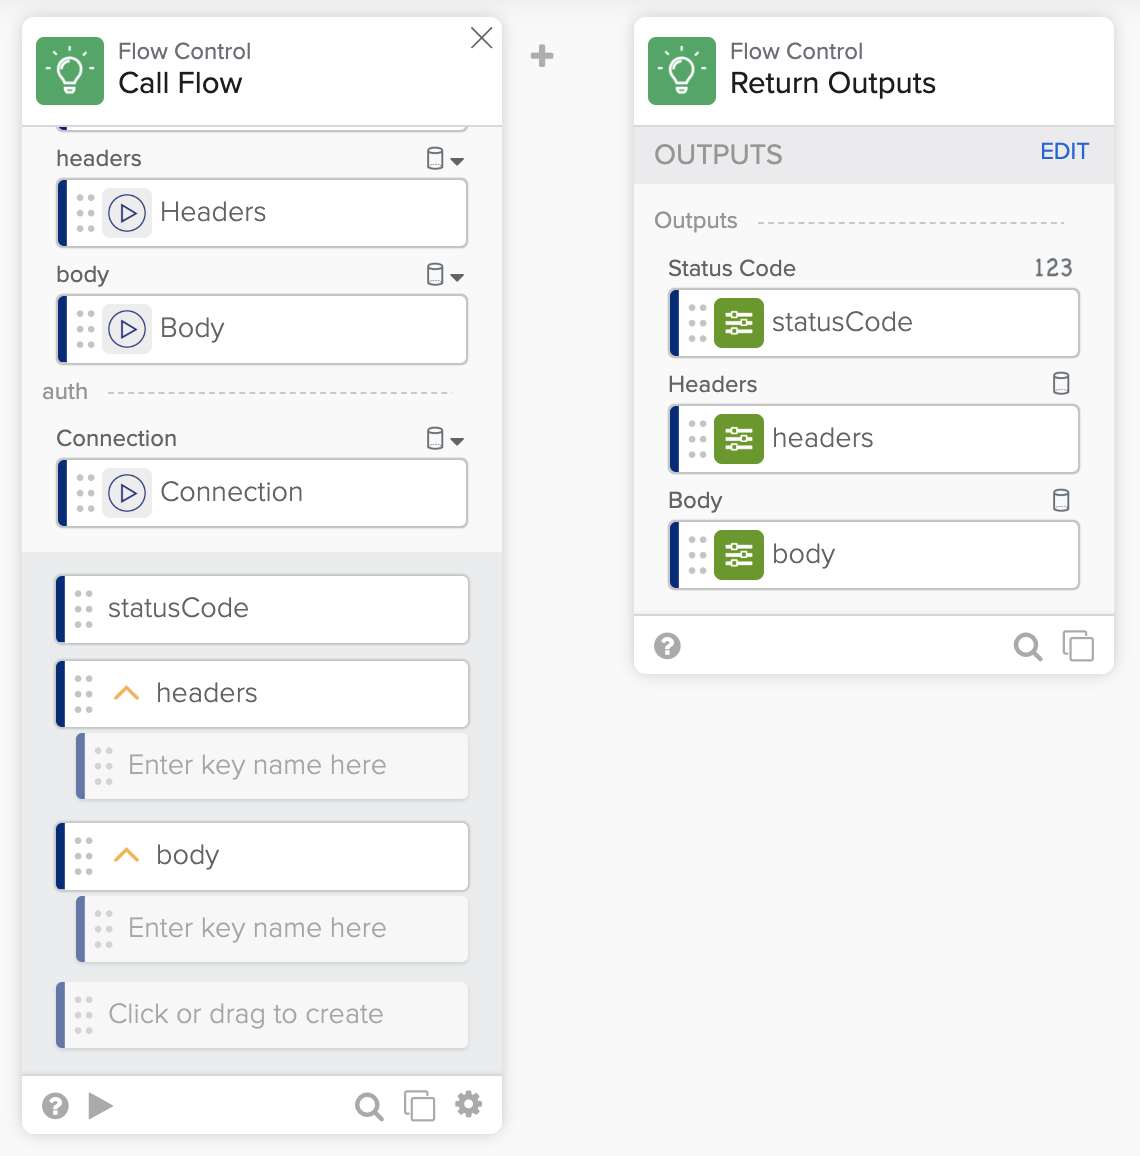
Setting up flow output.
Test the flow
The connector doesn’t have an action for the Geocoding API. You can use the Geocoding endpoint to test the custom API action.
To test the flow:
- Click Run to test the flow.
- Enter GET for Request Type.
- Enter /geo/1.0/direct for the Relative URL field.
- Enter
{"q": "Rome,IT"}for the query field. - Click Run to test the flow.
You added the Forecast and the Custom API Action to the connector. You need to deploy the changes.
Deploy the connector
Turn flows on
- Return to the Flow page and turn all flows on.
Deploy
- Return to the Deployment tab.
- Click Create test version to create a new connector version.
- Click the three vertical dots > Deploy Version.
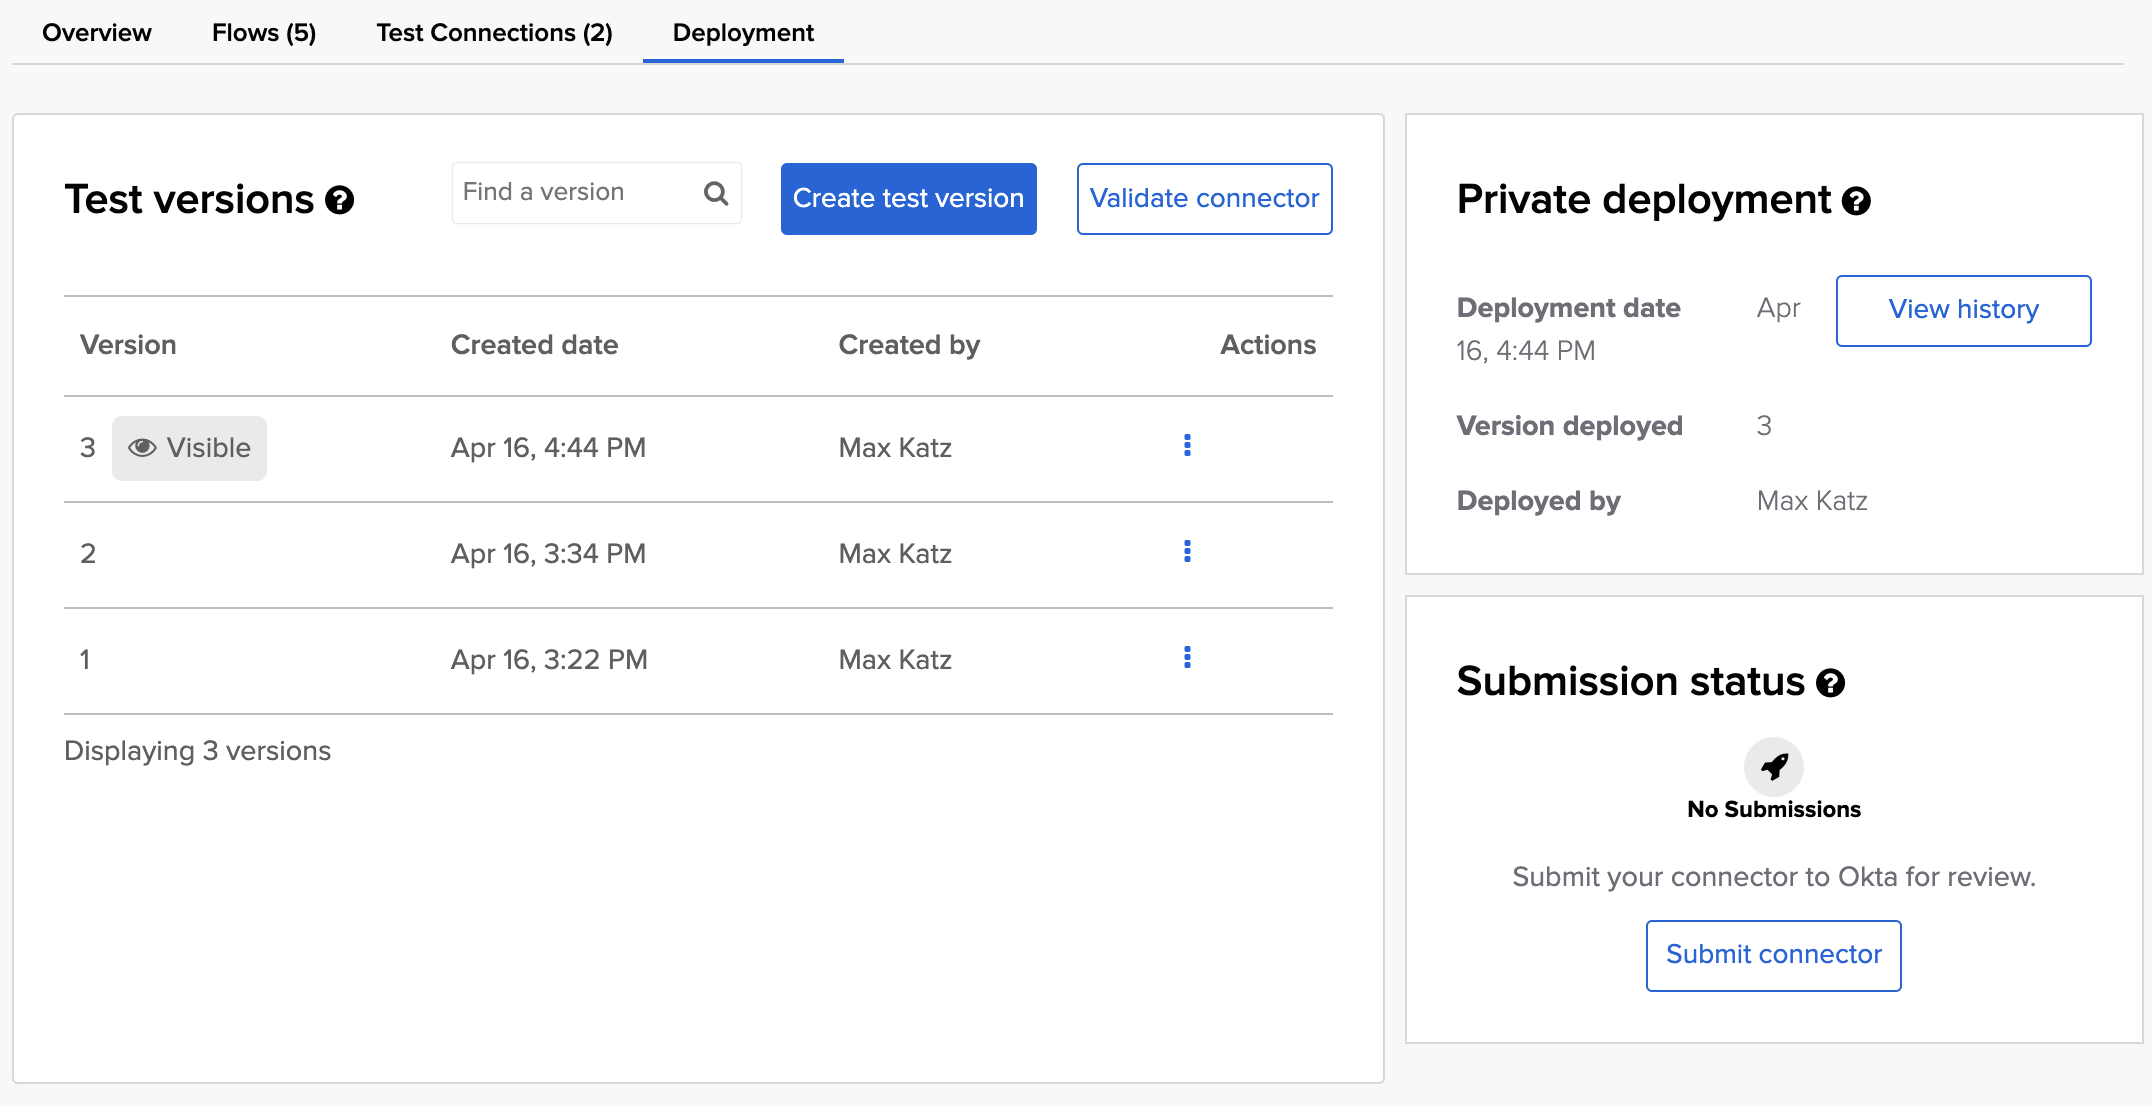
Connector deployments.
Use new connector actions in a flow
- Return to Workflows and open a flow you used before.
- Add the Weather – Forecast card and the Weather – Custom API Action card.
- Test the flow.
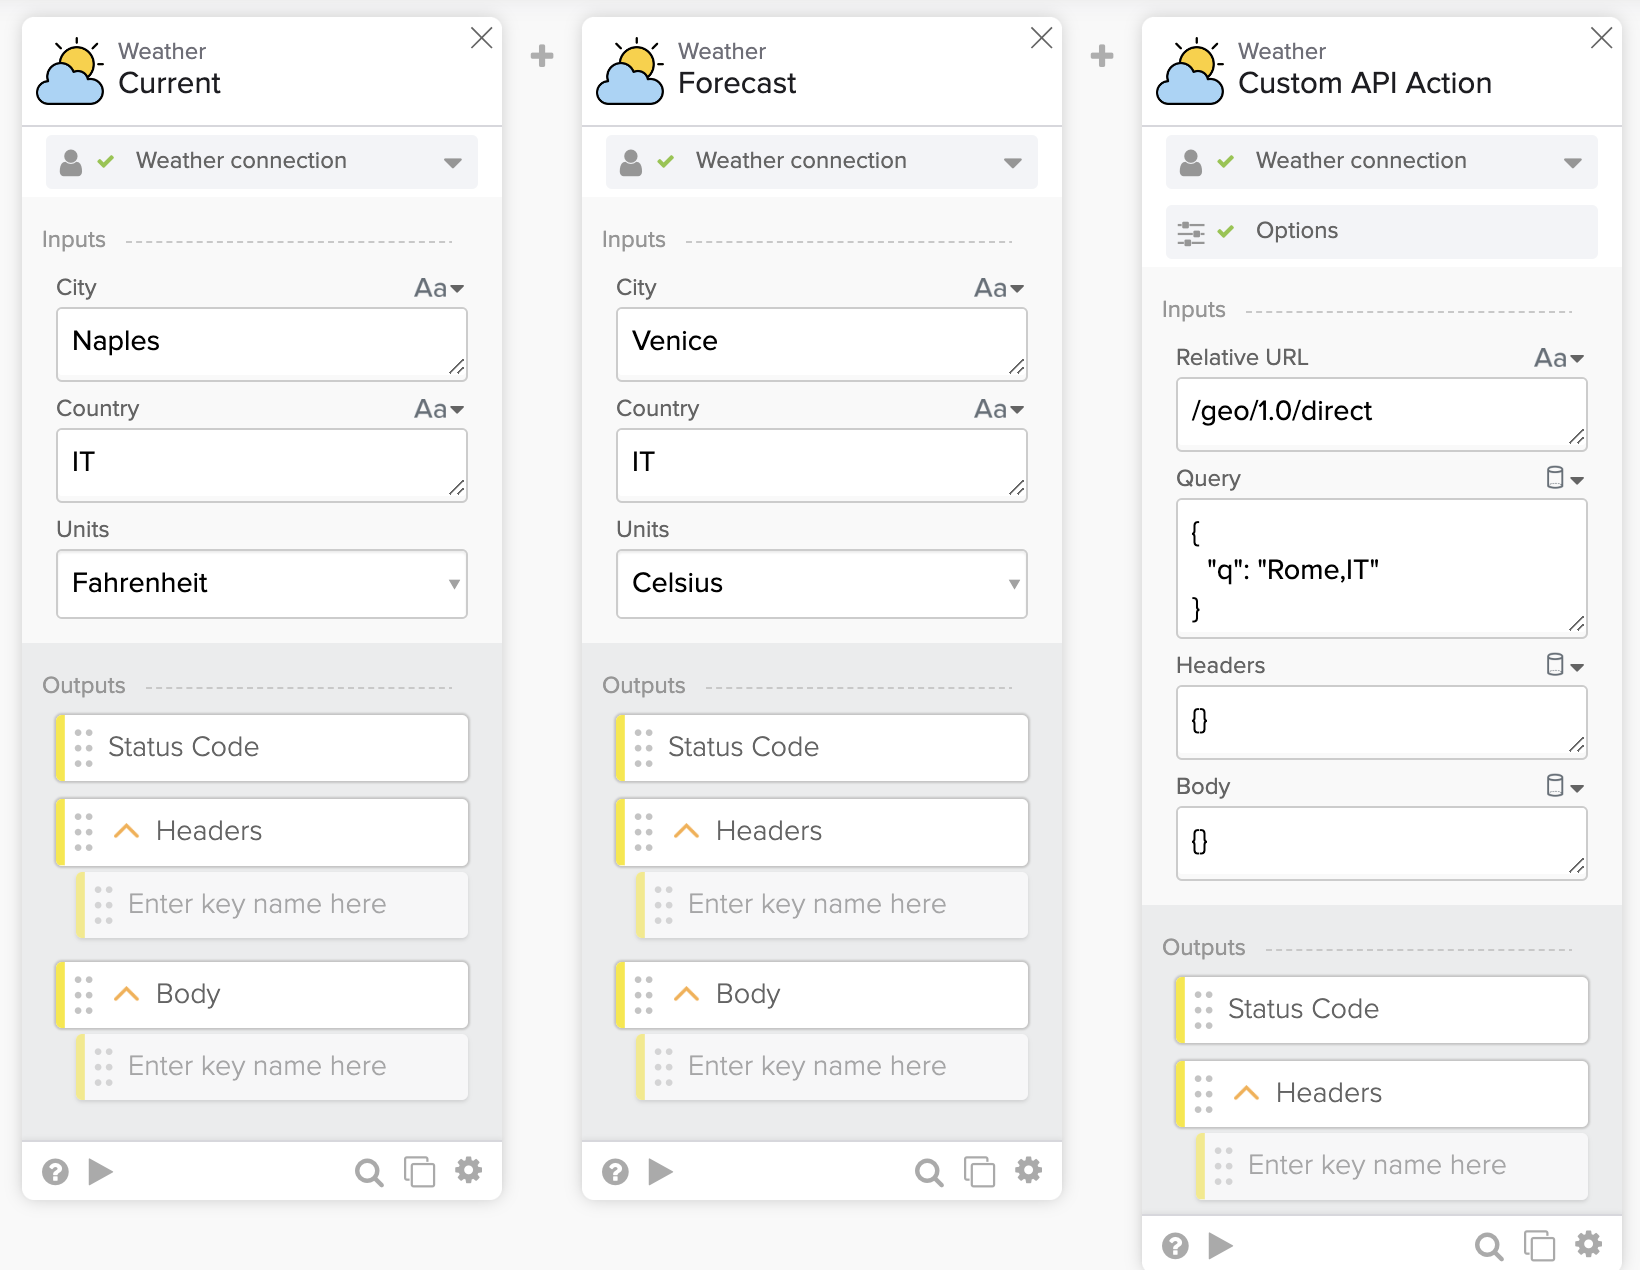
Testing the connector actions.
Nice work
Congratulations!
You built a connector with three actions for the OpenWeather API in the Okta Workflows Connector Builder.
Resources
📚 Building a Custom Connector in Okta Workflows, a Video Series.
📖 Okta Workflows Connector Builder documentation.
🍫 Get help from Workflows specialists during weekly community office hours.
📺 Learn from Workflows videos.
🛟 Get help from support: discuss a Workflows topic or ask a question.
🙋🏻♀️ Get help from the community: join the #okta-workflows channel on MacAdmins Slack.


